
Song Mashup Online: How to Build One Step by Step
You've got a vocal hook in mind and a backing track that feels like it belongs underneath it. You drop them together, the opening sounds promising, and then the chorus drifts, the bass swallows the lyric, or the upload gets flagged before anyone hears it.
Building a song mashup online means solving separate problems: musical compatibility, clean separation, arrangement, and permission to distribute the result. Treat those as production decisions from the start, and you won't spend hours polishing a version you can't use.
Screen Two Songs Before You Start Mixing
Compatibility screening ranges for a two-song mashup
| Check | Screening range | If the pair falls outside |
|---|---|---|
| Tempo ratio | 0.8 to 1.2 between the two songs | Choose another track, or accept audible stretching |
| Key distance | Within about 3 semitones | Shift the vocal toward the instrumental's key, then reassess the artifacts |
| Circle of fifths | Keys one step apart as an initial audition choice | Preview a short transition before committing |
| Section length | Matching musical phrases | Trim intros so downbeats line up |
| Vocal register | Both vocals sit in a comparable range | Pitch-shift only within a small range and check for artifacts |
Before uploading anything, run both recordings through a BPM and key finder, then listen to the sections you want to combine. An analyzer's whole-song label won't tell you whether the bridge changes harmony or the drummer speeds up into the chorus.
Compare tempo direction consistently. Divide the vocal's tempo by the backing track's tempo, and keep that convention throughout your notes. A pair that needs obvious acceleration can still work creatively, but it's a poor starting point when your priority is a natural-sounding vocal.
Check the musical relationship
Key labels are a shortlist, not a verdict. Relative major and minor material may share notes yet suggest different emotional centers, while a vocal melody can clash with a backing track's passing chords even when the labels look compatible.
Try the hook over the busiest harmonic section. If a sustained vocal note rubs against the bass or chord progression, decide whether a small pitch adjustment solves it without changing the singer's character.
Then compare phrase lengths and register. Say the vocal finishes its sentence before the backing track resolves. You'll need a deliberate gap, repeat, or trim, not a stretch that distorts the delivery just to fill space. Likewise, two lead vocals competing in the same register usually need alternating entrances rather than simultaneous playback.
Keep-or-drop rule: Keep the pair when the hook survives a short audition with modest adjustment. Drop it when the singer only fits after an obvious change of identity.
Create a source note at this point: recording title, artist, where you obtained the file, and intended use. Don't mistake a promising musical match for a cleared release.
How to Split Stems and Isolate Each Part
A useful separation gives you control, not merely another file. You need to hear which elements belong in the mashup and which remnants will become distracting once the other song enters.
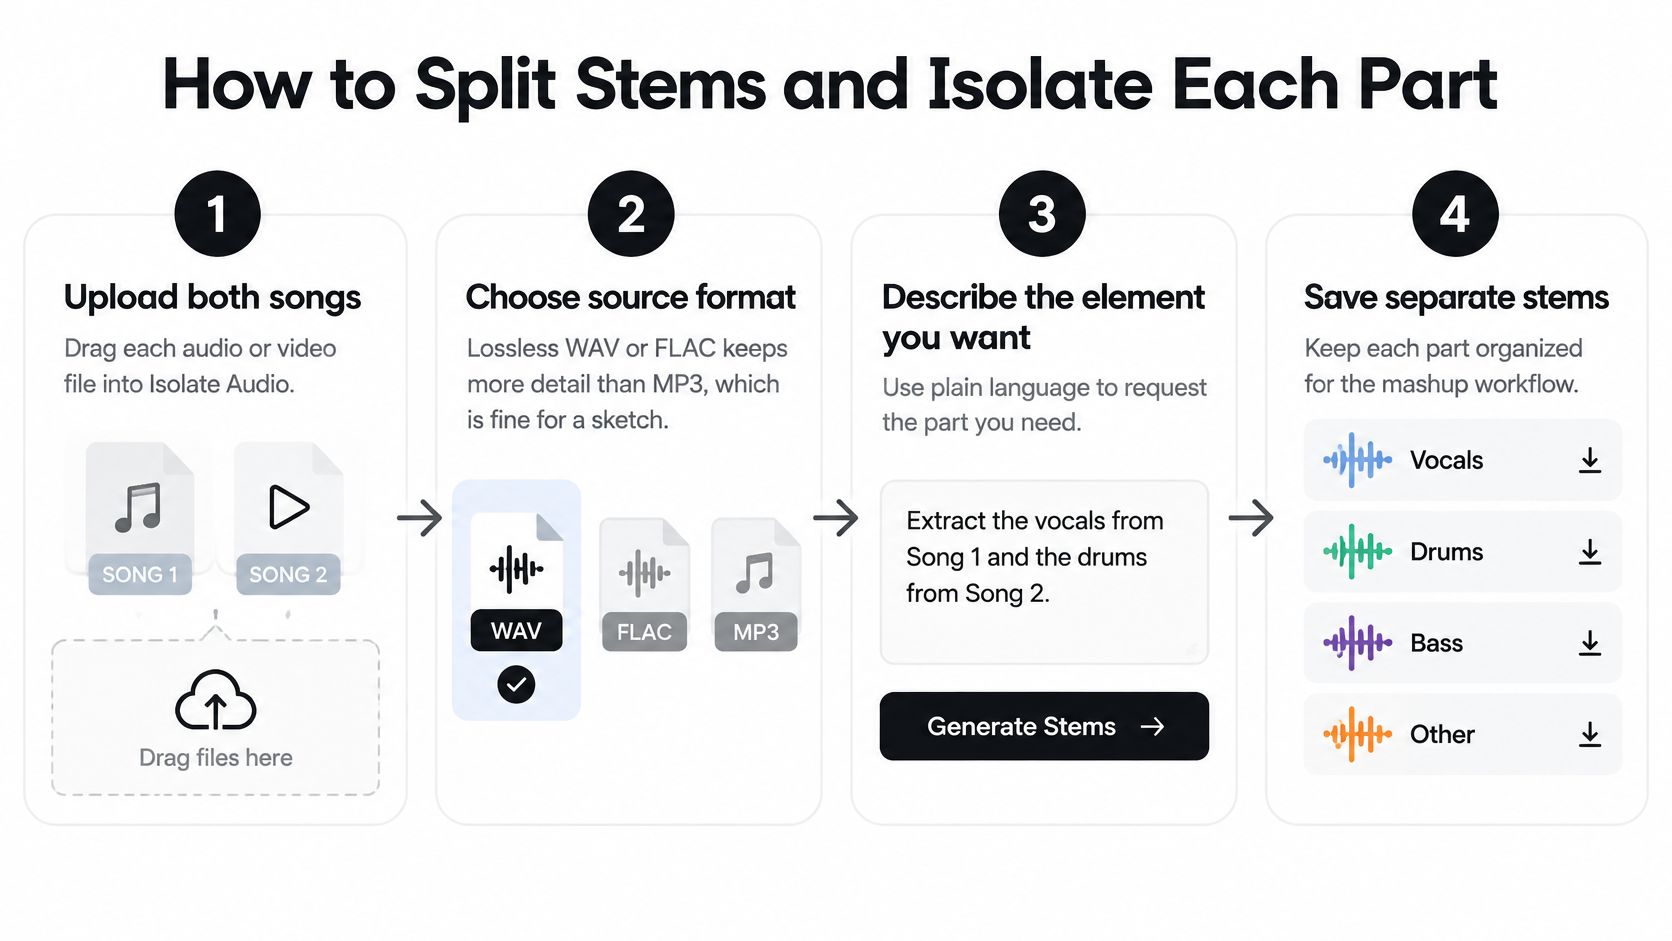
Our workflow is straightforward: upload your audio, describe the sound you want to isolate, then download your tracks. For this project, work through the following sequence.
Upload the source recordings. Drag each audio or video file into Isolate Audio, keeping the originals untouched in your project folder. Start from WAV or FLAC when available, because uploading an MP3 doesn't recover detail already removed by compression.
Describe the element precisely. Use plain English, such as lead vocal, piano melody, or crowd noise, rather than assuming every useful sound fits a conventional stem category. A vague request such as singer leaves the intended boundary unclear, especially when backing vocals and lead vocals overlap.
Listen to both returned files. Each separation produces the isolated sound and the remainder, so audition both before deciding which belongs in the arrangement. The common mistake is keeping the isolated vocal without checking whether the remainder already provides a usable backing track.
The illustration summarizes the upload, description, and file-saving sequence.
Refine the extraction before editing
Narrow the description when the boundary is wrong. If harmonies remain attached to the lead, try a more specific description such as male lead vocal without backing harmonies. Don't expect wording alone to undo every overlap, and don't keep rerunning a result without comparing it against the original.
Name files for the editing session. Include the song, element, and analyzed tempo in each filename, and distinguish alternative extractions clearly. Files named final and final-new become unreliable once you start replacing clips across the arrangement.
Keep only useful parts, but audit the full recording. Listen through exposed breaths, sustained notes, fills, and endings, not just the loudest chorus. A drum hit leaking into a vocal may disappear in a dense section but become obvious during a breakdown.
For extraction decisions, our online stem-separation guide provides additional workflow context. If you're deciding how to organize and reuse the resulting files, LesFM explains how to edit soundtracks with music stems.
Judge separation in context as well as solo. A slightly imperfect vocal that sits naturally in the new backing can be more useful than an aggressively processed extraction with softened consonants and unstable sustained notes.
Sync Tempo, Key and Bars Between the Two Songs
A single global stretch can make the opening line up while leaving the final chorus noticeably late. That happens when the source performance changes speed and the editor treats it as a perfectly steady recording.
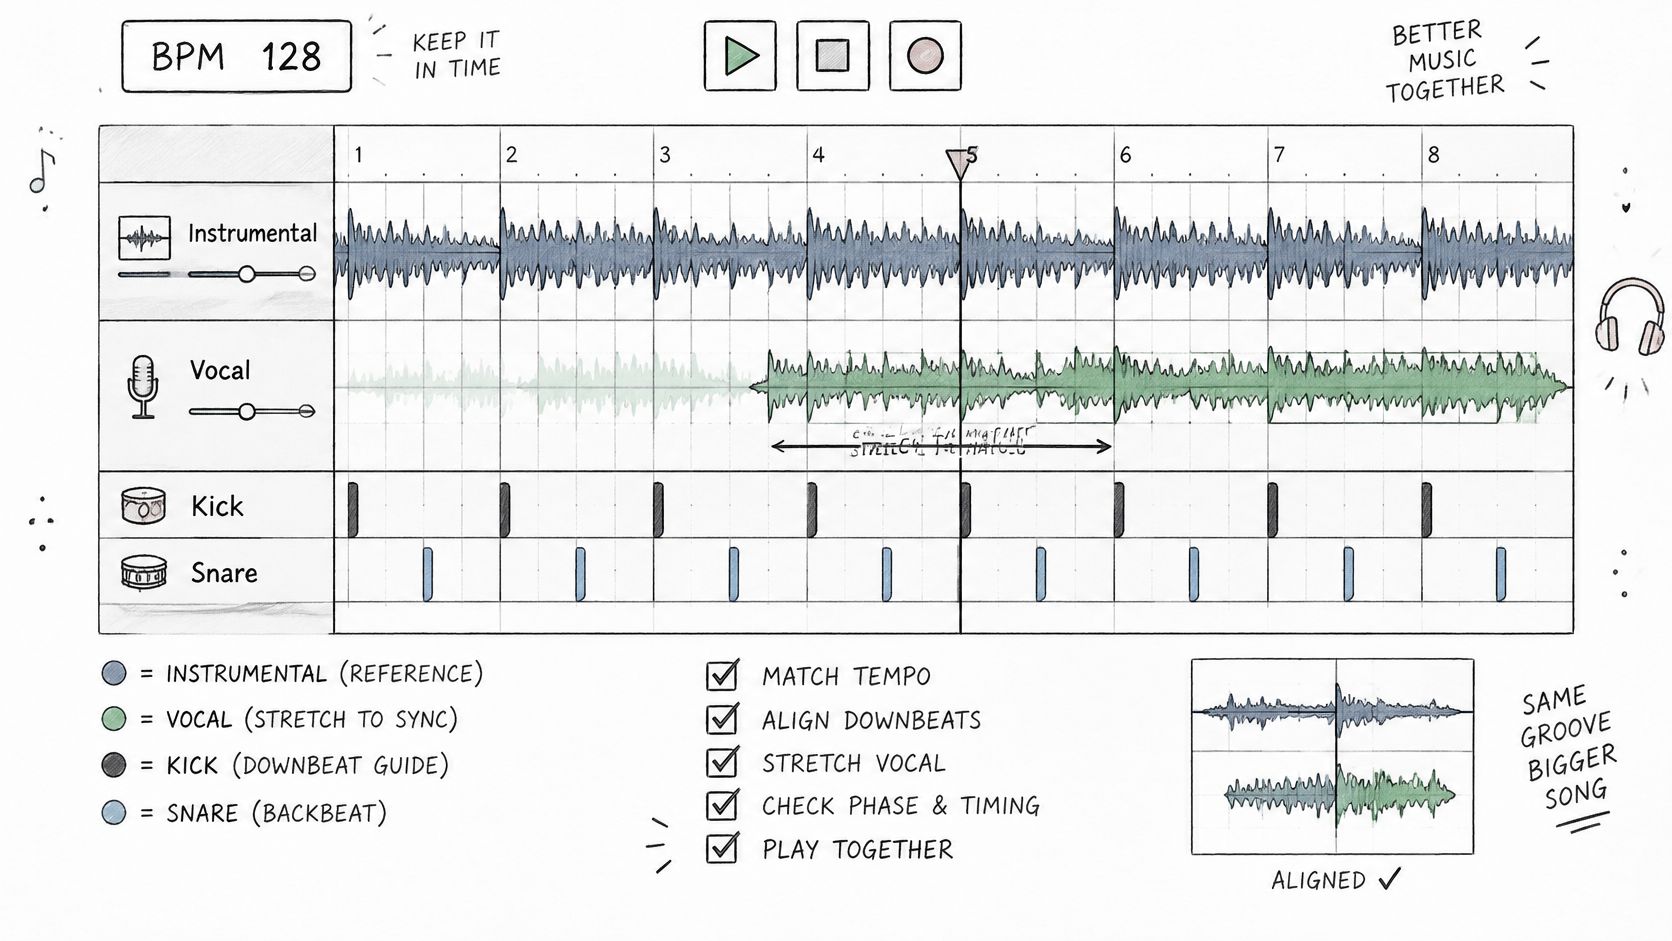
Use the backing music as your initial reference, then adapt the vocal locally. The editing view below illustrates the relationship between the vocal waveform, backing track, and timeline.
The ACM paper on computational mashup creation identifies rhythmic and harmonic compatibility as central criteria, with candidate-screening ranges of approximately ±3 semitones and a tempo ratio of 0.8–1.2. Those are audition filters, not promises that the melodies, chords, and delivery will work together.
Anchor sections rather than every syllable
Use the BPM & Key Finder to establish initial labels, then verify the downbeats by listening to the kick, snare, bass, and chord changes. Don't assume the first visible transient starts a bar, because many vocals begin with a pickup.
In your browser editor or digital audio workstation:
- Set the reference grid. Match the project to the track's pulse and confirm that the bar lines follow its phrasing.
- Anchor section starts. Place warp markers at meaningful boundaries, then inspect the material between them.
- Preserve the delivery. Move a phrase when its entrance is wrong; stretch it only when its internal timing needs adjustment.
- Audit late sections. Check the final chorus and outro, where accumulated drift becomes easiest to hear.
For a hypothetical pairing, a steady house backing track and a slightly slower vocal may need only modest stretching. A hand-played backing with tempo movement needs more local attention, even if its average BPM looks almost identical.
Use the embedded demonstration as a visual companion while checking your own timeline.
Choose a stretching mode suited to the material. Vocals need stable pitch and formants; percussive material needs preserved attacks. Excessive markers can make a singer sound mechanically corrected, so add them where you hear an error rather than at every waveform peak.
Export short transition previews before rendering the whole project. Listen for misplaced consonants, overlapping bass attacks, and reverb tails that expose the edit. A correct grid doesn't excuse an unnatural phrase.
Arrange the Sections into a Full Mashup
Aligned stems aren't yet an arrangement. The listener needs a clear lead, an energy curve, and a reason to stay through the next section.
Sketch the source structures before moving clips. Label intros, verses, choruses, breakdowns, and endings, including any unusual phrase extensions. Then choose which song supplies the main structure, usually the backing track.
Build a deliberate energy curve
Lay out the backing first. Mark section boundaries and listen without the vocal track. If the track already has a convincing build and release, preserve that movement instead of filling every gap.
Place the vocal verse where the backing leaves room for the lyric. Keep complete sentences together, and preserve pickups that make the singer's entrance sound intentional.
Create contrast before the chorus. A brief drum-led passage, filtered backing, or deliberate silence can make the hook arrive with more impact. Don't add a sweep automatically if the source already contains a strong transition.
Use a bridge or breakdown for a role swap only if the available stems support it. Letting the other song's vocal take over can refresh the arrangement, but changing both the lead and backing simultaneously may sound like an unrelated track has started.
Finish with resolution. Keep the strongest chorus, remove repetitions that add nothing, and choose an ending that respects the final lyric and musical phrase.
Leave some recognizable space from each source. Constant overlap can make the result feel busier without making it more inventive.
Audition transitions with the surrounding material, not as isolated edits. A technically clean join can still interrupt the story if it cuts off a lyric's answer or releases tension before the chorus arrives.
Prefer subtraction when the arrangement drags. Removing a redundant verse usually helps more than adding another effect to make the same material feel different.
Balance Vocals, Bass and Loudness Before Export
Protect the vocal's character before chasing a mathematically tidy compromise. Preliminary listener testing described in the Multimedia Tools and Applications study of two-source mashups favored a tempo near the originals' average while favoring the vocal's original key. That supports auditioning tempo changes before committing to unnecessary pitch shifts, not forcing every project to an average.
A backing-track-led timeline remains a useful editing reference. If the singer sounds strained against it, test a different project tempo before writing detailed automation.
Make room rather than adding level
Gain automation should do the heavy lifting. Balance the verse, chorus, and bridge independently, because the sources won't maintain the same density throughout. Raising the entire vocal to rescue a quiet phrase can make the next chorus painfully forward.
- Control competing bass. Decide which source owns the low end, then reduce unnecessary low-frequency content elsewhere.
- Use corrective EQ selectively. Cut the region that masks the singer instead of brightening the whole vocal until it becomes harsh.
- Duck for intelligibility. Briefly lower the backing where dense consonants disappear, rather than compressing everything harder.
- Check mono deliberately. Compare the centered vocal and kick against stereo playback, and investigate anything that collapses.
Don't high-pass an entire backing track merely because it contains competing bass. That can remove the foundation you intended to keep; separate stems give you a more selective option.
Finish with a level-matched A/B comparison against both originals on the same playback system. Turn louder references down so extra level doesn't masquerade as better sound.
If the mashup feels smaller, identify whether the missing weight comes from gain balance, excessive filtering, or phase interaction. Don't move correctly timed clips to solve a tonal problem, and don't push a limiter harder to disguise one.
Fix Drift, Clashes and Clicks in the Mix
When downbeats separate after an initially convincing opening, diagnose the timing before touching EQ. A louder kick won't fix a misplaced one, and another compressor won't restore a damaged vocal extraction.
Use the symptom to choose the next test, not to justify adding a familiar plug-in.
Mashup symptoms, likely causes and fixes
| Symptom | Likely cause | Fix |
|---|---|---|
| Downbeats drift after the first chorus | Global stretching applied to fluctuating tempo | Add local warp anchors or align sections separately |
| Vocal sounds thin or disappears | Phase cancellation, masking, or an extraction defect | Compare solo and combined playback, check mono, and isolate the competing element |
| Muddy low-mids | Overlapping instruments occupy the same tonal region | Make a narrow instrumental cut rather than boosting the vocal |
| Lyrics are hard to follow | Backing masks consonant-heavy phrases | Automate a brief instrumental dip during those phrases |
| Warbling or chipmunk vocal | Excessive stretching, pitch movement, or unsuitable formant handling | Compare the unprocessed stem, reduce processing, or choose a closer source |
| Clicks at transitions | Abrupt waveform discontinuities or clipped tails | Add short fades or crossfades and audition the edit in context |
Change one cause at a time
Start by bypassing processing on the affected clip. If the vocal already warbles in the separated file, changing the editor's pitch algorithm won't solve the original defect. Try a different extraction or a less exposed placement.
For a thin vocal, compare solo playback, stereo playback, and mono playback. If the problem appears only when another stem enters, mute that stem and identify the interaction before reaching for EQ.
Clicks need an audio edit, not merely a musical edit. Moving a cut onto a bar line can improve phrasing, but it doesn't guarantee a smooth waveform boundary. Use fades to handle the discontinuity, and preserve enough room for breaths, cymbals, and reverb decays.
Don't stack a new correction over an unexplained failure. Bypass, compare, identify the cause, and keep only the change that fixes it.
When repairing muddy sections, listen across the transition into the next part. A cut that clears the chorus may leave the verse hollow, so automate the correction or apply it only to the troublesome clip.
Keep an untouched version before major repairs. If a fix changes the singer's tone, weakens the groove, or requires another compensating effect, compare against that version before proceeding.
Clear Rights Before You Publish or Monetize
A heavily edited mashup isn't automatically cleared for release. Creative transformation and permission are different questions, and a noncommercial upload doesn't settle the legal question by itself.
The U.S. Copyright Office's guide to sampling and preexisting music explains that reused music can implicate both the sound recording and the underlying composition; fair use requires a case-by-case assessment rather than an automatic exemption for noncommercial work. This is a U.S. framework, not a universal rule for every jurisdiction.
The master owner controls rights in the particular recording, while songwriters and publishers may control the composition. Don't assume the performing artist owns everything, or that permission from an uploader covers either layer.
Rights to check by how the mashup is used
| Use case | Rights to check | Practical step |
|---|---|---|
| Private practice file | Unpublished practice is lower exposure, not automatic legal clearance | Keep stems, sources, and notes together |
| Promotional sharing with no income | Recording and composition rights may still apply | Verify permission and document required credits |
| Platform upload with monetization | Master and composition rights for each source | Confirm license scope and review platform policies |
| Live performance | Applicable performing rights and permissions for reused recordings | Confirm venue, collecting society, and sample-license requirements |
| Commercial release | Written authorization covering relevant rights and uses | Obtain clearance before committing to release |
Build a usable clearance record
Create a folder alongside the audio project containing:
- Source identity. Record the exact recording, artist, version, and source location.
- Rights contacts. Identify the relevant master owner, publisher, songwriter representative, or licensing contact.
- Permission scope. Save terms covering the intended edit, platforms, territories, monetization, and distribution.
- Credits and correspondence. Retain required wording, approvals, invoices, and the messages that establish authorization.
- Claim records. Preserve notices, affected timestamps, and any response you submit.
Our guide to clearing samples can help you organize the permission process. Contact rights holders with a private reference mix and a plain description of the intended use, rather than asking for vague approval to remix their music.
Separate attribution from authorization
Credits identify contributors; they don't replace permission. Likewise, buying a recording gives you access to that recording under its applicable terms, not an unrestricted right to redistribute edited versions.
If you rely on an exception such as fair use, assess the actual release with qualified legal advice where needed. Transformation, the amount used, and market impact require more than a label in the description.
For licensed material, read restrictions on adaptations and redistribution carefully. A composition's status also doesn't automatically establish the status of a particular recording of it.
Make clearance a release gate. If permission is missing, keep the project unpublished, replace the source with material you can use, or obtain the necessary authorization. Don't announce a release date on the assumption that a clean mix will persuade a rights holder afterward.
Export a Private Test Mashup and Keep Backup Versions
The useful deliverable isn't just the finished mix. It's a recoverable project with enough documentation to revise a section, establish permission, or explain what an automated system identified.
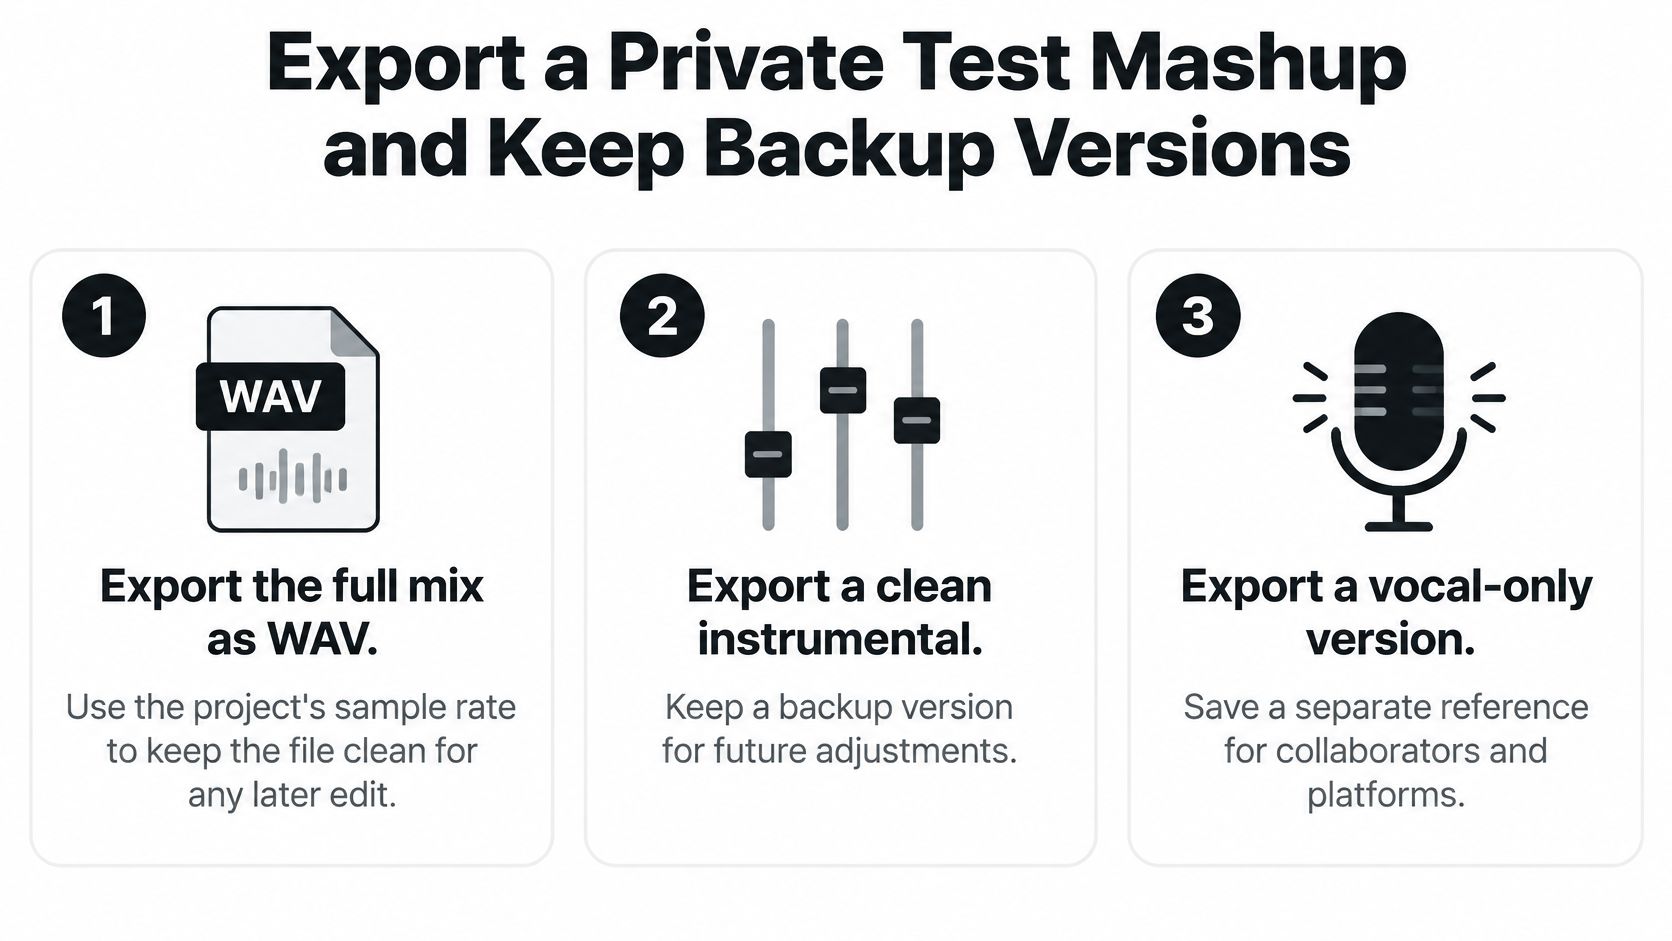
Export an editable master. Render WAV at the project's sample rate, preserving the session separately. Converting compressed stems to WAV won't restore lost detail, but it avoids another lossy export stage.
Export a backing track and a vocal-only reference where the arrangement allows. These make revisions and collaborator feedback easier without dismantling the full mix.
Save the working decisions. Archive stems, tempo and key labels, warp settings, transition timestamps, and the editor project. Attach each source's license or permission to its entry in the project notes.
Test locally on a phone and laptop, then use a private platform upload only when its terms and your permissions allow. Private visibility isn't immunity from detection or a substitute for clearance.
Use this checklist when saving the deliverables.
A study of mashup producers published in New Media & Society found that 96% had experienced platforms detecting copyrighted material in their work. That finding concerns detection, not a determination that every detected use infringed copyright.
Keep legitimate alternate edits for revision, not for evading recognition. If a claim is mistaken, use the platform's dispute process with supporting documentation; if permission is missing, changing the audio doesn't supply it.
Isolate Audio lets you upload a recording, describe the sound you need, and download the isolated part and remainder for your mashup. Visit Isolate Audio to prepare your source tracks, and use the free BPM & Key Finder to shortlist a compatible pair before building the arrangement.