Audio Restoration Techniques: A Practical Guide for Creators
You've finally recorded the interview. The guest was articulate, the answers were strong, and the room felt quiet while you were working. Back at the edit desk, the voice is buried under air conditioning, computer noise, distant traffic, and a few sharp digital clicks. The temptation is to stack denoise plugins until the waveform looks clean. That approach often removes the character you needed to preserve along with the damage.
Audio restoration techniques work best as controlled recovery. You identify what belongs to the original performance, separate localized defects from broad degradation, and apply the least destructive process that solves the actual problem. Sometimes the recording can be cleaned. Sometimes it can only be made more usable. When several sources overlap, the job may shift from cleanup to reconstruction.
The Reality of Ruined Recordings
A damaged recording usually contains more useful information than it first appears to. A spoken interview may have a steady room tone, intermittent chair movement, a clipped consonant, and a nearby conversation all sharing the same file. Those problems don't respond to one universal “clean audio” button because each occupies a different time, frequency, or source relationship.
Start by listening without processing. Mark the moments where the target signal is clear, then note whether the unwanted sound is continuous, intermittent, tonal, broadband, or source-like. A constant fan can often be reduced. A cough covering a word may be partly repaired. A second speaker talking over the subject isn't just noise, because removing it may also remove parts of the wanted voice.
Recovery starts with diagnosis
The old “fix it in post” promise encourages careless recording, but post-production can't recreate information that the microphone never captured. Restoration can improve intelligibility and reduce distractions, yet every process introduces a trade-off. Spectral attenuation can leave musical noise. De-reverberation can make speech thin. Separation can create phasing or synthetic textures.
A useful first decision is whether the defect is recoverable, reducible, or reconstructive:
- Recoverable: The original signal remains visible or audible, as with a short click between clean waveform cycles.
- Reducible: The damage overlaps the target but has a stable pattern, as with broadband hiss or electrical hum.
- Reconstructive: The target is masked, missing, clipped, or mixed with another source, so an algorithm must estimate what belongs there.
For tape and other archival media, digitization quality determines how much restoration latitude you have. Capture the source carefully before editing, and follow a controlled transfer workflow such as this guide to digitizing audio tapes. Keep the untouched transfer, work on a duplicate, and export intermediate versions so you can reverse a decision.
Your audience also notices presentation beyond the waveform. If the restored clip is going into a short-form campaign, review the final media in context, including its audio and visual behavior, with a social media media validation check before publishing.
Practical rule: If you can hear the processing while listening for the story, you've probably pushed it too far.
Foundational Principles Before You Start
Before opening a restoration plugin, classify the damage. Audio restoration literature commonly separates localized defects from global degradation. The distinction matters because a short, isolated event needs a different intervention from a problem affecting the whole recording.
Localized defects include clicks, pops, scratches, and digital sync loss. They occupy a small region of time, so sample removal, interpolation, or spectral editing can repair them without changing the entire track. Global degradation includes background noise, pitch variation, and nonlinear distortion. These problems require broader processing such as noise reduction, filtering, equalization, or corrective modeling. This historical distinction is documented in restoration research on localized and global audio defects.
Build a repair order
A safe sequence reduces the chance that one process makes the next one less accurate:
- Preserve the source. Duplicate the original file and label every processed version. Don't normalize or compress before you understand the damage.
- Inspect the waveform and spectrum. Waveform zoom reveals discontinuities and clipped peaks. Spectral views reveal tonal hum, broadband noise, and vertical transient marks.
- Repair obvious local defects. A click can confuse a denoiser, so fix clear spikes before making broad changes.
- Reduce stable global problems. Capture room tone or a noise profile when the recording provides one. Apply a conservative reduction and compare it with the untreated signal.
- Restore tone and level. Use EQ and gentle dynamics after cleanup, not as substitutes for diagnosis.
- Validate the purpose. Dialogue for transcription, music for release, and ambience for a film all have different acceptable artifact profiles.
The phrase “fix it in the mix” has a useful meaning here. It doesn't mean hiding every problem with a compressor or gate. It means making processing decisions while considering the complete arrangement, the intended listener, and the material that must remain natural.
A gate can reduce the apparent room noise between phrases, but it won't repair a click inside a word. A narrow EQ cut can tame a resonant hum, but it won't separate a competing conversation. Use the smallest tool that matches the defect.
For branded content, the same discipline applies to sonic identity. A clean recording still needs to feel consistent with the project, and guidance on sonic branding for short-form video can help you judge whether restoration has removed useful atmosphere or vocal character.
Repairing Transient Defects and Clicks
Clicks and pops are short enough to look insignificant, yet they can dominate attention. They may come from damaged tape, a bad edit boundary, a digital transmission error, microphone handling, or a plosive striking the capsule. Treating all of them as the same problem leads to unnecessary damage.
Find the exact event
Listen in context first. A click that seems obvious when soloed may be masked in the final mix, while a small discontinuity at the start of a word may become distracting after compression. Place a marker, then zoom into the waveform and spectral display.
A typical repair workflow looks like this:
- Locate the boundary: Find the sudden discontinuity or isolated vertical spectral mark. Confirm that it isn't a legitimate percussion transient or consonant.
- Shorten the selection: Select only the damaged material plus enough surrounding audio to estimate the natural waveform.
- Try interpolation first: Replace the damaged samples by estimating a smooth connection between the clean material before and after the event.
- Use spectral editing when needed: If the defect has a recognizable frequency shape, attenuate that shape rather than cutting a broad time region.
- Audition at normal level: A repair that sounds perfect at extreme zoom may create a tiny change in rhythm or tone when heard in context.
The reason interpolation is preferable to a hard cut is continuity. Removing samples can change timing and create a new discontinuity. Interpolation preserves the original duration and gives the waveform a plausible path through the damaged area. For an archival transfer or exposed vocal, that difference is often audible.

Match the method to the transient
A de-click processor works well when clicks share a repeatable shape and are scattered through otherwise healthy material. Set its sensitivity carefully. High sensitivity may catch consonants, pick attacks, or percussion, especially in dense music.
Plosives need a different approach. If the burst overloads the low-frequency response, a short gain envelope or targeted low-frequency attenuation may preserve more voice than a full-band cut. Don't erase the entire consonant. Reduce the burst, then check whether the word remains intelligible.
Digital glitches can be more severe. If a segment contains missing or scrambled samples, use neighboring material only when the event is brief and the surrounding signal is predictable. A sustained musical phrase or complex overlapping speech may require a different reconstruction strategy, not a generic repair click.
For hands-on editing, compare your DAW's native tools with dedicated audio repair software. The tool matters less than the inspection habit. Always bypass the processor, match levels, and check the repaired region against nearby unprocessed material.
Listen for the edge, not just the noise. A successful repair should remove the interruption without announcing the edit.
Taming Global Noise and Hum
A badly recorded file rarely fails in one obvious way. Broadband hiss, fan noise, electrical hum, and room rumble sit under the whole performance, shaping every word, note, and pause. The job is not to force silence. It is to leave a noise floor that feels natural and does not fight the subject.
Capture the noise profile
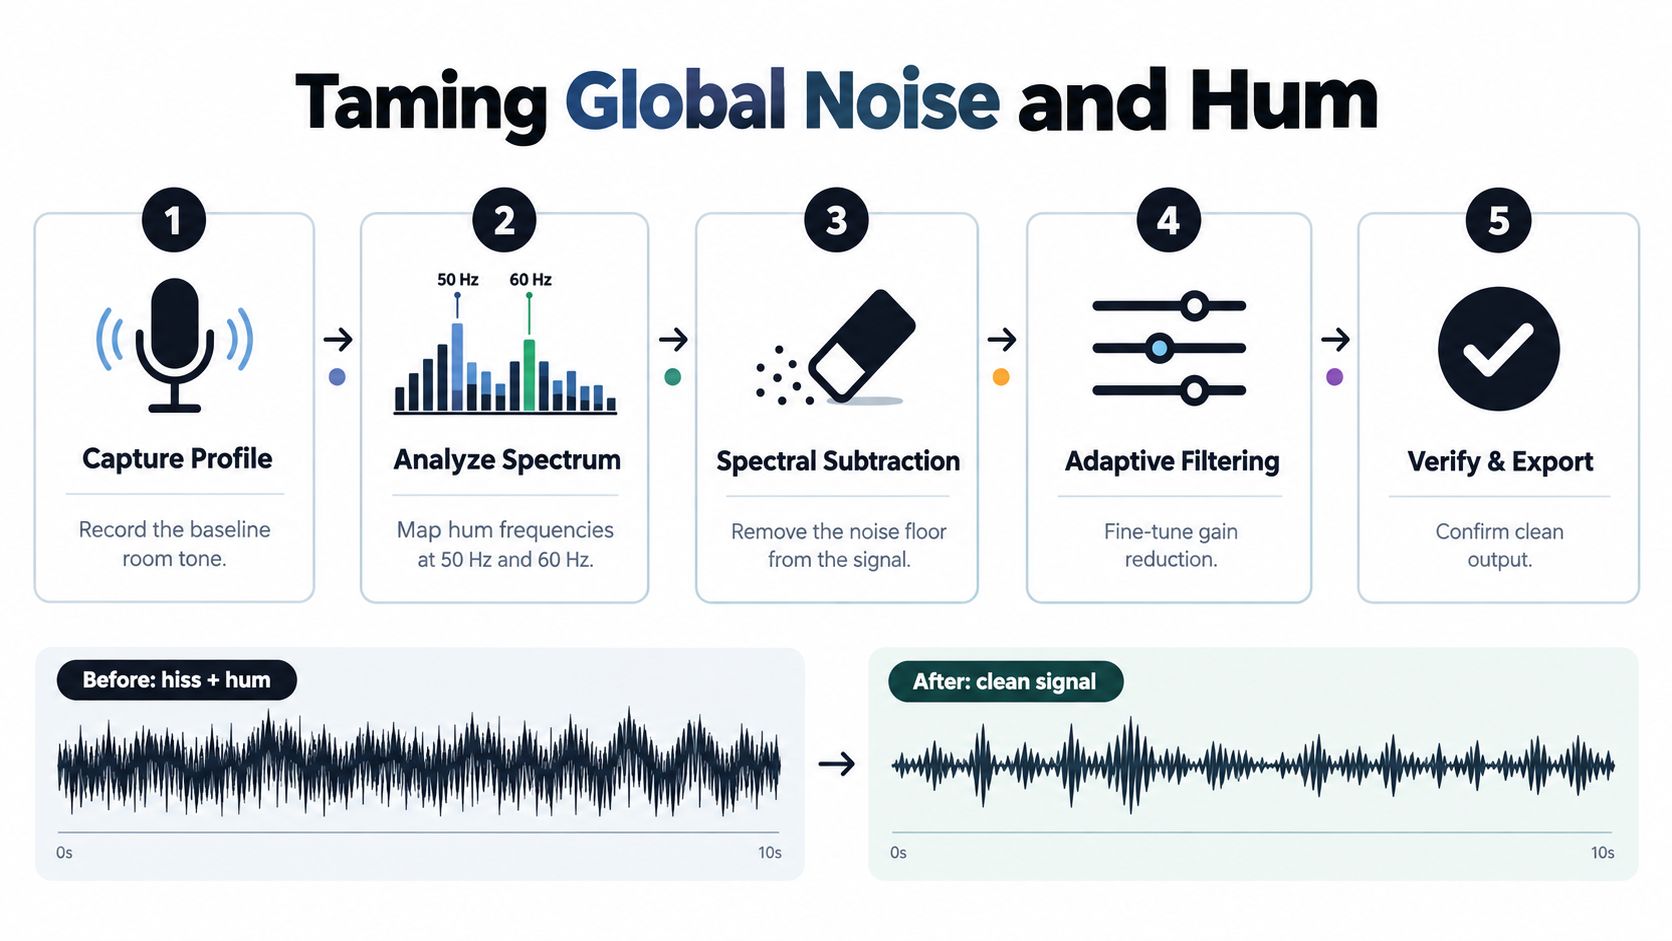
Start with a section where the unwanted sound is present and speech or music is absent. Capture that profile, then use spectral subtraction or a similar denoising process to reduce the matching energy. The profile has to come from the same recording. A sample from another room, mic position, or gain setting can make the result worse.
Work in stages. One aggressive pass often sounds cleaner at first, then falls apart under close listening. Watch for warbling, chirping, metallic tails, and the familiar underwater effect. Those artifacts usually mean the processor is shaving off parts of the wanted signal or chasing noise that is not steady enough to model cleanly.
A practical sequence is:
- Reduce the steady broadband component conservatively.
- Recheck pauses and low-level consonants.
- Address remaining tonal elements with narrow filters.
- Restore a small amount of natural room tone if the edit becomes unnaturally silent.
- Compare the processed file at matched loudness.
Treat hum as a tonal problem
Electrical hum usually shows up as a fundamental frequency with related harmonics. Find the actual peak in the spectrum before cutting. A narrow notch can reduce the interference while leaving voice or music intact. A wide cut can hollow out the recording and remove more than the problem itself.
Do not confuse hum with low-frequency room energy. Dialogue may need some low end for body, and music may depend on the same range you are tempted to remove. Use a high-pass filter only as high as the material can tolerate, then verify the result on headphones and speakers.
The comparison paper shows that restoration can combine noise reduction with tonal recovery, so the goal is not less noise. That matters in practice because a track can sound quieter and still lose presence if you push too far.
A noise gate helps in gaps when room tone is distracting, but it can cut off word endings and natural breaths. In edited dialogue, a short fade or manually shaped clip gain often sounds more transparent than a gate working across the whole track.
For a focused look at persistent mains noise, removing hum from audio is useful for separating diagnosis from later tonal balancing.
Traditional Editing vs. AI Separation
A manual edit gives you a clear chain of cause and effect. You can select a frequency, draw a gain change, repair individual samples, or automate compression around a known event. That control suits stable defects and recordings where the unwanted sound is easy to identify.
AI separation addresses a different problem. It estimates individual sources from their learned characteristics, so it can help when a voice, instrument, crowd, or environmental sound overlaps the target in time and frequency. The trade-off is reduced detail control. Separation may create artifacts, soften transients, or remove ambience that a carefully chosen manual edit would preserve.
| Method | Best For | Control Level | Processing Time |
|---|---|---|---|
| Traditional editing | Stable hum, clicks, known resonances, controlled dialogue edits | Fine, with direct parameter and sample control | Often slower for many defects |
| AI separation | Overlapping voices, crowd noise, instruments, identifiable sound sources | Broader source-level control, with less direct control over every artifact | Often faster for complex source relationships |
| Hybrid workflow | Recordings with both isolated defects and overlapping sources | Highest practical control when stages are reviewed separately | Moderate, because each result needs auditioning |
Choose by the defect
Use manual editing when you can locate the problem and describe how it behaves. A notch filter fits a narrow tonal interference. A de-clicker fits a short discontinuity. For one loud movement, clip gain and short fades often sound more natural than heavy dynamics applied across the track.
Use AI separation when the problem depends on competing sources. A voice under crowd response is not merely an excess frequency. Both sounds occupy the same time and spectrum, so a source-aware tool can provide a more useful starting layer than EQ alone. Isolate Audio accepts an uploaded audio or video file and a plain-English description of the target sound, then returns the isolated element and the remaining audio. Treat that result as a working layer and check it against the original.
The practical choice is often a staged one. Separate only when overlap prevents ordinary repair. Inspect the isolated layer for gaps, residue, altered breaths, and synthetic edges. Repair those local defects manually, then restore the target's tone with restrained processing. An AI output may already have attenuated transients or changed ambience, so applying the same aggressive settings used on the untreated recording can make the damage worse.
Stop cleanup when further reduction removes identity, space, or intelligibility. At that point, the task has shifted from correcting a defect to reconstructing a source, and the result needs evaluation by meaning and natural character, not by waveform neatness.
AI can shorten the search. It does not remove the need to listen.
Advanced Workflows for Overlapping Sources
Overlapping recordings force a harder question: when should cleanup become reconstruction? If noise sits between phrases, cleanup may be enough. If another source speaks over the important words, a model must estimate the target while preserving meaning, timing, and emotional detail.
Use a staged master chain
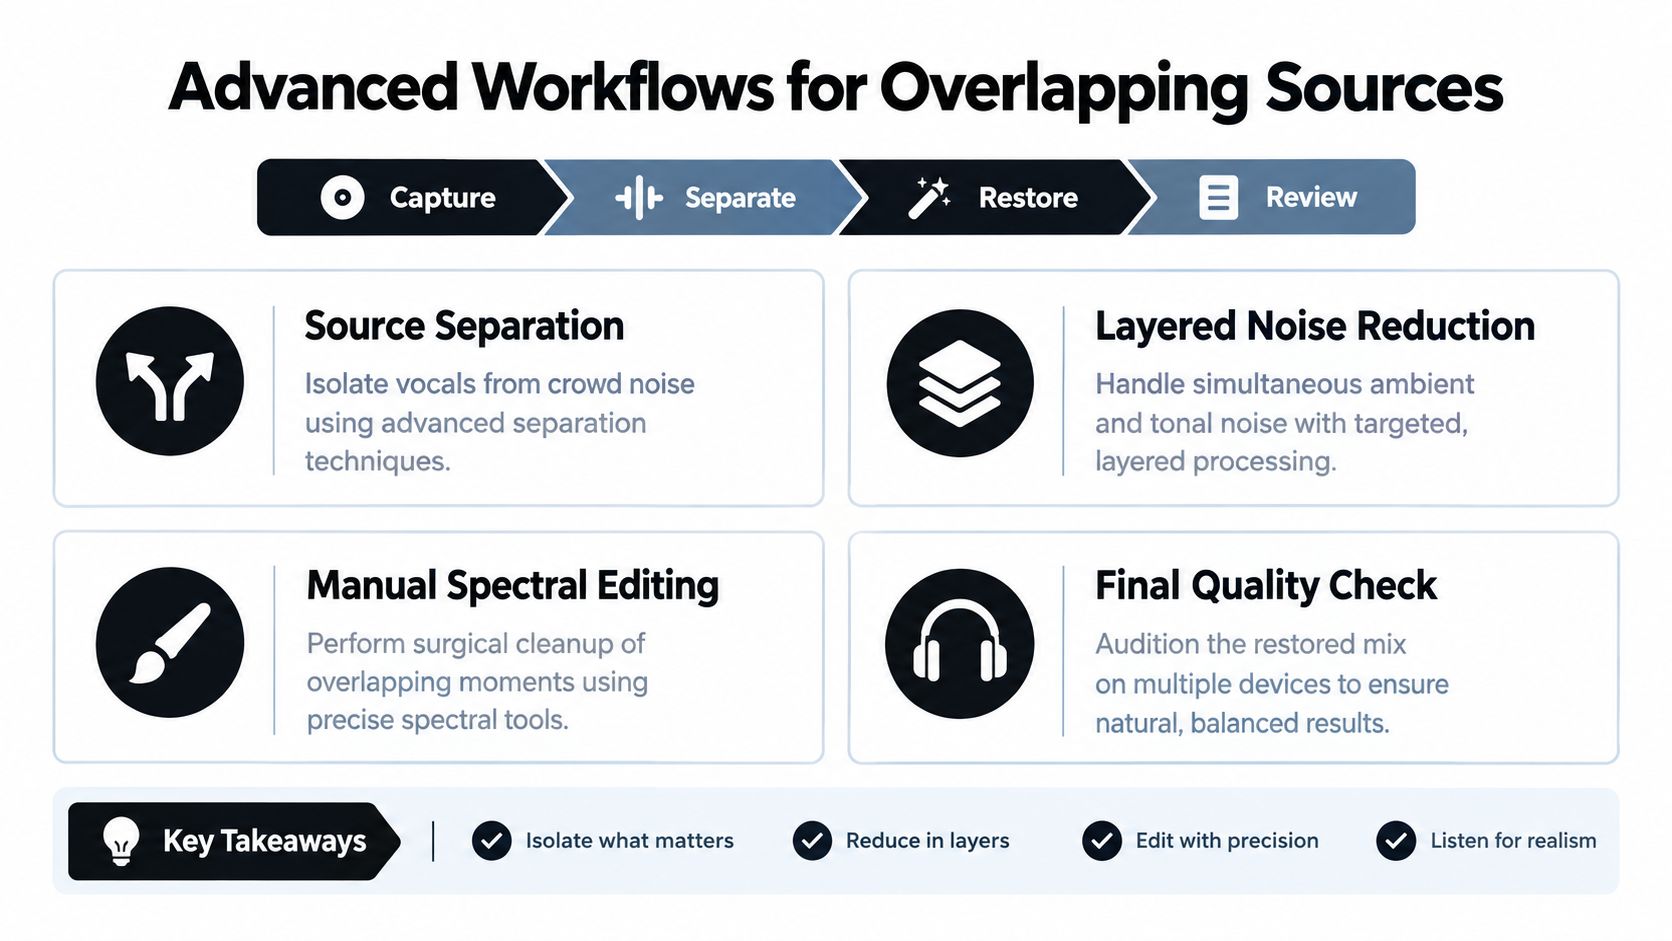
For a difficult interview, field recording, or live performance, work in this order:
- Capture: Keep the original transfer and document the source condition.
- Separate: Isolate the target only when another source overlaps it materially.
- Restore: Repair clicks, reduce stable noise, control hum, and correct tone in separate decisions.
- Review: Compare the result against the end-use task, not only against a visually cleaner waveform.
This order prevents a common mistake: denoising a complex mixture before deciding which source matters. If the crowd and speaker are processed together, the denoiser may interpret applause or consonants as noise. Separation can make the target more accessible, but it can also produce synthetic edges, missing ambience, or altered breaths.
Know when to stop
Restoration has crossed into reconstruction when the target is partly masked, clipped, or absent and the processor must infer content. At that point, technical cleanliness becomes a weak success criterion. Ask whether the words remain intelligible, whether the musical gesture still feels authentic, and whether the surrounding environment still makes sense.
Speech enhancement research supports this caution. Practitioners use PESQ, STOI, SI-SDR or SDR, WER, and MOS to evaluate quality, intelligibility, signal fidelity, transcription impact, and human perception. Yet enhancement doesn't automatically improve transcription. One study reported degraded ASR performance in all 40 tested configurations, with absolute semWER increases ranging from 1.1% to 46.6%. Those findings are reported in the Interspeech 2024 speech-enhancement study.
For music restoration, generic models can also perform poorly. A benchmark reported a U-Net SI-SNR of -37.8 dB and a BSRNN SI-SNR of -23.4 dB, with FAD{CLAP} perceptual scores around 0.7 to 0.8. A separate challenge summary reported a winning system at 4.46 dB Multi-Mel-SNR and 3.47 MOS-Overall, outperforming the second-place system by 91% and 18%, respectively. These results are detailed in the music restoration benchmark. Use signal metrics and human listening together.
Final check: If the restored version is clearer but no longer believable, return to the last natural-sounding stage.
Isolate Audio lets you upload common audio or video formats, describe a target sound in natural language, and download both the isolated element and the remainder for further editing. Use it as a source-separation stage for overlapping dialogue, crowd noise, instruments, or environmental events, then make the final restoration decisions in your DAW.
Visit Isolate Audio when a recording contains overlapping sources that ordinary EQ and denoise can't separate cleanly. Upload the file, describe the sound you need, and use the isolated and remainder outputs as layers in a controlled restoration workflow.