How to Extract Sound from Video Free A Creator's Guide
So, you've got a video file, but what you really need is the audio. Maybe it's a live music performance you want to mix, an interview you'd like to turn into a podcast, or just a funny soundbite perfect for a social media clip. Good news: you don't need expensive software to pull this off.
You can easily extract sound from video for free using everyday tools you might already have installed, like VLC Media Player or Audacity. There are also plenty of free online converters that get the job done in a browser. These methods let you rip the entire audio track from a video and save it as a standard MP3 or WAV file in just a few minutes.
Why Separating Audio from Video is So Useful
Have you ever wondered how podcasters take a Zoom interview and turn it into a polished, audio-only episode for Spotify? Or how a musician can record a live gig on their phone and then get a clean audio track to mix later? The trick is audio extraction. It’s one of those foundational skills that opens up a ton of creative doors.
This isn’t just a simple file conversion. It’s about getting more mileage out of the content you already have. For example, a marketing team could pull the most powerful line from a customer testimonial video and use that isolated sound for an Instagram Reel. Once you know how to do this for free, you start seeing opportunities everywhere to repurpose content without spending a dime.
The Rise of Audio Repurposing
Video is king on the internet—there's no doubt about it. In fact, it's projected to account for a massive 82% of all internet traffic. Because of this video boom, being able to quickly and easily pull audio has become a crucial skill for creators.
It's not just a hunch; the data backs it up. Teams that actively repurpose their video content into audio formats see up to 30% higher engagement on platforms like Spotify and YouTube Music. It's all about meeting your audience where they are. For more great insights on this, the folks at TrueFan have some interesting takes on converting video content.
The Big Picture: Think of audio extraction as a strategic way to multiply your content. A single video recording can be transformed into a podcast episode, a music sample, a social media sound, or even a simple voice memo—all from that one initial effort.
Ultimately, mastering audio extraction is about working smarter. It lets you:
- Repurpose Your Content: Easily turn video interviews, webinars, and tutorials into podcasts or audio-only lessons.
- Create Samples & Demos: Musicians can grab the audio from a performance video to create shareable tracks.
- Enhance Other Projects: Isolate specific sound effects, background noise, or bits of dialogue from one video to use in a completely different project.
Four Proven Methods for Ripping Full Audio Tracks
When you need the entire audio track from a video file, you've got several powerful and free methods at your fingertips. We're going to walk through four different approaches, each with its own strengths, depending on your needs and how comfortable you are with certain kinds of software. We'll cover everything from reliable offline tools to quick-and-dirty online converters, so you'll definitely find a good fit.
The first big decision is figuring out exactly what you need. Are you after the complete audio from start to finish, or just one specific soundbite? This choice will point you toward the right tool for the job.
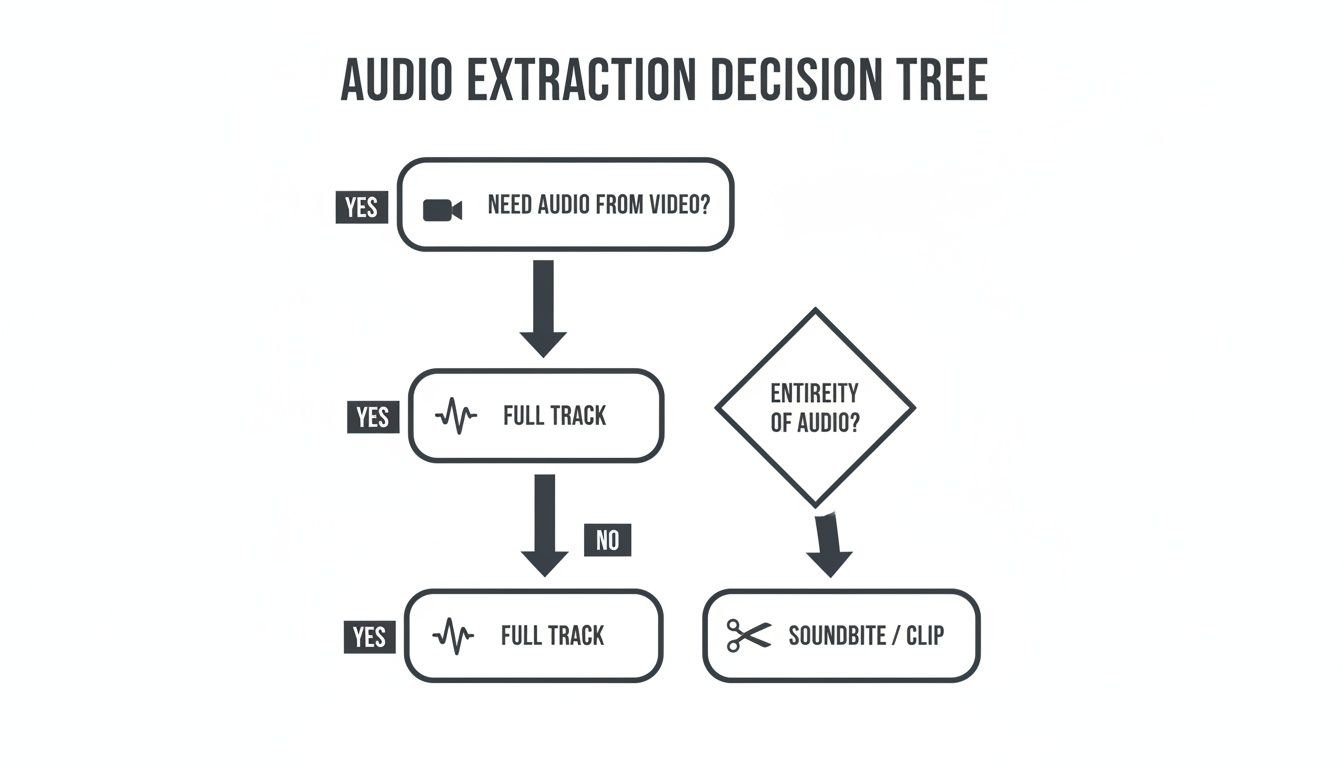
As you can see, knowing whether you need the full track or just a slice of it is the first step in picking your method.
Before we dive into the step-by-step guides, here’s a quick overview of how these four free methods stack up against each other.
Comparing Free Audio Extraction Methods
| Method | Best For | Pros | Cons |
|---|---|---|---|
| VLC Media Player | Quick, reliable offline conversions without extra software. | Already installed on many computers; works offline; very reliable. | Interface is not designed for conversion, so it can feel clunky. |
| FFmpeg | Technical users, developers, and batch processing. | Extremely fast and powerful; handles almost any format; scriptable. | No graphical user interface; requires comfort with the command line. |
| Audacity | Extracting and immediately editing audio in one workflow. | Combines extraction and editing; excellent for audio cleanup and mixing. | Requires a one-time setup of the FFmpeg library to import video. |
| Online Converters | Fast, one-off extractions without installing software. | Convenient and easy to use; no installation needed. | File size limits; requires internet; potential privacy concerns. |
Each of these tools gets the job done, but the experience and the workflow are quite different. Let's get into the specifics for each one.
1. VLC Media Player: The Trusty Swiss Army Knife
Believe it or not, the humble VLC Media Player you use to watch videos is also a capable audio extractor. If you already have it on your computer, you're ready to go. This is my go-to recommendation for anyone who wants a straightforward, offline solution without any fuss.
You just need to dig into the "Convert / Save" feature. From there, you add your video file, choose an audio profile like MP3 or FLAC, and let VLC do the work. The biggest plus here is its reliability and the fact that you don't need an internet connection. It just works.
My Personal Tip: When you're saving your file in VLC, make sure you manually type the file extension (like
.mp3) at the end of your filename. I've found that VLC sometimes forgets to add it automatically, which can cause a headache later.
2. FFmpeg: For Those Who Love the Command Line
If you're comfortable working in a terminal or command prompt, FFmpeg is the undisputed champion of media processing. It’s an incredibly potent open-source toolkit that can chew through just about any audio or video format you throw at it. This method is perfect for developers or anyone who needs to batch-process a folder full of videos in one go.
A single line of code can rip the audio in seconds. While the lack of a graphical interface can be intimidating for some, its raw speed and efficiency are second to none for repetitive tasks or automation.
3. Audacity: Extract Directly into Your Audio Editor
For podcasters, musicians, or anyone who plans to edit the audio immediately after ripping it, this is the most efficient route. Audacity is a fantastic free audio editor, and with the FFmpeg library installed, it can open video files directly, importing only the audio stream.
It does require a quick, one-time setup to link the FFmpeg library in Audacity’s preferences. But once that's done, you can just drag and drop a video file (like an MP4 or MOV) right into the editor. The audio appears as a waveform, ready for you to trim, clean up, or add effects.
This approach is all about streamlining your workflow:
- Ideal for: Creators who want to extract and edit in a single step.
- What you'll need: A one-time setup of the FFmpeg library for Audacity.
- The big advantage: You avoid the clunky process of exporting from one tool just to import into another.
4. Online Converters: The Quick and Easy Solution
Don't want to install anything? For a quick, one-off job, a browser-based tool is your best bet. An online audio extractor lets you upload a video, choose an audio format, and download the resulting file, often in just a couple of minutes. It's incredibly handy when you're on a machine where you can't install software.
Of course, there are a few trade-offs with this convenience. Most free online tools impose file size limits, and the conversion process can be slower than a desktop application. You'll also need a decent internet connection for uploading and downloading. For sensitive or private content, using an offline tool is always the safer choice.
Isolating Specific Sounds with AI Technology
Grabbing the entire audio track from a video is a solid first step, but what if you only want a tiny piece of it? Maybe you need to lift the dialogue from a busy street interview, sample a killer drum break from a live concert clip, or just capture the clean sound of footsteps for a foley project.
This is where basic audio ripping hits a wall. But thankfully, modern AI tools have completely changed what's possible.
Instead of just getting one mixed-down audio file, you can now dive in and pull out individual sounds with stunning accuracy. We're talking about technology that goes way beyond the old-school vocal removers, giving you a level of control that was once pure science fiction for anyone outside a high-end studio.
Moving Beyond Basic Audio Ripping
The classic tools we've discussed are fantastic for one thing: turning a video into a single audio file. Think of it like baking a cake. Once it's done, you have the whole cake, but good luck trying to get just the eggs back out. If that complete audio mix is all you need, then tools like VLC or Audacity are your best friends.
But creative work is rarely that simple. A podcaster needs to get rid of a police siren wailing in the background of a crucial interview. A music producer wants to sample only the bassline from a grainy '70s music video. These jobs require a scalpel, not a sledgehammer.
The AI Difference: AI-powered tools don't just mindlessly copy the audio; they listen, analyze, and understand it. This lets you surgically remove or isolate sounds based on what they are, not just their frequency. It's a level of control that used to require a professional sound engineer and some seriously expensive software.
This leap forward takes you far beyond the basic ways to extract sound from video for free. It’s the difference between getting the final, flattened MP3 and getting the original multitrack session files.
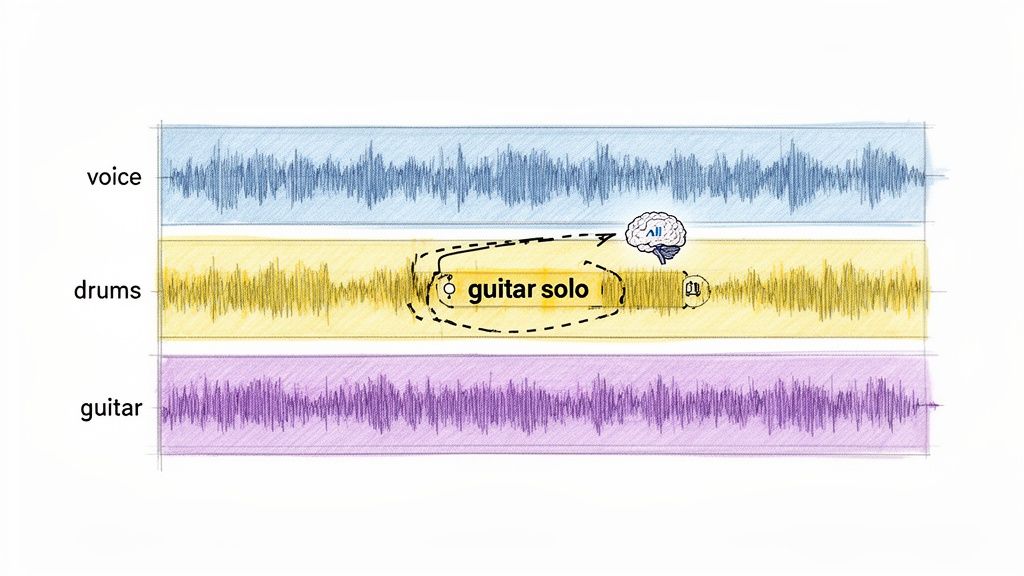
How Natural Language Unlocks Precision
The most exciting part of this new wave of audio tools is the ability to use natural language. Forget fiddling with confusing presets like "vocals," "drums," or "bass." Now, you can just tell the AI what you want in plain English.
It’s an incredibly intuitive and powerful way to work.
Let's say you have a video shot in a city park. You could give the AI specific, descriptive commands to clean up or separate the audio:
- "Isolate the sound of the fountain"
- "Remove the kids yelling in the background"
- "Extract the dialogue between the two people talking on the bench"
This approach makes complex audio editing genuinely accessible to anyone. A video editor can clean up field recordings by just typing "remove wind noise," saving hours of tedious manual work. It opens up a whole new world for remixing, sound design, and creating content that was simply out of reach for most of us before.
Choosing the Right Audio Format and Quality Settings
Alright, so you’ve successfully pulled the audio track from your video file. That's the first major hurdle cleared. But what you do next is just as crucial. Picking the right audio format and quality settings can be the difference between a crisp, professional-sounding track and something that’s muddy and disappointing.
This isn’t just a technical detail; it directly shapes how your final audio will be perceived. Think of it like the difference between a high-resolution photograph and a blurry, pixelated one. They're both pictures, but their quality and what you can do with them are worlds apart. Audio formats are pretty similar, and they generally fall into two camps.
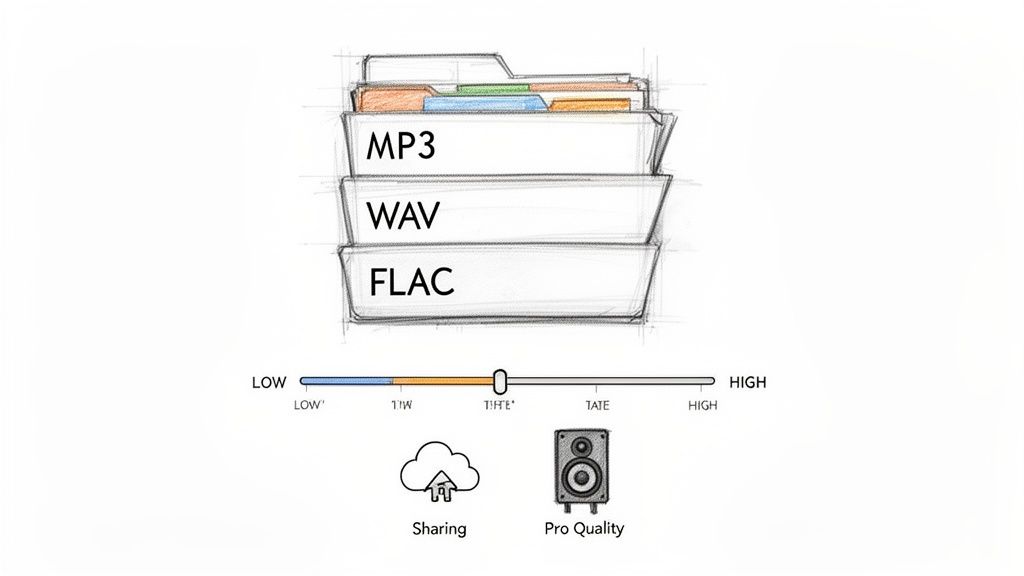
- Lossy Formats (MP3, AAC): These are the workhorses of the internet. They cleverly compress the audio by discarding bits of data your ears are least likely to miss. The result? Much smaller file sizes, which is exactly what you want for streaming, sharing online, or sending in an email.
- Lossless Formats (WAV, FLAC): These are the purist's choice. They keep every last bit of the original audio information, making them a perfect, uncompromised copy of the source. The files are massive, but if you're doing serious music production or archiving something for a professional project, this is the only way to go.
Understanding Bitrate and Its Impact
So, what makes one MP3 sound great and another sound like it's coming through a tin can? The secret is bitrate, which is measured in kilobits per second (kbps). Simply put, it’s the amount of data used to create each second of sound. More data means a higher bitrate and, you guessed it, better audio fidelity.
A common rookie mistake is just cranking the bitrate to the maximum setting every time. That’s often overkill. If you've just ripped the audio from an interview or a lecture, a 192 kbps MP3 is going to sound perfectly clear for speech. Bumping it up to 320 kbps will just make the file bigger without any real benefit you can hear.
On the other hand, if you’re extracting a rich musical performance full of complex layers and harmonies, that’s when 320 kbps really shines. It helps preserve the subtle details that a lower bitrate would smooth over and lose.
Key Takeaway: Always match your bitrate to your content. For spoken word, 128–192 kbps is your sweet spot. For music, you'll want to aim for 256–320 kbps to keep that richness. And for anything going into a professional studio session, stick with a lossless format like WAV, no questions asked.
Why Quality Settings Matter for AI Tools
These settings become even more critical when you're planning to use AI tools to isolate or clean up specific sounds. The quality of the audio you feed the AI has a massive impact on its ability to do its job well. Think of it as "garbage in, garbage out." A clean, well-encoded file gives the algorithm a much better chance of success.
Recent benchmarks show that AI-powered tools are miles ahead of older methods. In some tests, AI tools have been shown to retain 95% of the original audio fidelity when separating stems, while traditional software struggled to hit 70% on complex video files. I've even seen podcast teams cut their editing time by 60% just by converting their raw recordings to clean 192 kbps MP3s before running them through a dialogue isolation tool.
If you find yourself needing to switch formats after you've already extracted the audio—say, you have a huge WAV file but need a smaller MP3 to share—make sure you use a good tool for the job. To avoid losing quality in the conversion, it's worth checking out how to use a reliable audio converter to get it done right.
How to Fix Common Audio Extraction Problems
It’s happened to all of us. You follow all the steps to rip the audio from a video, and the result is... not what you expected. The file is silent, the sound is horribly out of sync, or it’s full of strange digital noise. It's frustrating, but don't worry—most of these hiccups are pretty common and usually have a simple fix.
Think of this as your troubleshooting guide for those moments when things go sideways. Let's dig into the most frequent issues you'll run into and how to sort them out.
Solving Audio and Video Sync Issues
This is one of the most maddening problems. You extract the audio, but when you play it back, the dialogue is a few seconds ahead or behind the action you remember from the video. More often than not, this is a frame rate mismatch.
Videos run at a specific frame rate (like 24, 30, or 60 frames per second), while audio has a sample rate (like 44.1 kHz). If the software you're using gets confused and misinterprets these values during the conversion, the timing will slowly drift apart.
Pro Tip: The fastest way to fix this is often just to try a different tool. If VLC gave you a file with sync issues, give Audacity or FFmpeg a shot. Different programs have their own ways of reading a file’s metadata, and another one might get it right on the first try.
If a new tool doesn't solve it, your next move is to check the properties of the original video file to find its exact frame rate. Some advanced software will let you manually input this information during the extraction, forcing everything to line up correctly.
Why Is My Exported Audio File Silent or Corrupted?
You hit "export," watch the progress bar fill up, and then... nothing. The file is either completely silent or so corrupted that your media player can't even open it. This almost always points to a codec issue or a botched conversion process. A codec is just the bit of software that encodes and decodes media, and if the right one isn't available, the process fails.
Here’s a quick checklist to run through:
- Check the File Extension: Did you remember to add
.mp3or.wavat the end of the filename? It seems basic, but some older programs occasionally forget to do it for you. - Unsupported Video Format: Is the original video in a weird or obscure format? The extraction tool might not know how to handle it. A reliable workaround is to first convert the video into a standard format like MP4 using a free tool like HandBrake, and then extract the audio from the new file.
- Not Enough Disk Space: This one sounds obvious, but it catches people out. If you're low on storage, the export might fail midway, leaving you with a broken, 0 KB file.
Dealing with Poor Sound Quality and Artifacts
Sometimes the audio comes out, but it just sounds bad. You might hear clicks, pops, or a weird, watery sound. These are called digital artifacts, and they're usually a sign that your quality settings were too low during the export.
When you choose a low bitrate, you're telling the software to throw away a lot of audio data to create a smaller file. This can completely wreck music or anything with a complex soundscape. The fix is simple: just re-export the file and choose a higher bitrate—for MP3s, try 256 kbps or even 320 kbps for the best quality.
If the problem is more about a constant background hum or hiss that was present in the original video, you may need a more specialized tool to clean it up. For a deep dive on that, check out our guide on how to remove background noise from audio to get your final track sounding pristine.
Got Questions About Extracting Audio?
When you first start ripping audio from video, you’re bound to run into a few common questions. It happens to everyone. From the legal gray areas to the technical limits of free software, let's clear up the most frequent hurdles you might face.
Think of this as the "what you need to know before you start" guide. Getting these answers now will save you a ton of headaches later and help you pick the right tool for the job.
Is It Actually Legal to Rip Audio from a Video?
This is the big one, and the answer is: it depends.
If it’s a video you shot yourself—say, a family gathering or a clip for your own vlog—you own it. Go nuts. You can do whatever you want with that audio because it’s your content.
But when you're dealing with copyrighted material like movies, TV shows, or commercial music, things get tricky. Using that audio in a public or commercial project without permission is a fast track to copyright infringement problems. That said, using a short clip for personal projects, a school assignment, or a critical review might fall under "fair use," but those rules can be complicated and vary by country.
My advice? If your project is going to be seen by the public, stick to your own content or use audio from royalty-free libraries. It's just not worth the risk.
Can I Isolate Just the Vocals from a Music Video for Free?
Yes, you absolutely can, but your standard audio ripper won't cut it. Tools like VLC or a basic online converter are great for grabbing the entire audio track, but they can't separate the vocals from the instruments. They just don't have that kind of precision.
For that, you'll need a more specialized tool—specifically, an AI-powered stem separator. These tools are trained to identify and separate the different layers of a song. Many of them have free plans that are perfect for pulling out a vocal track for a remix or creating a DIY karaoke version of a song.
What’s the Best Free Tool for High-Quality Audio?
The "best" tool really boils down to what you're trying to accomplish. There isn’t a single one-size-fits-all answer.
Here’s how I think about it:
- For Maximum Audio Fidelity: If you just need the full, untouched audio track in the best possible quality, I'd point you toward Audacity or FFmpeg. They let you export into lossless formats like WAV or FLAC, which means you won't lose any of the original sound quality.
- For Isolating Specific Sounds: If your goal is to pull a single element—like dialogue from a noisy scene or a specific drum beat—out of the mix with real clarity, a dedicated AI audio isolation tool is going to give you much cleaner results.
How Do I Get the Audio from a YouTube Video?
Since YouTube doesn't have a built-in "download audio" button, you’ll have to use a third-party tool. There are tons of free online converter sites designed specifically for this. You just paste the YouTube URL, and they do the rest.
A word of caution, though: Be mindful of YouTube's terms of service and copyright. This method is really meant for your own personal use, or for videos that are in the public domain or have a Creative Commons license. Always double-check that you have the rights to the audio before you download it.
Ready to move beyond basic ripping and start isolating sounds with pinpoint accuracy? Isolate Audio uses AI to understand what you're asking for. You can pull out vocals, specific sound effects, or even individual instruments just by typing a description. Try it for free and hear the difference for yourself at Isolate.audio.