
How to Isolate Voice from Background Noise Cleanly
A good interview can become difficult to use once you hear the recording on headphones: a fan sits under the dialogue, traffic swells between answers, or another person keeps talking just out of frame. Turning up the volume won't fix that. It raises the voice and the competing sound together, so the cleaner result starts with identifying what's getting in the way and choosing a method that fits.
Match the Method to Your Type of Noise
A noisy interview in a café and a voice recorded beside an air conditioner need different fixes. Before you open an editor, listen to a pause and then to a section where someone speaks. Identify the loudest interfering sound. Use the table to choose a first pass, not as a promise that processing can erase every trace.
| Noise type | Typical example | Best first method | What to expect |
|---|---|---|---|
| Steady hiss, fan or hum | Laptop fan, air conditioner, mains hum | Noise reduction with a noise profile from room tone | Hiss drops, voice mostly intact |
| Room echo | Small hard-walled room, bathroom, kitchen | Dereverberation or re-record closer to the mic | Less boxy sound, clearer consonants |
| Other people talking | Café conversation, group interview, crowd chatter | AI voice separation with the target speaker described | Partial recovery; check the remainder track |
| Traffic, sirens or crowds | Street interview, sporting event, public transit | AI separation naming the voice and interfering sound | Usable on speech-dominant clips |
| Music under dialogue | Background track in a vlog or podcast intro | AI separation of voice from music | Good results; watch for warbling on sustained notes |
For steady hiss or hum, a short section of room tone gives traditional noise reduction a profile to work from. If reflections make a voice sound distant or boxy, use dereverberation or improve the microphone position; neither approach can turn a reflective room into a perfectly dry studio. For a guide to the simpler case, see this walkthrough on removing hiss from a recording.
Competing speech is the difficult case. In a study of 60 listeners with normal hearing, the signal-to-noise ratio needed for 50% word recognition was about −12.4 dB under multitalker babble, compared with −15.8 dB under white noise. The listener study on speech recognition in different noise conditions found the lowest word-recognition scores with multitalker babble. Other voices share many of the target speaker's speech characteristics, so a separator can mistake parts of the wanted voice for background, or leave pieces of competing speech behind.
For traffic, sirens, or music, describe both the target and the interference when the tool allows it. A useful rule is to name the loudest interfering sound first, then choose the matching row. Don't keep increasing suppression just because the first pass leaves a trace. The remaining noise may be less distracting than the artifacts caused by pushing too hard.
How to Isolate the Voice Step by Step
Keep the first pass reversible. That way, you can compare the processed result with the original and change your approach without damaging the only copy.
Save the original untouched. Put a copy in its own folder before editing. Keep it out of the processing workflow so you can return to the unaltered audio at any point.
Listen once and name the interference. Write down what you hear in plain words, such as crowd noise, traffic, a fan, or a second speaker. The description gives you a practical starting point instead of a vague instruction to “clean everything up.”
Upload the recording. Drag the audio or video file into your editing tool. Isolate Audio accepts formats including WAV, FLAC, MP3, M4A, and MP4, and handles conversion for you. Its workflow is three steps: upload the audio, describe the sound to isolate, then download the tracks.
Describe the target voice specifically. Use a plain-English prompt such as “the interviewer” or “the male host voice.” Isolate Audio takes natural-language descriptions, so you can name the sound rather than selecting only a fixed category.
Run a standard first pass. Start with the default quality setting and listen before changing anything. This gives you a baseline and helps reveal whether the issue is leftover noise, a damaged voice, or both.
Audition both outputs. Listen to the isolated voice and the remainder on headphones, then check them on a phone speaker. The remainder helps reveal whether the tool removed background sound cleanly or took pieces of the target voice along with it.
Try Precision mode for overlap. If other voices still bleed into the target, test a short excerpt with the more precise setting before processing the whole recording. A clearer description of the target speaker can also help separate one voice from nearby conversation.
Export and check sync. Save the isolated voice for editing and keep the remainder for recovery or reference. If the audio belongs to a video, line it up with the picture and confirm that the voice stays in sync from beginning to end.
The process flow is simple: save the source, diagnose the sound, upload, then isolate the target.
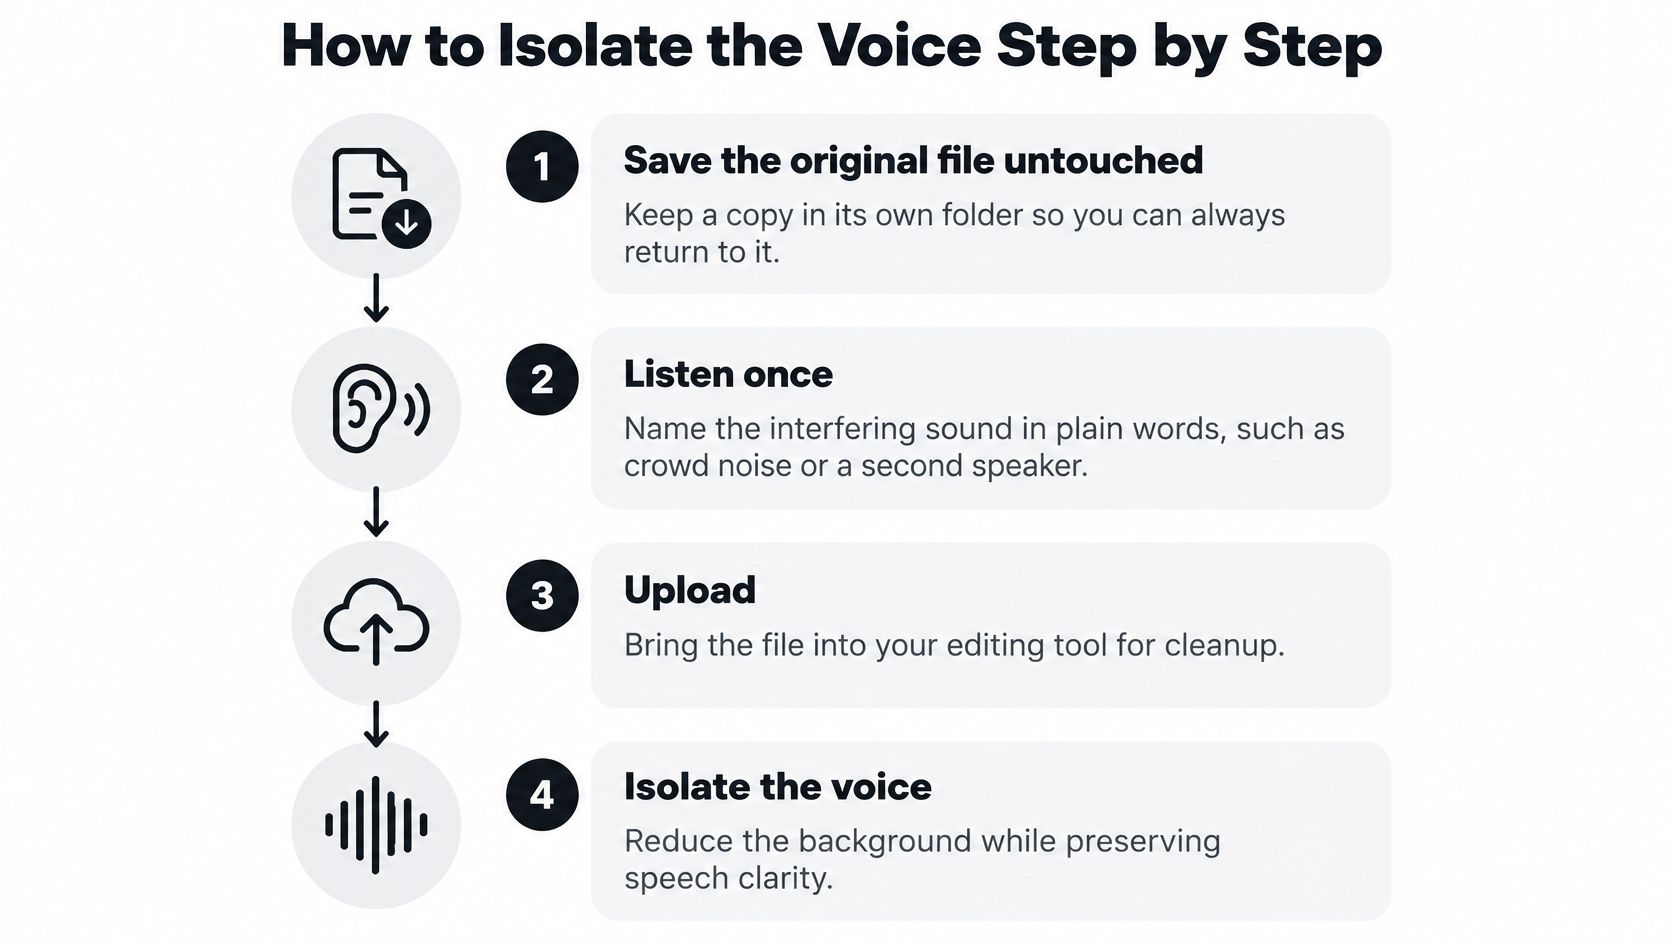
A successful pass leaves crisp consonants, removes distracting room noise, and keeps the target voice out of the remainder. If your next step is turning interviews or research recordings into searchable notes, this guide to organizing recordings into ELN-ready records offers a useful way to carry the audio into a documentation workflow.
For another walkthrough of the process, watch this video.
Quality Settings and Export Formats That Keep Dialogue Clean
Run a test pass before committing to a full file. A standard setting is usually enough to reveal whether the target voice is separating cleanly. Use a higher-precision, slower mode when several speakers overlap or a difficult mixture leaves unwanted voices in the output. For more detail on choosing a quality setting, see this guide to high-quality audio presets.
| Stage | Recommended setting | Why it matters |
|---|---|---|
| Sample rate | Keep the source rate unless the model needs resampling | Avoids extra conversion artifacts |
| Gain | Normalize conservatively before processing | Aggressive gain amplifies noise with the voice |
| Test pass | Standard setting on a short clip | Catches problems before a full run |
| Final voice export | WAV or FLAC for editing | Keeps quality through further edits |
| Delivery | MP3 at a high bitrate only for the final file | Limits compression to the last step |
Preserve the original, avoid converting it to a lossy format before processing, and don't use heavy gain or compression to make a quiet recording louder. Those changes can bring up the noise along with the speech and damage delicate consonant sounds. An evaluation reported that microphones with a 75 dB signal-to-noise ratio delivered up to 40% better speech intelligibility than 65 dB-SNR microphones in babble noise, as described in this microphone evaluation on signal-to-noise ratio.
For long recordings, split the file into overlapping chunks, process each piece, then crossfade the joins so the voice doesn't jump at the seams. Keep the source sample rate unless the model requires resampling, and audition difficult passages separately. Gating or echo effects applied during recording can complicate separation, so capture a clean source and process it once rather than stacking fixes blindly. If you need help taking cleaned audio through a finished video project, a guide to video editing services can help you plan the broader production workflow.
Fix Muffled, Robotic or Clipped Voices
A muffled or underwater voice usually means suppression has gone too far. The tool is removing details that help speech sound natural, not just the background. Start by lowering the suppression strength and rerunning the same clip, rather than adding EQ to disguise the problem.
| Symptom | Likely cause | Fix |
|---|---|---|
| Muffled or underwater voice | Suppression set too strong | Lower the strength and rerun on the same clip |
| Robotic or metallic tone | Musical noise from heavy suppression | Reprocess shorter segments with less gain |
| Clipped consonants (t, s, k) | Quiet speech removed with background | Compare with the remainder and lower suppression |
| Second speaker still audible | Target voice description too vague | Name the speaker more specifically; try Precision mode |
| Warbling on a long file | Whole file processed in one pass | Segment into overlapping chunks and crossfade |
| Room echo remains | Strong reflections in the recording | Apply dereverberation or re-record closer to the mic |
A metallic or warbling quality often comes from aggressive spectral processing. Try a shorter segment and less gain, then compare the result with the original. Don't assume the most silent output is the best one. If the remainder contains clipped consonants, you may be able to recover them by lowering suppression and checking which speech details moved into that track.
A lingering second speaker calls for a more specific target description. Say which voice you want, then try Precision mode if the voices still overlap. When the whole file wavers, process overlapping chunks and crossfade the joins. That can fix a processing seam; it won't repair strong room echo, which needs dereverberation or a new recording closer to the microphone.
When to Re-Record Instead of Processing
Some recordings can't be saved cleanly. Between 60 dBA and 85 dBA of background noise, average intelligibility fell from roughly 95% correct to about 80%, and the effective signal-to-noise ratio declined by approximately 0.44 dB for every additional 1 dB of background noise. Above 85 dBA, performance on the Modified Rhyme Test dropped below 80%, according to this study of speech intelligibility in noisy public spaces. When the voice is buried, processing can't restore speech information the microphone never captured.
Use these triggers to decide when to stop trying another pass:
The remainder contains more of the target voice than the isolated output. The separation is removing wanted speech. Reposition the microphone closer to the speaker and make a fresh recording if possible.
The voice sits under extreme noise, especially above 85 dBA. If you can record again, choose a quieter room or wait for a quieter time. Adding soft furnishings can also reduce reflections in a hard-surfaced room.
More than two voices overlap at similar levels. If the speakers can repeat the conversation, record them separately or move the microphone close to the person whose voice matters most.
Consonants remain clipped after two passes with lower suppression. Stop processing and re-record if you can. Move closer to the speaker, reduce room reflections, and avoid recording during the loudest noise.
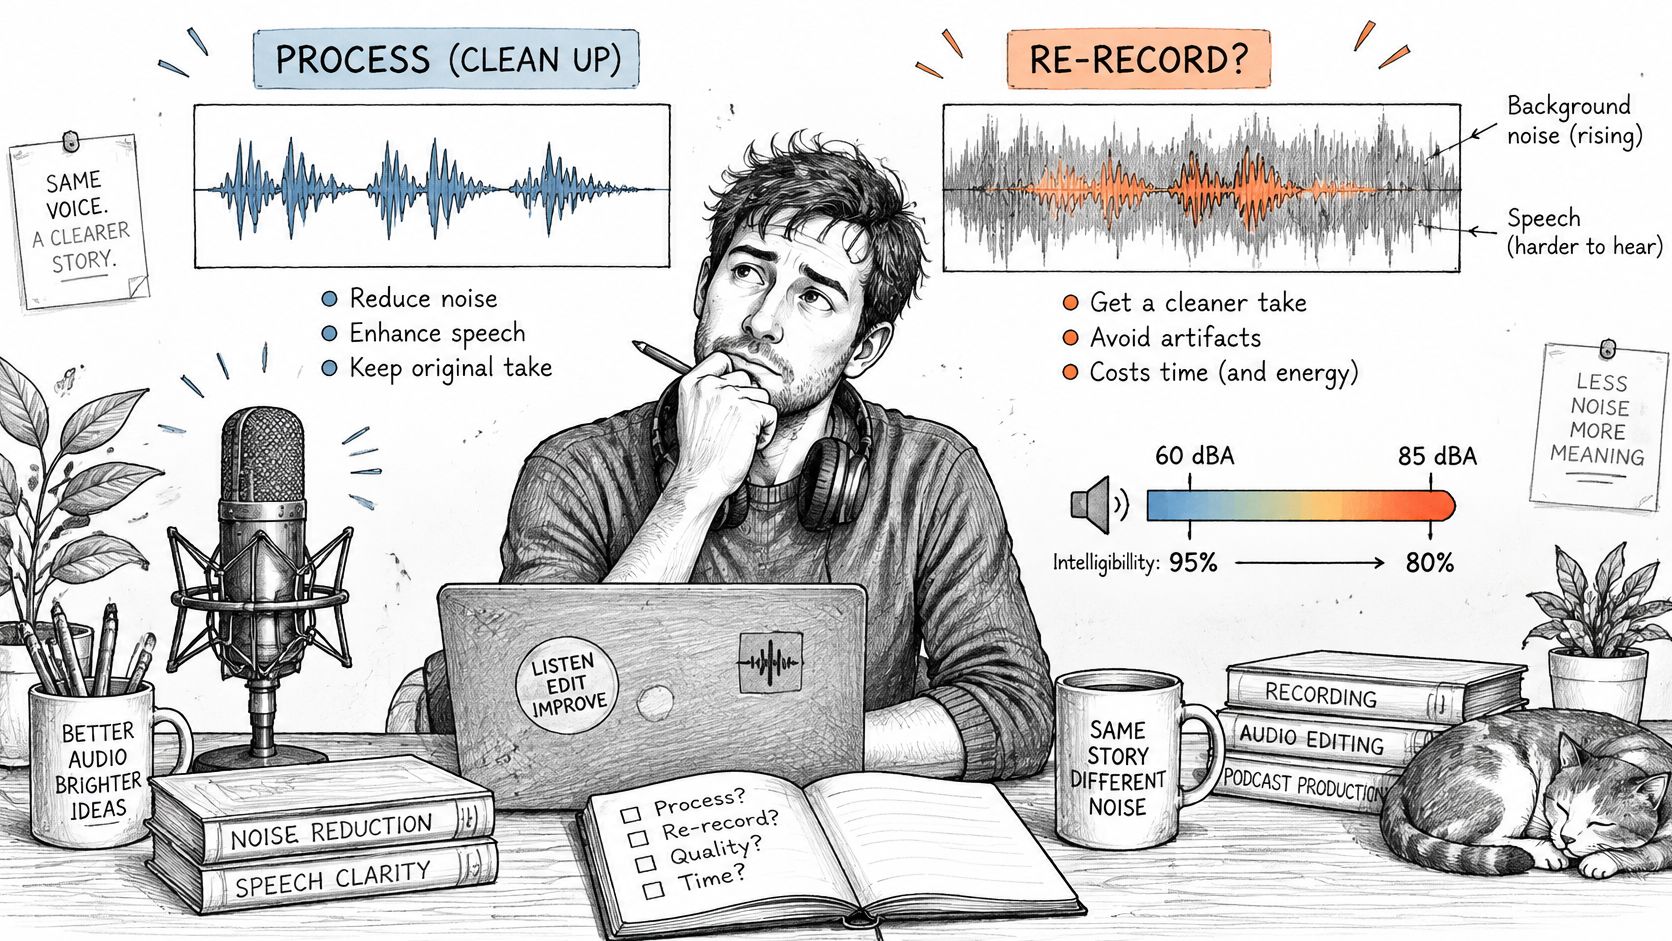
A signal-to-noise ratio describes how prominent the desired voice is relative to competing sound. This guide to signal-to-noise ratio in audio can help you interpret why a distant voice is difficult to extract. Keep a short note of what changed after each pass. If the result stops improving, use the time to reposition the mic or schedule a retake instead.
Test Accents and Overlapping Voices Before You Publish
A clean waveform can still be hard to understand. A separator may reduce noise while making a particular accent, code-switch, or overlapping voice less intelligible, so judge the result by what listeners can follow, not just by how quiet the background sounds.
Build a test clip that includes an accented speaker, a sentence that switches languages, and two voices talking over each other. Process it with the settings you plan to use, then run speech-to-text on both the original and the isolated file. Compare the transcription errors and listen for words that disappeared or changed.
The coverage limits matter. A 2026 evaluation of speech-recognition systems tested only three languages and identified broader language coverage, including Slavic and Asian languages, as an unresolved need. A separate speaker-identification evaluation reported strong accuracy at moderate noise levels but limited coverage of heavily accented and multilingual speech, reverberation, and overlapping speakers, as summarized in this evaluation of speech-recognition robustness across conditions. Your own test clip is more relevant than a clean English demo if your recording contains different speech patterns.
For objective checks, SI-SDR measures distortion, STOI estimates intelligibility, and PESQ evaluates perceived speech quality. Published systems on DNS Challenge-style data reported STOI values from 0.70 to 0.98, but the result depends on the recording and evaluation conditions; a benchmark also found that improving PESQ could coincide with lower STOI, as discussed in this speech-enhancement benchmark. Don't optimize for a single score.
Before publishing, check three things: consonants remain clear, the remainder doesn't contain the target voice, and the isolated track has no distracting warbling or metallic artifacts. If transcription matters, compare the words too.
Run a Test Isolation on Your Recording Today
Choose the recording with the most distracting problem and match it to the noise type that best describes it. Upload the full file or a short excerpt, name the target voice in plain English, and identify the interfering sound. Isolate Audio lets you describe a sound rather than choosing only from fixed categories, and each separation gives you an isolated track and a remainder to review.
Listen to both outputs on headphones and a phone speaker. If the remainder holds only the noise, tune the settings if needed and export the voice. If the remainder contains speech or the recording meets the re-record triggers, stop processing and make a cleaner take if that's possible.
Use the same excerpt for each tuning pass and keep a brief log of the prompt, setting, and result. That makes comparisons fair and gives you a repeatable starting method for the next recording. Isolate Audio's Free plan costs $0 forever and includes 5 audio separations per month; the Pro plan includes best-quality processing, WAV and FLAC output, files up to 30 minutes, a priority queue, Precision mode, and email support.
Process when the method matches the noise and the remainder confirms a clean separation. Re-record when it doesn't.
Isolate Audio lets you describe the voice or other sound you want to isolate in plain English and download both the isolated track and the remainder. Try a test on your noisiest recording, compare both outputs, and visit Isolate Audio to get started.