How to Extract Background Music from Video Like a Pro
To pull the background music out of a video, you'll need a tool that can dig into the audio track and separate its core components—things like vocals, music, bass, and drums. These days, AI tools like Isolate Audio make this surprisingly simple. You can often just upload a video file, type what you want to isolate, and get a clean audio file back in WAV or MP3 format.
So, Why Bother Extracting Music from Videos Anyway?
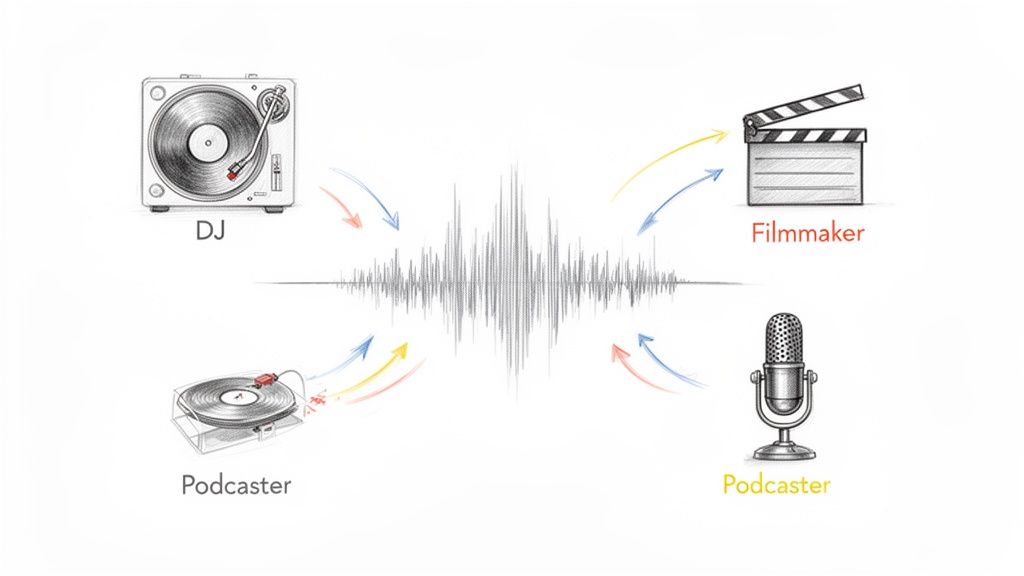
Ever watched a movie and thought, "That score would be perfect for my own project"? Or maybe you're a DJ who stumbled upon an incredible, unreleased track in a live concert video and you're itching to remix it. This is exactly why knowing how to extract background music from a video has become such a game-changing skill for creators. It's less about the technical process and more about unlocking creative potential that was previously sealed away.
This skill opens up a ton of possibilities. A filmmaker, for instance, could grab a subtle ambient track from one scene and weave it into another to keep the mood consistent. Podcasters can clean up interviews recorded in noisy places by stripping out distracting background tunes, making the conversation pop.
Unlocking Creative and Commercial Value
Getting clean audio separations isn't just a niche hobby; it's a big deal in the content world. The global background music market was valued at USD 2.96 billion in 2024 and is expected to hit USD 6.8 billion by 2034. That growth is all about the demand for perfectly tuned audio experiences in everything from retail stores and hotels to digital content, where the right music can make a huge difference in keeping people engaged. You can learn more about these background music market trends and their projected growth.
The real magic of audio extraction is its power to reverse-engineer a finished product back into its raw, creative parts. It gives you the freedom to sample, remix, and reimagine audio in ways the original creator might never have even considered.
This ability to deconstruct and repurpose sound is what fuels so much innovation in music production, filmmaking, and content creation.
What's really exciting is the move away from clunky, manual editing in traditional software. We're now seeing a shift toward simple, intuitive AI-driven processes that put high-quality audio separation in everyone's hands, not just the audio pros.
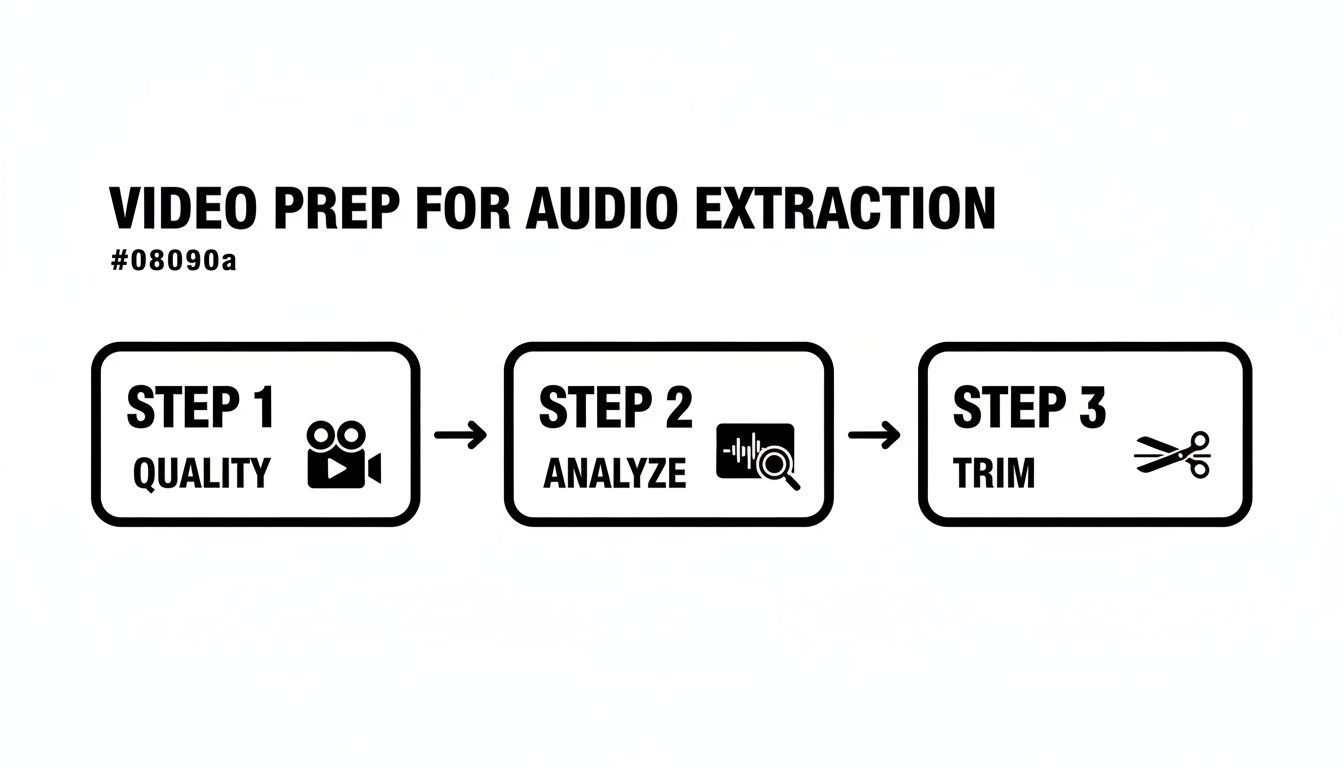
Setting Your Video Up for a Clean Extraction
Before you even think about hitting that "extract" button, a little prep work can make a world of difference. It's like a chef getting their ingredients ready before starting a complex recipe—it just makes the final result that much better. The whole idea is to give whatever tool you're using the cleanest possible audio to work with.
The most critical first step? Always start with the highest quality video file you can get your hands on. Every time a video gets compressed, saved, or uploaded somewhere, a little bit of audio detail gets shaved off. Trying to pull music from a heavily compressed social media clip is like trying to restore a painting from a blurry photograph; the essential information is already gone.
So, if you can, grab the original source file. We're talking about the MP4 or WebM that came straight off the camera or out of your editing software. This ensures the audio track has its full fidelity, giving the separation AI much more data to work with. A higher bitrate file almost always means a cleaner musical extraction with fewer weird digital artifacts.
Analyze Your Audio Landscape
Next, just listen. Put on some headphones and really pay attention to the video's sound. Is the music you want to grab playing throughout the whole clip, or does it fade in and out? More importantly, are there moments where dialogue or loud sound effects crash the party? Pinpointing these "problem areas" ahead of time helps you set realistic expectations.
For instance, a scene with quiet dialogue over a soft instrumental track is going to be a much easier job than a chaotic action sequence with explosions and music battling for the spotlight. Knowing this helps you choose the right settings later. If you're just getting started, brushing up on how to extract audio from a video is a great place to begin.
Trim for Precision and Speed
Once you've found the best spot, trim your video down to just that section. There's no sense in making an AI process a two-hour movie when you only need a 30-second music cue. It's a massive waste of time and can even muddy the results, as the tool has to sift through tons of irrelevant noise.
By trimming your clip to the essential part, you're not just saving time—you're focusing the AI's power exactly where it's needed. This simple action is one of the most effective ways to prevent a messy, artifact-filled extraction.
You don't need fancy software for this. Most video editors, even the free ones that come with your computer, can handle a simple trim. Just isolate the portion where the music is the star of the show and export that little piece as a new file. This focused approach is the secret to getting clean background music from almost any video.
Using AI to Isolate Music with Isolate Audio
Modern AI tools have completely changed how we pull background music from videos. Forget fiddling with complex settings and confusing interfaces. With a tool like Isolate Audio, the process feels more like a conversation. You're not just clicking a generic "music" button—you’re telling the AI precisely what you're after.
Instead of being stuck with pre-defined stems like "vocals" or "drums," you can use plain English. This means you can type "the cinematic background score" or "the upbeat synth track" to get a specific, targeted result. That level of control is what makes today’s AI so powerful, giving you a degree of precision that once took hours of painstaking manual editing.
This evolution in audio tools makes perfect sense when you look at the booming digital music market, which hit USD 22.0 billion in 2023 and is expected to climb to USD 54.5 billion by 2033. This massive growth is fueled by creators who need versatile audio—think pulling a specific guitar riff from a live concert video for a remix or cleaning up dialogue for a podcast. You can learn more about the expanding digital music content market and its impact on creative tools.
Before you dive in, a little prep work goes a long way. This quick workflow sets you up for the best possible results.
Starting with a high-quality file, taking a moment to analyze the soundscape, and trimming the clip gives the AI a clean slate to work from, which always leads to a cleaner separation.
Choosing Your Quality Presets
Not every project needs the same level of audio fidelity, and you don't always have time to wait for a perfect render. Isolate Audio gets this, offering simple presets so you can find the right balance for the job without getting bogged down in technical specs.
- Best: This is your go-to for the highest fidelity separation. I use this when I'm pulling a track for a film score, a professional remix, or any project where pristine audio quality is an absolute must.
- Balanced: This preset is my workhorse. It offers a great mix of quality and speed, making it perfect for creating clean backing tracks for social media or isolating music for a YouTube video. It sounds great without a long wait.
- Fast: When I just need to quickly check an idea or grab a rough cut, this is the one. It processes files in a snap, which is great for auditioning musical elements or creating a quick practice loop.
This flexibility means you’re not stuck waiting on a high-quality render when a quick preview is all you really need. If you're looking for a simple tool to get started, our handy online audio extractor is a great place to begin.
Tackling Tough Overlaps with Precision Mode
So, what do you do when dialogue and music are completely tangled together? It's a classic problem for filmmakers and creators—crucial lines of dialogue are getting drowned out by a loud score. This is exactly why a feature like Precision Mode exists.
Precision Mode is designed for these tough situations. It activates a more intensive analysis model that meticulously untangles overlapping frequencies, resulting in a much cleaner separation of both the music and the dialogue.
Imagine a documentary scene where a narrator is speaking over a powerful orchestral piece. A standard separation might leave behind faint, "ghostly" artifacts of the voice in the isolated music. By switching on Precision Mode, the AI can more accurately differentiate between the spoken words and the instrumental tones, keeping both elements intact. It’s the tool I turn to for rescuing audio that would otherwise be a lost cause.
Before AI tools made it easy, pulling background music from a video was a real hands-on challenge. It’s worth looking at these older, more manual methods to really appreciate how far the technology has come.
These classic techniques, usually found in a Digital Audio Workstation (DAW), were the only game in town for years. They required a lot of patience and a good ear, but they laid the groundwork for the tools we use today.
Knowing these foundational methods isn't just a history lesson; it helps you understand why AI is so effective and gives you fallback options if you ever need them for a simple audio fix. This whole field is exploding, too—the music and streaming services market is expected to jump from USD 32.4 billion in 2025 to a massive USD 118.1 billion by 2035. That growth is all about the demand for high-quality, remixed, and repurposed content. You can read a full breakdown of the booming music and streaming market on futuremarketinsights.com.
The Old-School DAW Approach in Audacity
For a long time, scrappy creators and audio engineers turned to free software like Audacity to try and separate audio tracks. The process was more of a workaround than a clean solution—think of it like trying to un-bake a cake to get the eggs back. You might get something, but it’s going to be messy.
Two techniques were the go-to methods:
- EQ Filtering: This is where you use an equalizer to carve out the frequencies where the human voice usually lives, which is typically between 1 kHz and 4 kHz. The huge downside is that tons of musical instruments—guitars, keyboards, snares—also occupy that same frequency space. You end up with a muffled, thin-sounding track that often still has faint, ghostly bits of dialogue.
- Phase Inversion: This clever trick only works under perfect conditions. If you have a stereo audio file and a separate instrumental version of that same file, you can flip the phase of one track. When you play them together, the identical parts cancel each other out, theoretically leaving only the vocals behind. It’s a neat concept, but finding those perfect source files for a random video is next to impossible.
These methods show how people got creative with the tools they had, but they’re just not practical for getting a clean, usable music track today.
Adobe Audition’s Center Channel Extractor
Adobe Audition offered a slightly more advanced solution with its Center Channel Extractor effect. The logic here is that in most standard stereo mixes, lead vocals are placed dead center, while instruments are spread out to the left and right to create a wider sound.
This tool zeroes in on that center channel to remove whatever is sitting there—usually the vocals.
The Center Channel Extractor is a definite step up from basic EQ, but it's far from perfect. It often struggles when vocals have reverb or echo, leaving behind wispy "tails." It can also accidentally remove any instruments panned to the center, like a kick drum, snare, or bass guitar, leaving you with a weirdly hollow-sounding track.
It’s a decent tool for reducing dialogue bleed in some situations, but it’s not designed for cleanly isolating a full musical score. It sits in a middle ground—better than tedious manual filtering, but nowhere near the precision of today’s AI-powered separators.
How to Polish Your Extracted Audio Track
Getting the raw audio file is a huge win, but your work isn't quite done. Think of that downloaded WAV or FLAC file as a rough diamond—it has potential, but it needs a final polish to truly shine in your project. This last stage is what separates a decent extraction from a professional-sounding asset.
The first thing I usually do is pull the track into a Digital Audio Workstation (DAW). Tools like the free Audacity, Apple's Logic Pro, or Ableton Live give you surgical control over the sound. Even if the AI did a fantastic job, you might find tiny, lingering artifacts from other sounds that bled through. A little cleanup here makes a world of difference.
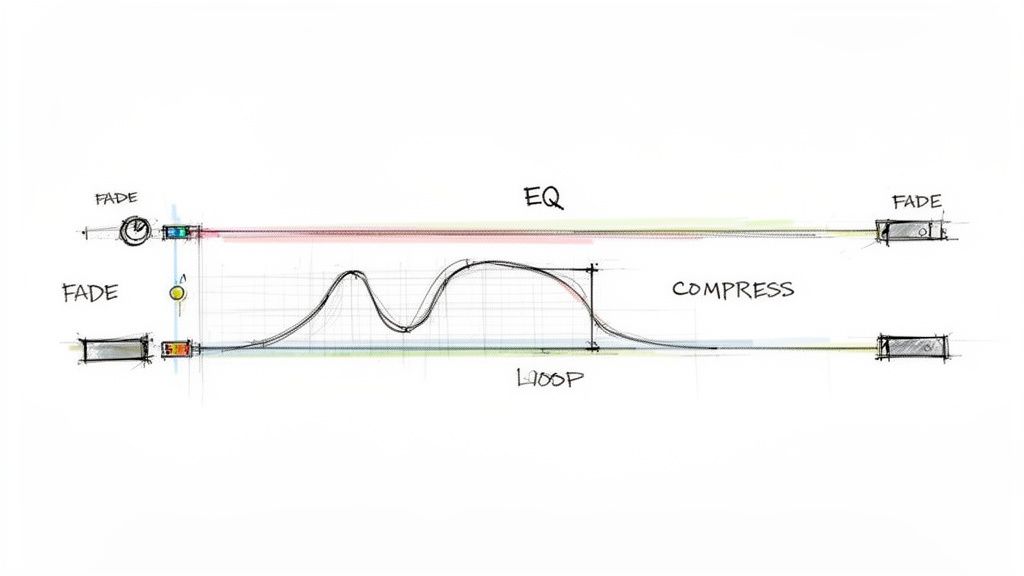
Fine-Tuning with EQ and Dynamics
Your most powerful tool for this cleanup job is the equalizer (EQ). With a subtle EQ, you can gently scoop out specific frequencies where artifacts might be hiding. For instance, if you hear a slight bit of vocal "ghosting," a small cut in the 1-4 kHz range can often work wonders without butchering the music. The key here is to be gentle; drastic changes will just make the track sound strange and unnatural.
Next up, let's look at the track's volume. Normalization is a simple process that brings the entire track up to a consistent, maximum level without distorting it. It’s perfect for giving your music a strong, professional presence. If you're working with a track that has a wide dynamic range—very quiet parts and very loud parts—a bit of light compression can even things out, creating a much smoother listening experience.
Post-processing isn't about fixing a bad extraction; it's about elevating a good one. Subtle adjustments in a DAW are what make your extracted music sound intentional and seamlessly integrated into its new home.
Adapting the Music for Your Project
How you approach this final polish really depends on where the music is going. Your end goal will dictate which techniques you use to finalize the audio.
- For Musicians: If you're creating a practice loop, your main focus will be finding clean, seamless loop points. I recommend zooming way in on the waveform and looking for "zero-crossings"—those are the points where the wave is at the center line. Starting and ending your loop there will help you avoid audible clicks or pops when it repeats.
- For Video Editors: When blending the music into a new video, your priority is making it sound like it belongs. This is all about finesse. Add gentle fade-ins and fade-outs so the music doesn't start or stop abruptly. Sometimes, applying a touch of reverb can also help the track sit more naturally within the new audio environment.
These final touches are crucial for a polished result. If you find your track still has some persistent humming or hiss that the AI missed, you can find more targeted advice in our guide to reduce background noise from any audio. Taking these extra steps ensures your extracted music is truly ready for whatever you have planned.
Have Questions About Extracting Music? Let's Get Them Answered.
Jumping into audio separation for the first time? It's normal to have a few questions. Let's tackle some of the most common ones I hear, so you can move forward with your project confidently.
The biggest one, without a doubt, usually revolves around the legal side of things. It's crucial to remember that just because the technology lets you isolate a track, that doesn't automatically give you the right to use it freely.
Is It Actually Legal to Use Music I Pull from a Video?
This is the most important question, and the answer comes down to one word: copyright.
You should always operate under the assumption that the music is copyrighted. If it is, you cannot legally use it in a commercial project or share it publicly without getting a proper license from the copyright holder. It's that simple.
Now, if you're just using the track for personal practice, private study, or a critique, your use might fall under the "fair use" doctrine. But be warned, "fair use" is a notoriously gray area and its interpretation can vary wildly depending on where you are. For anything you plan to publish or share, you absolutely need to use royalty-free music or get the rights to the track you isolated. There are no shortcuts here.
A key takeaway from my years in this field: Technical ability does not equal legal permission. Always put copyright first to protect yourself and your work from serious legal headaches.
What's the Best File Format to Use for Music Extraction?
For the cleanest possible results, you need to think about quality at both the start and the end of your workflow.
Always start with the highest-quality video file you can get your hands on. A high-bitrate MP4 or, even better, the original camera file, will have the most audio data for the AI to work with. When it's time to export your isolated music, always choose a lossless format like WAV or FLAC.
These formats are uncompressed, meaning they keep all the original audio information intact. An MP3 might be a smaller file, but it achieves that by throwing away data ("lossy" compression), which can make any little imperfections from the separation process sound much, much worse.
Why Does My Extracted Audio Sound a Little Warbly or Robotic?
Those weird, watery sounds you're hearing are called "artifacts." They're a common side effect that happens when an AI model has a tough time untangling sounds that are mashed together. You'll hear them most in really busy scenes where the music is fighting with dialogue and sound effects for space in the mix.
How do you fix it? The best defense is a good offense. Start with a high-quality source file and use a robust AI tool with different quality settings, like the 'Best' preset in Isolate Audio. Sometimes, a more specific prompt can help the AI zero in on the right sound. While you might be able to clean up minor artifacts with some EQ in post-production, nothing beats a clean extraction from the get-go.
Can I Isolate Just One Instrument Instead of the Entire Music Track?
Yes, you absolutely can! But this is where the tool you choose makes a massive difference.
Older, traditional stem separators are pretty rigid. They're programmed to look for pre-defined categories like 'vocals,' 'bass,' 'drums,' and 'other.' They have no idea how to handle a request like "get me just the saxophone solo" or "pull out that lead guitar riff."
This is precisely where natural language AI tools shine. Instead of clicking a button, you just type a description of the sound you're after. This opens up a whole new world of creative possibilities, letting you pinpoint individual instruments or specific musical phrases in a way older tools just can't compete with.
Ready to stop guessing and start getting clean, professional audio separations? Isolate Audio combines the power of AI with the simplicity of typing what you want. Just upload your video and tell it exactly what you need. Try Isolate Audio today and hear the difference for yourself.