How to Isolate Sound in a Room That Actually Works
Acoustic foam is one of the most popular answers to room noise, and one of the least reliable when the problem is sound travelling between rooms. Foam can reduce reflections inside a space, but it won't seal a door gap, stop footsteps through a ceiling, or keep bass from passing through a shared wall. Before buying anything, find the path the sound is taking. That diagnosis determines whether a seal, a heavier barrier, a change to the recording setup, or more substantial construction is likely to help.
Why Acoustic Foam Alone Will Not Isolate Your Room
Isolation and acoustic treatment solve different problems. Isolation reduces sound travelling through a room's boundaries. Absorption reduces reflections within the room, which can make speech or music sound clearer at the listening position or microphone. Foam wedges can help with that second job, but they don't add the mass, airtightness, or structural separation needed to meaningfully block sound from a neighbour or keep your own noise from reaching one.
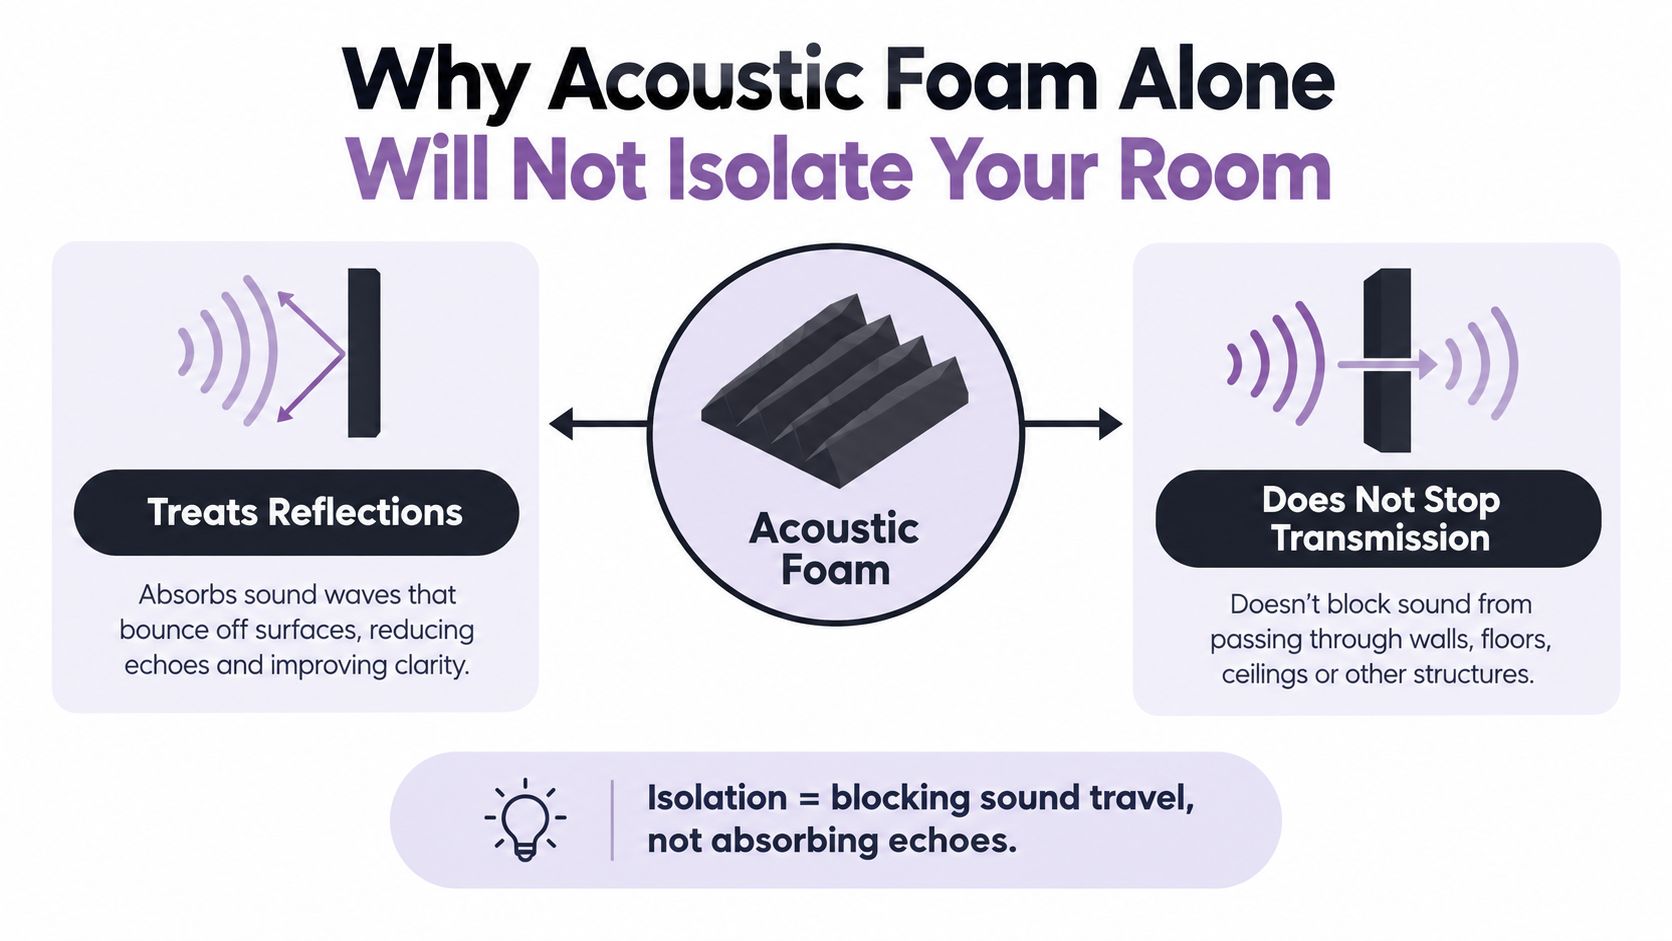
The distinction matters in a bedroom, home studio, or office. If a recording sounds hollow, absorption may help. If you can hear a conversation through the wall, or a neighbour can hear your voice, you're dealing with transmission. A room can sound controlled inside and still leak sound through its door, window, ceiling, or service openings.
What STC tells you, and what it leaves out
The principal North American rating for airborne sound isolation is Sound Transmission Class (STC). Laboratory testing under ASTM E90 measures transmission loss across 16 one-third-octave bands from 125 to 4,000 Hz, and ASTM E413 turns those results into one rating. That gives a useful way to compare partitions for common indoor noise such as speech, television, and radio, but STC isn't a universal measure of quietness. It doesn't fully describe bass-heavy music, footsteps, or structural vibration. The history and limitations of STC help explain why a single wall rating can't predict every real-room complaint.
A rating also depends on the complete construction, not just a wall's visible face. Doors, windows, outlets, ducts, and flanking paths can undermine a stronger partition. A useful starting point for understanding sound isolation versus noise cancellation is to separate the sound travelling through a boundary from the reflections you hear within a room.
How to isolate sound in a room starts with identifying which job you need done. Treat echoes with absorbers. Reduce sound passing between spaces by finding and improving the weakest transmission paths.
Diagnose the Transmission Path Before Buying Materials
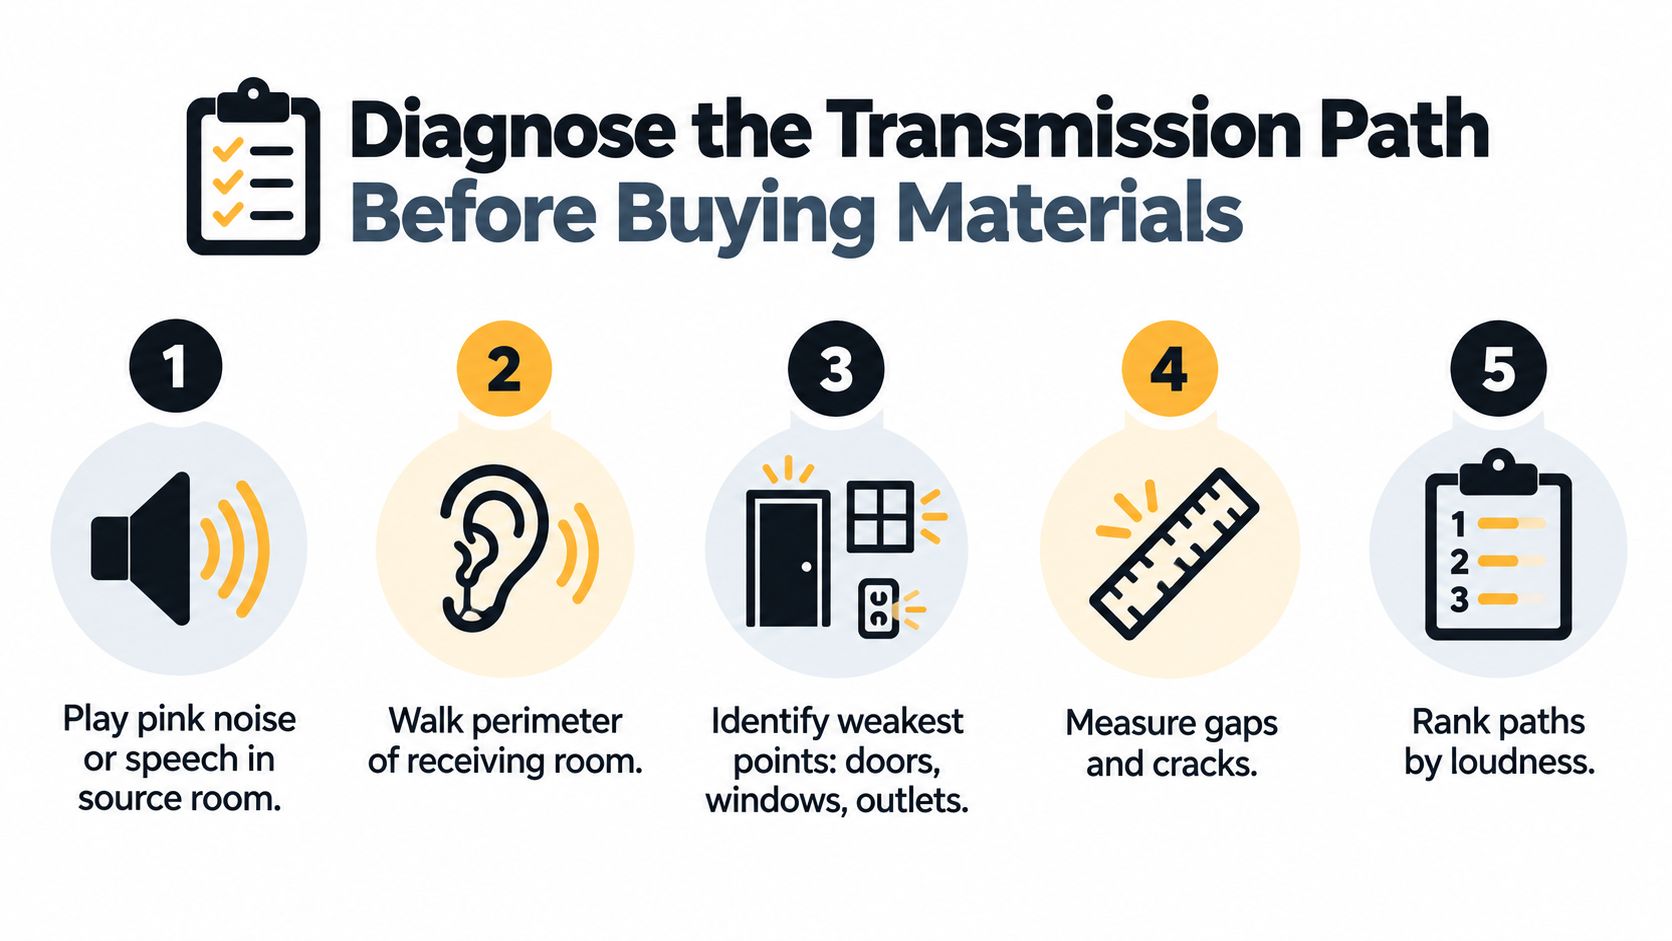
Don't start with a shopping cart. Start by finding out where the sound gets through. If possible, have someone play speech or broadband noise in the source room at a steady, moderate level while you listen from the receiving room. Walk slowly around the perimeter and pause at each junction, opening, and service penetration. You're looking for changes in audibility, not trying to prove a wall's rating by ear.
Run a listening route
Begin with the door. Check the frame and the gap beneath it, then listen around window frames and glazing. Move on to electrical outlets, HVAC grilles, ceiling edges, recessed lights, pipe openings, and the wall-to-floor junction. In a home with a suspended ceiling, sound may travel over the partition and through the ceiling void. Shared joists and other continuous structures can also carry vibration around the wall you thought was the problem.
Use this simple checklist, marking each point as clear, noticeable, or strong:
- Door and frame: Listen around the perimeter and at the threshold. Hollow-core doors and undercuts often leave an easy route for voices.
- Windows: Check both the glass and the frame. A poorly sealed sash can be the weak point even when the adjacent wall is substantial.
- Outlets and penetrations: Listen near electrical boxes, pipes, and cable openings. Look for visible gaps, but don't remove electrical covers unless you can do so safely.
- Air paths and ceiling edges: Check grilles, recessed lights, ceiling tiles, and the point where the partition meets the ceiling.
- Floor and structure: Listen at floor-wall junctions and note whether low sounds seem to arrive through surfaces rather than through the air.
If the sound is bass-heavy or feels like a vibration, record that separately from speech. A door seal may reduce voices but won't necessarily solve vibration through a floor or shared framing. The difference between soundproofing and acoustic treatment is useful when choosing whether to treat a reflection problem or address sound leaving the room.
Practical rule: Fix the loudest, clearest weak point first. A high-rated wall can't compensate for an open gap around a door or a sound path that bypasses it through the ceiling.
The Mass, Decoupling, Absorption, and Airtightness Sequence
For a new or rebuilt partition, think in terms of mass, decoupling, cavity absorption, and airtightness. Each principle tackles a different part of the problem. Mass makes a surface harder to move with sound energy. Decoupling reduces direct vibration transfer between the faces. Porous insulation in the cavity dissipates energy within the space. Sealing closes the gaps that let sound bypass the assembly.
A cited assembly provides a useful reference point: one 5/8-inch gypsum panel on each side of a partition, with a 1.5-inch sound-attenuation blanket in the cavity, is reported at STC 53 under its assembly specification. That's a laboratory benchmark, not a promise about a finished room. Doors, windows, ventilation, installation details, and sound travelling around the wall can all reduce field performance. Berklee's discussion of room acoustics also emphasizes the importance of the full assembly and its weak points.
Put the sequence to work
In construction, begin with the partition's mass, then separate its faces with an appropriate stud or resilient-channel design. Fill the cavity with mineral wool or fiberglass, and seal the perimeter and penetrations with acoustical sealant. Don't assume that adding a soft product to the room-facing surface replaces the structural work.
For renters, the same principles translate into smaller, reversible steps. Weatherstripping and a door sweep address leakage around the door. A well-filled bookcase can add some mass at a shared wall, though it won't behave like a properly built isolated partition. Heavy curtains may soften some higher-frequency sound at a window, but aren't a substitute for a sealed window or a window insert. Before adding any wall layers, check whether the sound is escaping through a gap or arriving through a different surface.
| Principle | DIY-friendly example | Approx. cost | Reversible | Main job |
|---|---|---|---|---|
| Mass | Place a full bookcase at a shared wall | Varies | Yes | Adds weight at the surface |
| Decoupling | Use a removable freestanding barrier where space allows | Varies | Yes | Reduces direct contact with the wall |
| Absorption | Add mineral wool or fiberglass within a suitable cavity assembly | Varies | Depends on installation | Dissipates energy in the cavity |
| Airtightness | Fit removable weatherstripping and a door sweep | Varies | Usually | Closes gaps around openings |
The table's cost descriptions are deliberately qualitative because materials and installation vary. The order matters: seal obvious leakage before investing in added layers, and don't mistake absorbent room treatment for a barrier to sound transmission.
DIY Fixes, Acoustic Panels, and Full Construction Compared
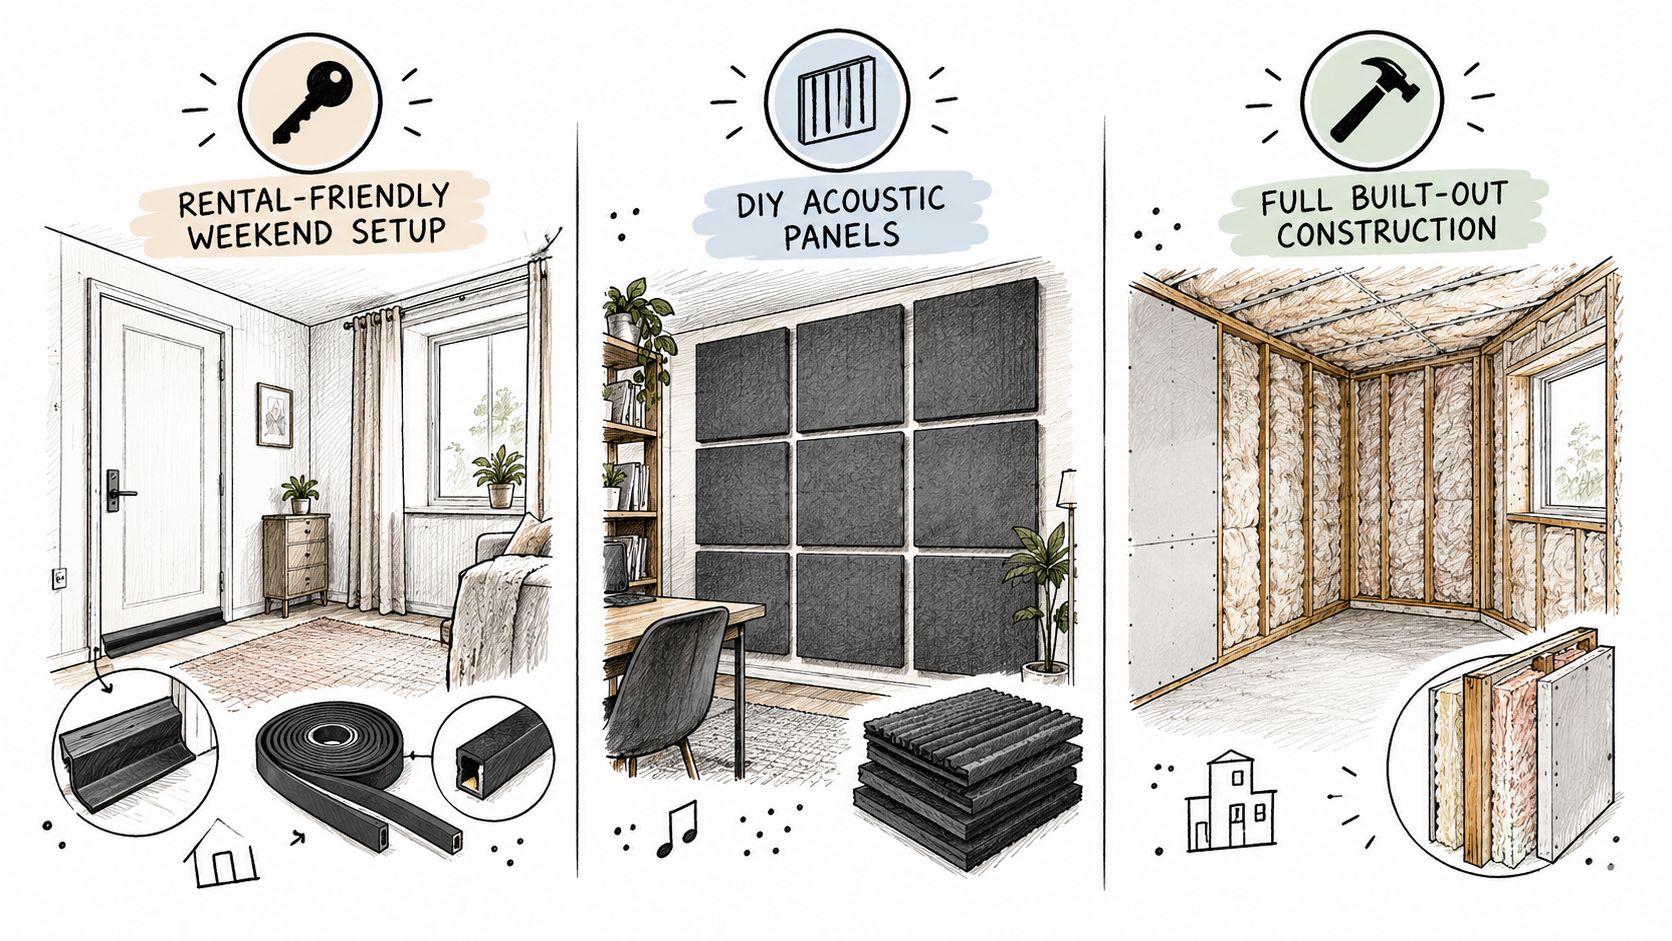
A renter-friendly pass can make a room less leaky without opening walls. Fit removable weatherstripping around the door, add a door sweep where permitted, and check that the frame closes firmly. Heavy curtains or a window insert may help with a window path, while a bookcase can add weight at a shared wall. These measures are reversible or relatively easy to undo, but they won't turn a lightweight bedroom partition into a studio wall. They're most useful when the diagnostic walk points to a small number of obvious weak spots.
Match the intervention to the problem
A more serious home-studio setup might combine a solid-core, gasketed door with improved perimeter seals and a suitable drop seal, alongside treatment for the room's reflections. Dense absorbers can improve recordings by controlling the sound that bounces around the room. They don't, by themselves, isolate the room from neighbours. A ceiling cloud also controls reflections; it isn't a replacement for a decoupled ceiling assembly where the noise is travelling through the structure.
Full construction is a different category. A designed assembly may use separated or double-stud walls, resilient channels, cavity insulation, and carefully sealed perimeters. That work can take up space, affect ventilation and services, and require permission or professional detailing. If the complaint is bass or impact noise, get the transmission path assessed before building a new wall. A wall-only solution can disappoint if the dominant path runs through the ceiling, floor, or a connected structure.
| Approach | What it can address | Where it falls short |
|---|---|---|
| Reversible room fixes | Door and window leakage, some airborne speech, minor gaps | Bass, structural vibration, and flanking paths |
| Studio treatment | Reflections and recording clarity, combined with targeted sealing | Treatment alone doesn't create a sound-isolated enclosure |
| Structural construction | Airborne transmission and, with suitable design, vibration paths | Cost, lost space, building constraints, and detailing risk |
For floor and impact complaints, the construction target may be the floor-ceiling assembly rather than a wall. Guidance on floor soundproofing options can help frame the trade-offs, especially when footsteps or dropped objects are the main issue.
Recording choices can reduce what the microphone hears
Isolation is not only a building project. A singer in an apartment living room can place a cardioid dynamic microphone close to the mouth and aim its rear rejection toward the loudest noise source. That can reduce room sound in the recording, but working close increases proximity effect, which adds bass emphasis. A pop filter helps control plosives. A reflection shield may reduce some sound reaching the rear of the microphone, but it won't block noise coming through the room's boundaries.
A podcaster near a street-facing window might choose a cardioid microphone and arrange the setup so the microphone's least-sensitive direction faces the traffic. A condenser can capture more quiet detail, including room and background noise, so placement and distance matter. For a producer recording drums in a spare bedroom, microphone choice and placement help manage spill between instruments, but they won't prevent the kit from vibrating through the floor. If multiple microphones are capturing separate sources, the 3-to-1 rule is a placement guideline used to help control phase interaction, not a soundproofing measure. Choose the pattern and position that reject the problem source before adding another panel.
Building a Vocal Booth Without Renovating the Room
A vocal booth doesn't need to be a permanent room-within-a-room. For voiceover or spoken-word recording, a clamp-mounted reflection filter can reduce some reflections around the microphone. It's portable and simple to position, but it provides limited isolation from traffic, neighbours, or noise coming through a wall.
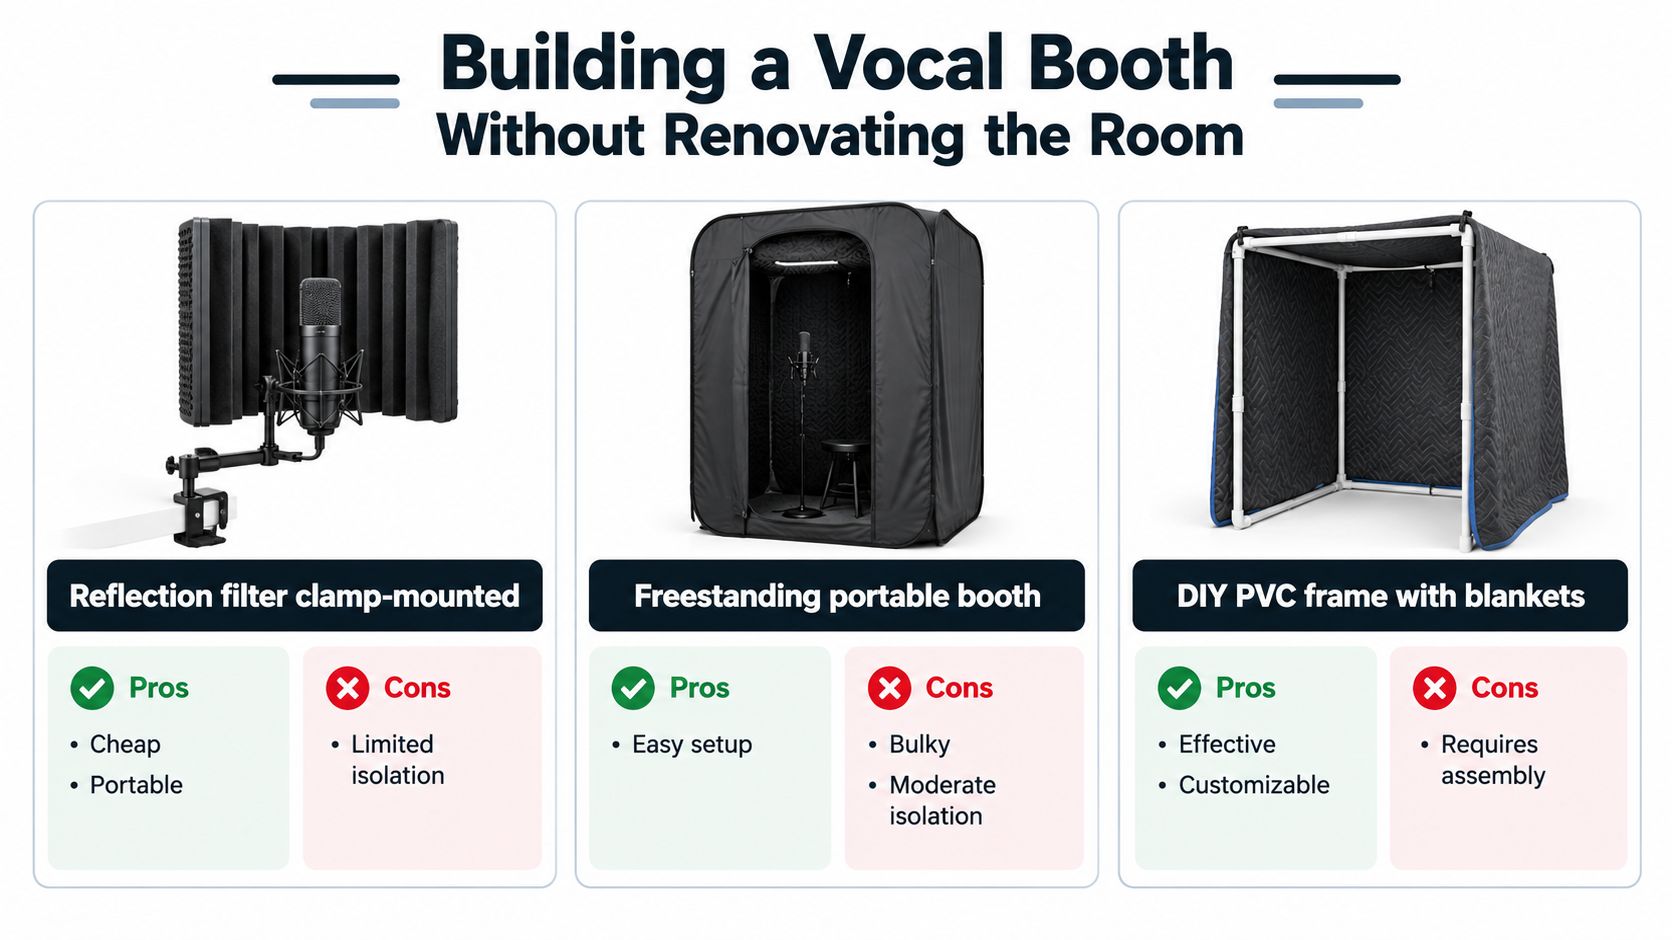
A freestanding portable booth can give a voice actor a more controlled recording area without modifying the room. It's easier to set up than a construction project, but takes floor space and shouldn't be confused with a fully isolated recording booth. For sung vocals, avoid crowding the performer into a tiny, overly reflective enclosure. A little space and controlled absorption usually produce a more natural take than surrounding the microphone with soft material on every side.
Make a movable gobo
A DIY gobo is a freestanding absorber that can be positioned around a singer or used near a reflective surface. Build a sturdy frame, fill it with mineral wool, and cover the exposed faces with breathable fabric. A 2-inch mineral-wool panel in a simple 1-by-3 frame is one possible design; add a stable base or casters if you need to reposition it. Keep the panel secure, and choose materials and coverings appropriate for the space.
For a singer, place the gobo to interrupt reflections from a nearby wall without enclosing the microphone completely. For voiceover, use it to reduce a strong reflection from behind the performer. For drum microphones, a movable absorber can help control room reflections and spill between instruments, but it won't stop impact vibration from reaching another floor.
The microphone still needs sensible placement. Put the performer close enough to maintain a strong direct voice relative to the room sound, then adjust for proximity effect and plosives. A portable setup can improve the recording, but it can't substitute for a properly sealed, massive, decoupled boundary when the goal is preventing sound from leaving the room.
For recording and podcasting workflows, podcaster recording considerations can help you think through microphone placement and the kinds of unwanted sound that may remain in a take.
A demonstration of a portable vocal setup can also help you compare the practical options before building anything:
Handling Bass, Footsteps, and Impact Noise
Bass and footsteps are where surface-only DIY fixes often fail. A thin foam panel can reduce reflections in the room, but it won't add meaningful isolation against low-frequency energy or vibration. Lightweight doors and walls are more easily set in motion than heavy, well-detailed assemblies, and structure-borne sound can reach a room without passing directly through the wall you treated.
First, listen for the character of the noise. Speech usually has a clearer airborne quality. Bass may be more noticeable in corners or felt through a floor, while footsteps and dropped objects can sound like brief thuds or vibration. This is a practical distinction, not a substitute for measurement. Airborne isolation and impact transmission are separate performance questions, as described in guidance on room sound isolation and field effects.
Choose the assembly, not the foam
If a shared wall is the dominant path, added mass and a properly decoupled inner layer may help, provided the design addresses edges and junctions. If the noise comes from above, the floor-ceiling assembly deserves attention. Where you can influence the source room, rugs or suitable floor coverings may reduce some impact noise. If you're working from below, a ceiling treatment designed for isolation may be more relevant than wall panels, though installation details and structural connections matter.
For a floor problem, resilient underlayment beneath a new floor finish can reduce some impact transmission, but it won't automatically solve airborne sound or vibration through other connections. Don't expect a loose rug in the receiving room to correct a poorly isolated floor-ceiling assembly. Structural bass problems often need specialist assessment, especially when sound is audible across several surfaces or vibration is felt through the building.
Verify rather than guess
Compare the room before and after a change using the same sound source, position, and playback level. A sine sweep can reveal whether some frequency ranges remain prominent, while a sound-level meter can help you keep comparisons consistent. Treat phone readings as a rough check, not a building-acoustics test. STC describes airborne performance over a defined frequency range; it doesn't capture every bass, impact, or structure-borne complaint. If a small treatment changes the room's echo but the low-frequency sound remains, you've improved absorption, not necessarily isolation.
When Physical Isolation Is Not Enough, Use AI Separation
Even a carefully treated recording space can capture room sound, HVAC hum, traffic, or bleed from another instrument. Physical isolation reduces what reaches the microphone, but it can't guarantee a perfectly clean take. Recording close to the intended source, choosing a microphone pattern that rejects the noise, and controlling the room remain the first line of defense. Post-production separation is a fallback for unwanted sound that made it into the recording.
Use separation as a repair tool
AI source separation can help recover a voice or instrument from a mixed recording, but it doesn't repair the room itself or stop sound passing into another space. The result depends on the recording: overlapping sources, reverberation, distortion, and noise can make separation harder. For a podcast recorded near street noise, separation may help bring dialogue forward. A remixer might use it to work with a vocal element, while a researcher could try to extract a target sound from a field recording. Listen critically to the output, especially where sources overlap.
Audio source separation explained covers the general idea of separating an intended sound from other material in a recording. Isolate Audio is one tool in this category: users upload an audio or video file, describe the sound they want in plain English, and download the isolated element along with the remainder. It offers Best, Balanced, and Fast quality presets, plus Precision Mode for challenging mixes with overlapping sources.
The practical workflow is still diagnosis first. Find the leak, seal or isolate what you can, set up the microphone to reject the loudest noise, and record a test. If unwanted sound survives, separation can help with the recording, but it won't replace construction where the goal is reducing noise between rooms.
Upload a recording with bleed, room rumble, or unwanted background sound to Isolate Audio, describe the element you want to isolate, and compare the result with the original. Use it as a post-production safety net alongside the physical fixes that address the room itself.