Ai Audio Cleanup - ai audio cleanup for crystal vocals and cleaner recordings
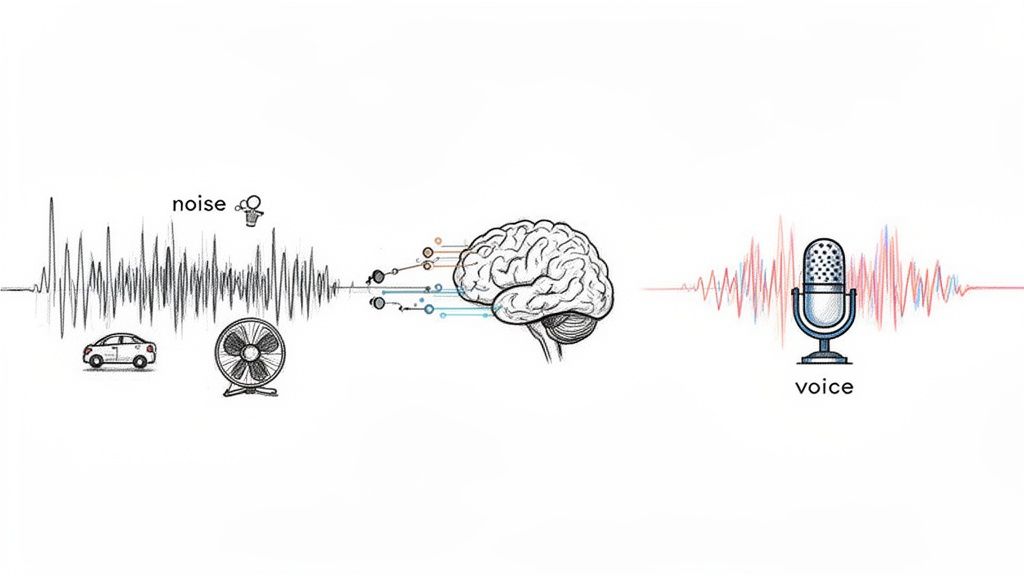
At its core, AI audio cleanup is about teaching a machine to listen intelligently. It uses smart algorithms to distinguish the sounds you want to keep—like a clear voice or a specific musical instrument—from all the distracting background noise you want to get rid of.
This tech digs into the very texture of a recording to surgically pull out things like wind noise, traffic rumble, or the annoying hum from a refrigerator, leaving you with a crisp, professional-sounding track.
Understanding Modern AI Audio Cleanup
Forget the clunky audio plugins and tedious manual editing of the past. Modern AI has moved way beyond simple noise gates that just crudely silence the gaps between words. Today's tools are more like a sonic scalpel, capable of understanding and isolating specific elements within a single, messy audio file.
Let's say you're editing a podcast interview recorded in a bustling café. The old way meant spending ages with an equalizer (EQ), trying to notch out the exact frequency of a humming espresso machine—a process that almost always took a bite out of the speaker's voice quality, too.
An AI tool changes the game. You can give it a simple instruction like, "remove coffee shop sounds," and it intelligently separates the voice from the clatter of plates and background chatter. It just knows what to listen for.
How AI Learns to Listen
This incredible precision comes from training machine learning models on massive datasets—we're talking thousands of hours of every kind of audio imaginable. This is how the algorithm learns the unique "sonic fingerprints" of different sounds.
Through this training, it learns to tell the difference between:
- Human Speech: It can identify the subtle patterns of various voices, accents, and pitches.
- Musical Instruments: It knows a guitar strum from a piano chord or a drum hit.
- Environmental Noise: It recognizes everything from a constant air conditioner drone to a sudden car horn.
This ability to understand context is what makes modern AI audio cleanup so effective. It doesn't just hear "noise"; it identifies what the noise is and figures out how to remove it without collateral damage to the audio you care about.
The bottom line: AI tools analyze the character and context of sound, not just its volume. This allows for incredibly targeted noise removal that preserves the original recording’s quality—a huge leap from older, more destructive methods.
To see the difference in action, here’s a quick breakdown of the old way versus the new way.
Manual vs. AI Audio Cleanup: A Quick Comparison
| Feature | Manual Cleanup (e.g., EQ, Gates) | AI Audio Cleanup (e.g., Isolate Audio) |
|---|---|---|
| Speed | Slow and time-consuming; requires manual adjustments. | Extremely fast; often processes audio in seconds. |
| Ease of Use | Requires technical knowledge and a trained ear. | Intuitive; often uses simple text prompts or presets. |
| Precision | Can be imprecise; often affects desired audio (artifacts). | Highly precise; isolates and removes specific sounds. |
| Consistency | Results can vary depending on the user's skill. | Delivers consistent, repeatable results. |
| Learning Curve | Steep. You need to understand concepts like EQs and gates. | Minimal. If you can type, you can clean your audio. |
The move toward AI-powered tools isn't just about convenience; it's a fundamental shift in how we approach audio production.
The Growing Demand for Clean Audio
The need for great-sounding audio has exploded, thanks to the boom in content creation and remote work. As a result, the AI-powered audio enhancer market is projected to skyrocket from USD 1,256.8 million in 2025 to an incredible USD 22,429.8 million by 2035.
This growth reflects the daily struggle of creators who need pristine audio but don't have access to a professional studio. If you're looking for the right tool, our guide on the best audio repair software is a great place to start.
The efficiency gains are undeniable. Many creators find they can clean up their recordings 2-3 times faster with AI than with manual methods, transforming a once-dreaded task into a quick final touch.
Getting Your Audio Ready for AI Cleanup
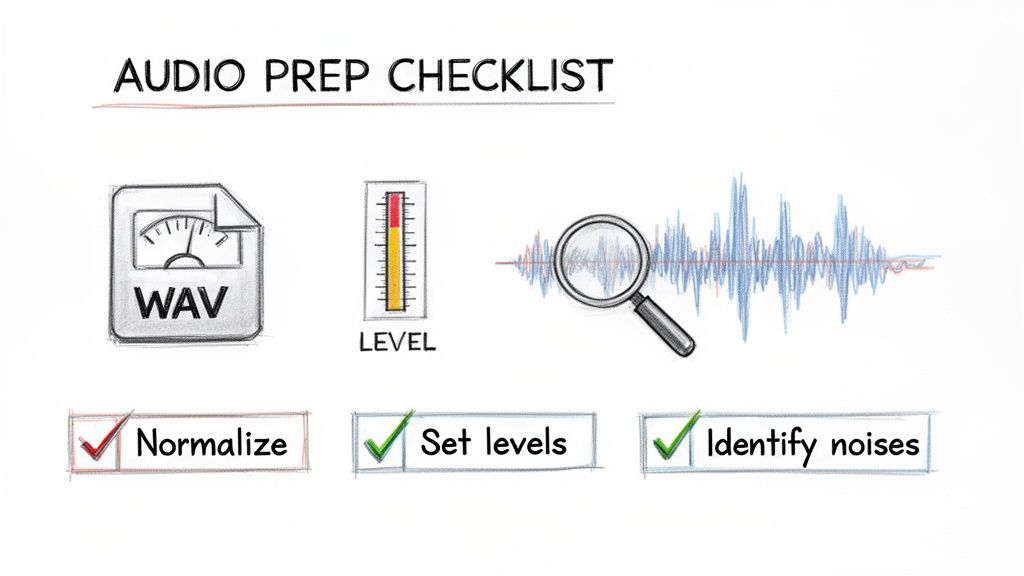
The secret to getting stunning results from any AI audio cleanup tool isn't just about the fancy processing. It's all about the prep work. Honestly, the quality of your source audio directly dictates what the AI can do with it.
Think of it this way: garbage in, garbage out. Feeding the AI a clean, well-structured file gives it the best possible shot at working its magic. A few minutes of prep can be the difference between a pristine final product and a frustrating afternoon of re-editing.
Start With a High-Quality File
I can't stress this enough: always try to start with a lossless audio format. MP3s are everywhere, but their compression algorithms permanently throw away audio data to save space. This can create weird artifacts that confuse the AI, making it harder to separate the good stuff from the noise.
- WAV or AIFF: These are your best friends. They're uncompressed, meaning they keep every single bit of the original audio. This gives the AI the most accurate, complete picture to work from.
- FLAC: This is another fantastic option. It’s a lossless compressed format, so it makes the file size smaller without sacrificing any quality.
Look, if an MP3 is all you have, the tool can still make a huge difference. But starting with a high-fidelity format like WAV almost always leads to a cleaner, more natural-sounding result.
Get Your Levels Right
Before you upload anything, you have to get your audio levels in the right ballpark. If your file is too quiet or way too loud, it can throw the AI for a loop.
When a signal is too loud, you get clipping—that awful, crunchy distortion. This is a nightmare to fix because the original waveform information is just gone. Even a powerful AI struggles to rebuild it from scratch.
On the flip side, if your audio is super quiet, the AI has to crank the volume, which also brings up the entire noise floor. All that underlying hiss and hum gets amplified, forcing the algorithm to work overtime to untangle the mess.
My Go-To Tip: Always normalize your audio first. I aim for a peak level somewhere between -3dB and -6dB. This gives you plenty of headroom to avoid clipping while keeping the signal strong enough for the AI to analyze properly.
Do a Critical Listening Pass
This is probably the most crucial step of all. Before you even open the cleanup tool, grab a good pair of headphones and listen to your entire recording from start to finish. Your job here is to be an audio detective.
Don't just listen for "background noise." You have to get specific.
- Is that a constant low-end hum from the HVAC system, or is it an intermittent buzz from a dodgy guitar cable?
- Do you hear a neighbor's dog barking around the two-minute mark?
- Is there a distracting echo or reverb because the room was too big and empty?
Identifying these specific problems beforehand lets you write much more effective prompts. It's the difference between telling a mechanic "my car is making a weird sound" and saying "there's a rattling noise coming from the front right wheel when I turn left." The more specific you are, the better the fix will be.
For a deeper dive into tackling these issues, our guide on how to remove background noise has a ton of great techniques.
Writing Prompts for Precise Audio Isolation
This is where you graduate from just using a tool to actually directing it. The real magic of modern AI audio cleanup is that it understands plain English. Forget fiddling with dozens of knobs and sliders—you can simply tell the AI what you want, giving you a level of surgical precision that used to be the exclusive domain of seasoned audio engineers.
The whole game is clear communication. These AI models aren't just matching keywords; they're genuinely interpreting the context of your request. It's this conversational approach that makes the tech so powerful and lets you pull off complex audio edits with a single sentence.
The Art of Specificity
Think of the AI as a brilliant but very literal assistant. Give it a vague command, and you'll get a vague result.
For example, telling it to "remove noise" is like asking a photo editor to "make the picture look better." Sure, it'll take a guess—probably targeting common culprits like hiss or hum—but it might completely miss the specific distracting sound you're trying to kill.
Now, let's get specific. Instead of that generic "remove noise," try one of these:
- "Remove the air conditioner hum"
- "Take out the echo in the room"
- "Get rid of the sound of typing on the keyboard"
- "Isolate the main speaker's voice from the crowd chatter"
Each of those prompts gives the AI a distinct target. It now has a sonic "fingerprint" to hunt for and eliminate, which leads to a much cleaner, more accurate result. The more detail you feed it, the better it can understand—and execute—your vision.
The demand for this kind of technology is exploding. The Audio AI Tools market, which includes platforms like Isolate Audio, is expected to jump from USD 1,046 million in 2024 to USD 2,260 million by 2034. Why? Because creators need these precise, prompt-based tools to claw back time, often slashing editing workflows by 40-60%. You can dig into more of the data in the full market analysis from Intel Market Research.
Crafting Prompts for Different Scenarios
The beauty of using natural language is how easily it adapts. You can tailor your instructions to the unique headaches of any project, whether you’re a musician, podcaster, or filmmaker.
For Podcasters and Interviewers
For you, it's all about dialogue clarity. Background noise from a messy remote recording or an on-location interview can tank an entire episode.
- Weak Prompt: "Clean up the audio."
- Strong Prompt: "Isolate the interviewer's voice from the coffee shop sounds."
- Pro-Level Prompt: "Separate the guest's voice on the left channel from the traffic noise."
For Musicians and Producers
Here, you're likely deconstructing a track for a remix, making a backing track, or just trying to salvage a demo recording. Your prompts need to speak the language of music. We dive even deeper into this in our guide on how to isolate vocals.
- Weak Prompt: "Isolate instruments."
- Strong Prompt: "Extract the acoustic guitar melody."
- Pro-Level Prompt: "Isolate the kick drum and snare, and remove the cymbal bleed."
My Personal Tip: When you're working with music, don't be afraid to get descriptive about the character of the sound. I’ve had great success with prompts like "isolate the distorted electric guitar riff" or "remove the low synth pad." The more adjectives you use, the better the AI can pinpoint what you're hearing.
For Video Editors and Filmmakers
Dialogue is king, but so is atmosphere. Your job is often to remove distracting on-set sounds—like a rustling jacket or a humming light—without killing the natural ambience of the scene.
- Weak Prompt: "Fix the dialogue."
- Strong Prompt: "Remove the wind noise from the outdoor scene."
- Pro-Level Prompt: "Isolate the actors' dialogue and reduce the sound of their footsteps on the gravel."
Why Descriptive Prompts Work Better
It’s pretty simple, really. A detailed prompt gives the AI more data to work with.
When you say "air conditioner hum," the AI knows to hunt for a consistent, low-frequency drone. When you specify "keyboard typing," it's searching for sharp, rhythmic, percussive sounds in a completely different frequency range.
This approach puts you in the director's chair of the audio restoration process. You're no longer just crossing your fingers and hoping a generic preset works. Instead, you're providing explicit instructions based on what your own ears are telling you. This collaboration between human hearing and machine intelligence is what gets you truly professional-grade results from your AI audio cleanup efforts.
Fine-Tuning and Optimizing Your Results
Your first pass with an AI audio cleanup tool will often get you 90% of the way there. But that final 10%? That’s where the magic happens and where true professional quality really shines through. This is the stage where you stop just giving commands and start sculpting the sound, using different processing modes and diving into advanced features to knock out the most stubborn audio gremlins.
Think of it this way: the initial AI pass is like a talented but unsupervised assistant. It did a great job on your main instruction, but now it's your turn to step in as the director, adding that final layer of polish and control. This is what separates a pretty good result from a flawless one.
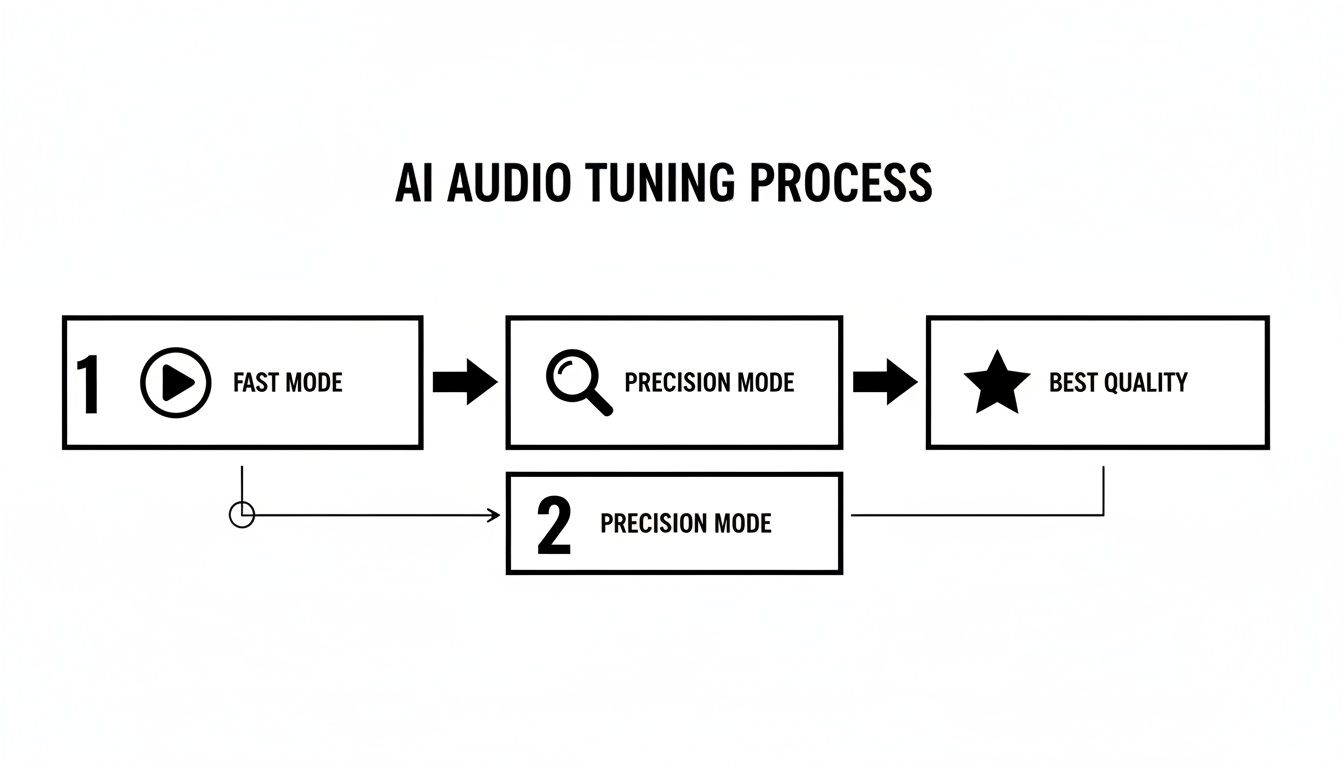
Choosing the Right Quality Preset
Not every audio cleanup job needs the full, heavy-duty processing treatment right away. High-quality processing demands more computational horsepower, which means it takes more time. Being smart about which quality preset you use can seriously speed up your workflow without compromising the final product.
Here’s how I typically approach it:
Fast Mode: This is my go-to for auditioning a prompt. It’s perfect for quickly checking if my instructions are working as intended. For instance, if I tell it to "remove wind noise," a fast pass tells me in seconds whether the AI nailed it or if it's eating into the dialogue. It's all about quick, low-stakes iteration.
Best Quality: I save this for the final export. Once I've dialed in my prompt and I'm happy with the general separation, I'll run the audio through the highest quality setting. This mode brings out the big guns—more complex algorithms that deliver the cleanest possible audio with the fewest artifacts.
Jumping between these modes is a fundamental part of an efficient workflow. You can test and tweak ideas rapidly without waiting forever for a render, then commit to the high-quality version once you're confident.
Unleashing Precision Mode for Complex Audio
Every so often, you’ll run into a recording where sounds are just tangled together, practically sitting on top of each other in the frequency spectrum. This is a classic problem when you're trying to separate a lead vocal from a tight backing harmony, or when isolating one specific sound effect from a dense, noisy background. For these jobs, a feature like Precision Mode becomes your secret weapon.
Activating Precision Mode tells the AI to stop just listening and start dissecting the audio with a much deeper, more granular analysis. It’s built for those nightmare scenarios where standard processing just can't quite tell the difference between two very similar sonic elements.
I had a perfect example of this on a recent project. I was working with a location recording from a busy city street and needed to isolate the clean, distinct sound of a bicycle bell for a foley track. In standard mode, the AI kept confusing the bell's sharp, metallic ring with nearby car horns and other traffic noise. Flipping on Precision Mode was a game-changer. It was finally able to lock onto the bell's unique harmonic signature and pull it out cleanly from that chaotic mess.
When to Activate Precision Mode
Knowing when to deploy this feature is half the battle. Using it on everything will just slow you down, but in the right situation, it's an absolute lifesaver.
I find myself reaching for it in a few key scenarios:
- Tightly Harmonized Vocals: Trying to separate two singers whose voices are locked together in a similar frequency range.
- Removing Instrument Bleed: Perfect for isolating a snappy snare hit from the cymbal wash that bled into the same mic.
- Surgical Sound Design: When I need to extract a very specific, subtle sound from a complex audio bed, just like that bicycle bell.
- Complex Dialogue Cleanup: When a speaker's voice is almost completely buried by another overlapping sound, like a blaring TV in the background.
By getting comfortable with these fine-tuning controls, you move from just using the tool to truly mastering it. You’ll be able to tackle even the most challenging AI audio cleanup tasks, knowing you have what it takes to get a pristine, professional-grade result every single time.
Practical AI Audio Cleanup Workflows
Knowing the theory behind prompts and quality modes is one thing, but the real magic happens when you see how it all clicks together in a real project. So, let's get our hands dirty and build out a few workflows for common creative jobs. Each scenario throws a unique audio curveball, but the core principles of using AI to fix it stay the same.
The idea here isn't just to show you what the tool does, but how to weave it into your existing creative process. This is about making AI another seamless part of your toolkit, whether you're saving a podcast interview, remixing a song, or cleaning up dialogue from a noisy film set. Once you get the hang of these methods, you'll find yourself solving tricky audio problems faster and getting back to the creative stuff.
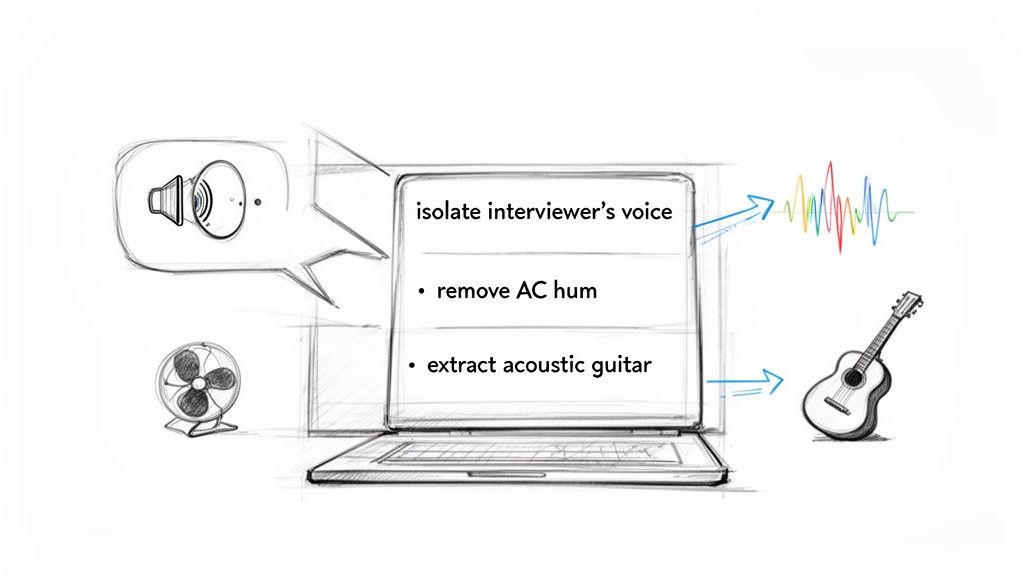
A Podcaster's Guide to Rescuing Remote Interviews
One of the biggest headaches for podcasters is wrangling inconsistent audio from remote guests. We've all been there: you finish a fantastic hour-long interview, only to discover your guest's audio is completely drowned out by a loud laptop fan. A re-record is out of the question, so it’s up to you to fix it in post.
The first move is always to isolate each speaker's track.
- Start by uploading just the guest's messy audio file to the AI tool.
- Give the AI a crystal-clear instruction, something like: "isolate the speaker's voice and remove the computer fan hum." You're telling it exactly what to keep and what to toss.
- Run a quick test on a small chunk using a 'Fast' preset. Does it kill the hum without making the voice sound robotic? If so, you're on the right track.
- Once you're happy with the preview, process the whole file using the 'Best Quality' setting for the final version.
With the clean audio in hand, just drag it back into your editor, like Adobe Audition, and line it up. Now you can mix and master the conversation, confident that both you and your guest sound equally professional.
This whole process, from a quick check to a final, high-quality export, is what I call the "test and commit" workflow.
As you can see, you can start with a quick pass in Fast Mode, dig deeper with Precision Mode if needed, and then commit to the final render when you know it's right. It saves a ton of time.
A Musician's Workflow for Remixing and Sampling
For musicians and producers, AI audio cleanup is less about fixing mistakes and more about unlocking creative potential. It's basically a deconstruction tool. Want to make a karaoke version of a track or snag a cool bassline for a remix? The process is all about treating a finished song as a collection of parts you can mine.
Here’s how that might look in practice:
- Making a karaoke track: Upload the full song and simply ask the AI to "remove lead vocals." It will analyze the mix and spit out a clean instrumental. For songs with tons of vocal reverb or delay, flipping on Precision Mode can help the AI better distinguish the voice from its effects.
- Pulling a remix stem: Maybe you just want the rhythm section. A prompt like "isolate the bassline and drum kit" will give you a single track with the core groove. From there, you can chop it, loop it, and layer it with your own sounds in a DAW like Logic Pro.
The real game-changer is what you do with the remainder file. After the AI pulls out the bass and drums, the second file it gives you has everything else—vocals, synths, guitars. This "leftover" track often has this wild, atmospheric texture that's perfect for creating ambient pads or glitchy ear candy.
A Video Editor's Solution for Salvaging Dialogue
Video editors are constantly fighting a battle against bad location sound. A windy outdoor scene is the classic villain, capable of swallowing crucial dialogue whole. An AI workflow here isn't just helpful; it can be a total lifesaver.
Let's say an actor delivers a key line on a beach, but a huge gust of wind barrels through and completely buries their words.
- First, export just the audio from that clip and upload it.
- Be super specific with your prompt: "separate the male actor's voice from the ocean waves and wind noise."
- Wind noise is tricky because its frequencies often overlap with human speech. This is the perfect time to use Precision Mode. It gives the AI a much better shot at making a clean separation.
- Download both the isolated dialogue and the remainder file (which is now just pure wind and waves).
Back in your NLE, like DaVinci Resolve, layer the cleaned-up dialogue back into the scene. Now you can use that "wind and waves" track as your natural ambient sound, tucking it into the mix at a much lower volume. You get the clarity you need while keeping the authentic atmosphere of the location.
The growth in this space is staggering. The AI audio editing market is on track to hit USD 5.68 billion by 2029, a huge leap from USD 1.55 billion in 2024. This boom is driven by creators who are finding these workflows can cut their audio post-production time by 50-70%, turning what used to be painstaking restoration work into a few simple steps. You can dig into the numbers yourself in the full industry report on GlobeNewswire.
Troubleshooting Common Audio Problems
As you start using AI to clean up your audio, you'll probably run into a few common hurdles. Even the smartest tools have their limits, and knowing how to work around them is what separates a frustrating edit from a successful one.
Let's walk through some of the questions I hear most often and how to solve them. Think of this as your go-to guide for those "what now?" moments.
Can the AI Get Rid of Room Echo and Reverb?
Yes, and this is where AI cleanup tools really shine. That echoey, cavernous sound you get from recording in an untreated room can make otherwise great audio sound amateurish. AI models are trained to spot the difference between the direct sound (your voice) and its reflections bouncing off the walls.
For the best results, be direct with your prompt. Try something like, "remove the echo from the room" or "make the voice sound closer and less distant." It’s surprisingly effective for fixing interviews recorded in big, empty conference rooms or home offices with hardwood floors.
What’s the Best Way to Handle Overlapping Voices?
This is a tough one. When two people talk at the same time, their voices get mashed together into a single waveform. While AI is impressive, it’s not always a miracle worker at untangling that kind of audio knot.
That said, you're not out of options. Here's what I'd try:
- Focus on the loudest speaker. Your best shot is to zero in on the dominant voice. A prompt like "isolate the main speaker's voice" tells the AI to prioritize the clearest signal it can find.
- Go for a deeper analysis. This is the perfect time to use a feature like a "Precision Mode" if your tool has one. It forces the AI to work harder and analyze the file more granularly, which can give it a better shot at separating the voices.
- Use a hybrid approach. Sometimes the best workflow is to let the AI do the heavy lifting first. It might not be perfect, but it can get you 80% of the way there. After that, you can pop the track into your audio editor and manually fix the remaining rough spots.
Does My Original Recording Quality Really Matter?
Absolutely. This might be the single most important factor. The old saying "garbage in, garbage out" has never been more true. A clean, high-quality recording gives the AI much more information to work with, making its job of spotting and removing noise way easier.
A Pro Tip From Experience: Always record and work with the highest quality audio you can, like a WAV or FLAC file. Compressed formats like MP3s throw away audio data to save space, and that missing information can lead to weird artifacts when the AI tries to rebuild the sound. Good mic placement is still your best friend.
How Do I Fix Those Weird "Watery" Sounds?
Every so often, you might notice a strange, watery or warbling sound in your processed audio. This is a common artifact that happens when the AI gets a little too aggressive, especially when the noise it's trying to remove is very close in frequency to the voice you want to keep (like wind noise).
When that happens, here’s how to fix it:
- Be more specific with your prompt. Instead of a generic "remove noise," try telling it exactly what to target. "Reduce the computer fan hum" or "soften the hiss" can prevent the AI from overprocessing the whole track.
- Dial back the intensity. Many tools let you control how strongly the effect is applied. If you're hearing artifacts, just dial it back a notch or two. It’s about finding that sweet spot.
- Blend the tracks. This is a classic studio trick. Take your cleaned-up audio and mix a little bit of the original track back in at a low volume. This can restore some natural room tone and mask minor artifacts, giving you a result that's both clean and authentic.
Answering these common questions helps pull back the curtain on the AI audio cleanup process. With these solutions in your toolkit, you’ll be much better prepared to handle whatever audio challenges come your way.
Ready to see what prompt-based audio editing can do for you? Isolate Audio lets you remove background noise, extract vocals, and clean up dialogue with simple text commands. Try it for free and hear the difference.