How to Remove Background Noise for Crystal-Clear Audio
When it comes to cleaning up audio, you've got three main ways to tackle the problem. You can prevent noise before you even hit record, manually edit it out with classic audio tools, or lean on AI software to do the heavy lifting for you. Which path you take really depends on your experience, the kind of noise you're dealing with, and how much time you're willing to spend.
Your Journey to Flawless Audio Starts Here
There's nothing more frustrating than realizing a great take is ruined by unwanted background noise. That subtle air conditioner hum, the echo from an empty room, or a surprise dog bark can pull your listeners right out of the moment and make your work sound amateur. This guide will walk you through the practical steps to get that clean, professional sound, no matter what you're up against.
We'll break down the three core strategies you can use:
- Prevention First: Honestly, the best defense is a good offense. Setting up your recording space and using the right techniques can eliminate most noise problems before they even start.
- Traditional Editing: If the noise is already baked into your recording, don't worry. We'll get hands-on with the same tools the pros use, like EQs and spectral repair, to surgically remove it.
- AI-Powered Cleanup: We’ll also explore the magic of modern AI tools. These platforms can intelligently separate vocals and instruments from background distractions with just a click, saving you a ton of time.
Think of this as a roadmap. It’s designed to help you pick the best tool for the job based on your project, skills, and deadline. By the end, you'll have a clear plan to rescue any audio and make it shine.
Choosing Your Audio Cleanup Path
So, where do you start? Your first decision is whether to focus on prevention before recording, manual editing after the fact, or an automated AI approach. Each has its place, and this decision tree can help you visualize the best route for your situation.

The real takeaway here is that your ideal workflow changes based on when you can deal with the noise—before, during, or after you've captured the audio. As more of us create content and work from home, the need for powerful, easy-to-use cleanup tools has exploded.
The market for audio noise reduction software hit USD 1.33 billion in 2025 and is on track to reach USD 1.78 billion by 2034.
This isn't just a niche industry anymore. It's being driven by massive shifts like the rise of remote work, where an incredible 68% of companies now provide audio enhancement tools for virtual meetings. For content creators, clean audio has gone from a nice-to-have to an absolute must. You can dig into more of the numbers in the full audio software market research report.
Three Paths to Clean Audio at a Glance
Feeling a bit overwhelmed by the options? Don't be. This table breaks down the three main strategies for getting rid of background noise, helping you quickly see which one fits your project best.
| Method | Best For | Effort Level | Key Tools |
|---|---|---|---|
| Prevention | Anyone, before recording begins. The most effective method. | Low to Medium | Acoustic treatment, pop filters, proper mic placement |
| Manual Editing | Audio pros who need precise control over specific noises. | High | DAWs (like Pro Tools, Audacity), EQ, noise gates, spectral repair |
| AI Separation | Creators needing fast, high-quality results with minimal effort. | Low | AudioShake's Isolate Audio, other AI-based tools |
Ultimately, having a little knowledge in each of these areas will make you a more versatile audio editor. You can prevent what you can, manually fix what you must, and let AI handle the rest.
Preventing Noise Before You Hit Record
Honestly, the best way to remove background noise has nothing to do with fancy software or expensive plugins. It’s all about what you do before you even think about hitting that record button. Being proactive is, without a doubt, the most effective way to get clean audio. It’ll save you hours of headaches in post-production.
Think of it like this: trying to edit out noise is like trying to un-bake a cake to get the flour out. Prevention is just making sure you don't spill any extra flour in the batter to begin with. Getting into this mindset is a game-changer for anyone who's serious about audio quality.
Scout Your Recording Location
Before setting up a single piece of gear, just stop and listen. Seriously. Our brains are amazing at filtering out constant background hums and buzzes, but trust me, your microphone will hear everything. Take a walk through your recording space and be a detective for a minute.
What should you be listening for?
- The HVAC Hum: That low drone from an air conditioner or heater is a classic audio killer. It’s so easy to ignore until you hear it on playback.
- Appliance Buzz: Refrigerators, whirring computer fans, and even the ballast in old fluorescent lights can add a nasty, persistent buzz to your track.
- The Outside World: Is there a busy road outside your window? A neighbor who lets their dog out at the same time every day? These random, unpredictable sounds are the absolute worst to fix later.
If you’re a filmmaker scouting a location, this step is mandatory. Just stand in silence for five minutes and let your ears tell you what the microphone will capture. For a podcaster recording at home, this might mean discovering the golden hour for recording is late at night after the heat has clicked off and the house is quiet.
The first rule of audio is that what goes in is what you get out. A clean recording from the start will always sound better than a noisy one you’ve processed heavily. Getting it right at the source is 90% of the battle.
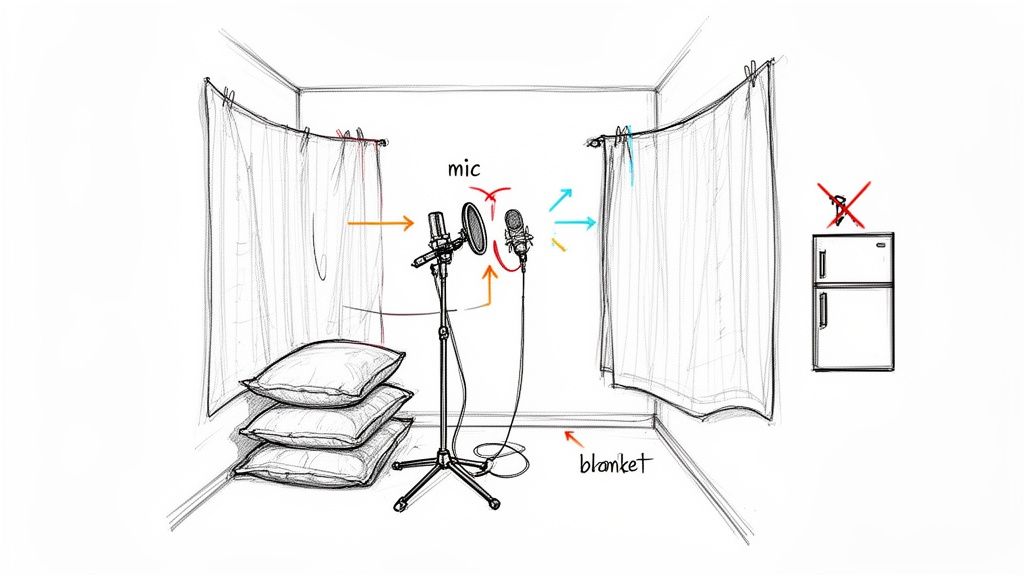
Tame Your Room's Acoustics
Okay, so you've minimized the noise from outside your space. The next enemy is the room itself. Hard, flat surfaces are not your friend. Think bare walls, hardwood floors, and big windows—they all act like mirrors for sound, causing waves to bounce all over the place. This creates the echo and reverb that makes audio sound amateurish and hollow.
The good news is you don’t need to build a professional studio. You can get surprisingly great results with stuff you probably already have.
- Soften Everything: Drape some heavy blankets over doors or hang them on mic stands to create a little fort around you. Toss some pillows or couch cushions in the corners of the room where bass tends to build up.
- Pick a Smart Spot: There's a reason the "record in a walk-in closet" trick is a classic. All those clothes act as natural sound absorbers. Even just backing yourself into a corner with a thick duvet hung up behind you can make a night-and-day difference.
These little tricks do a fantastic job of dampening those sound reflections. This helps the mic pick up the direct sound of your voice, not a messy combination of your voice and the room's echo.
Master Your Microphone Technique
Finally, how you use your microphone is just as critical as where you put it. Bad mic placement is a fast track to a whole new set of audio problems, from those harsh "p" and "b" sounds (plosives) to vocals that sound thin and distant.
A great place to start is positioning the mic about 6-8 inches from your mouth. An easy way to measure this is the "hang loose" or "shaka" sign—the distance from your thumb to your pinky.
Once you're there, try angling the microphone slightly off to the side, so it's pointing at the corner of your mouth instead of straight on. This is a simple but brilliant trick. It lets the bursts of air from plosives shoot right past the mic's diaphragm instead of slamming into it. Of course, a pop filter is a cheap and indispensable tool that does this job even better.
By scouting your location, taming your room, and using proper mic technique, you're laying the groundwork for truly professional-sounding audio. These aren't just one-off tips; they're the core habits that separate pristine recordings from noisy, frustrating messes.
Getting Your Hands Dirty: Classic Noise Reduction in Your DAW
With your audio captured, it's time to fire up your Digital Audio Workstation (DAW) and do some real work. This is where the time-tested, manual techniques of audio engineering shine. While AI tools are fantastic for speed, these classic methods give you the surgical precision needed for truly professional results.
Learning your way around a noise gate, equalizer (EQ), and spectral repair tools gives you ultimate control over your sound. Think of it like being a sculptor—you’re carefully chipping away the unwanted noise to reveal the clean, pristine audio underneath. These are foundational skills that will pay dividends on every project you touch.
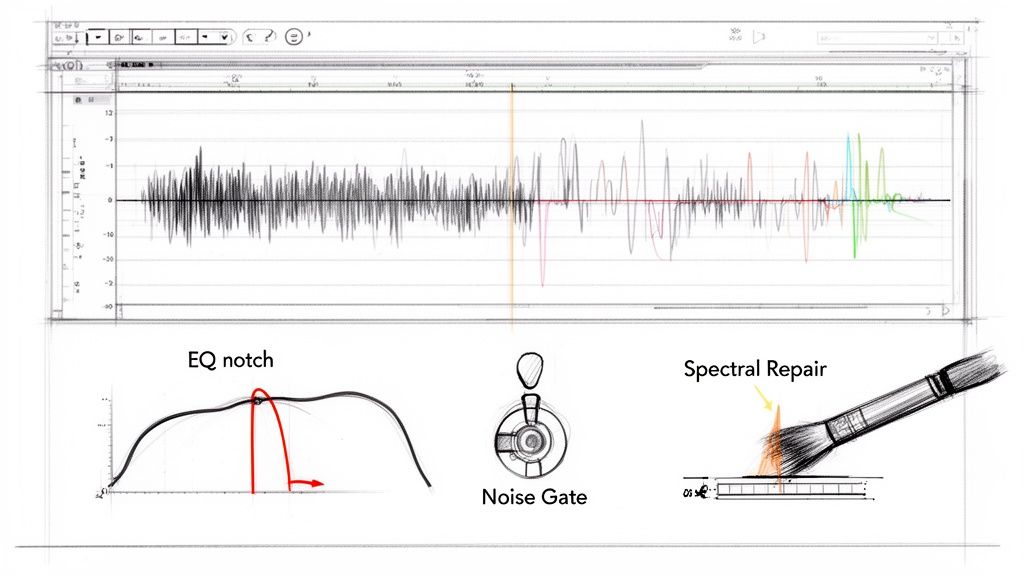
Using a Noise Gate for Cleaner Pauses
A noise gate is your first line of defense against that constant, low-level hum or hiss. In essence, it’s an automated mute button. You set a volume threshold, and any sound that falls below that level gets silenced, while anything louder passes through completely untouched.
This is a game-changer for cleaning up the empty space between words or musical phrases. Say you're recording a podcast and there's a faint computer fan whirring in the background. A noise gate will automatically slice out that hum every time you take a breath, making the whole track feel cleaner without ever touching your voice.
Dialing it in comes down to a few key settings:
- Threshold: This is the big one. You need to set it just above the background noise floor but well below the level of the desired audio (like your voice).
- Attack: This knob controls how fast the gate opens. A quick attack is crucial to ensure the very beginning of your words isn't clipped off.
- Release: This sets how slowly the gate closes after you stop speaking. A slightly longer release creates a more natural decay instead of an abrupt, jarring silence.
Performing Sonic Surgery with an EQ
But what about noise that’s always there, lurking underneath your main audio? I’m talking about things like a high-pitched whine from a faulty light fixture or a low-frequency electrical hum. For these tonal problems, a parametric equalizer (EQ) is your most powerful weapon.
Instead of boosting frequencies to sweeten the sound, you’ll be doing the opposite—a technique called "subtractive EQ." The goal is to hunt down the precise frequency of the offending noise and carve it out. Most modern DAWs include an EQ with a spectrum analyzer, which gives you a visual map of the frequencies and makes this process much easier.
Here's how I typically approach it:
- Find a small section of the recording where only the noise is audible.
- Grab a very narrow EQ band and give it a massive boost.
- Slowly sweep that boosted band across the frequency spectrum. You’ll hear the annoying hum or whine suddenly jump out in volume.
- You've found it. Now, just turn that big boost into a deep, narrow cut.
Just like that, the noise will either vanish or become far less distracting. A word of caution: keep your cuts narrow. If you make them too wide, you risk carving out essential frequencies from the source audio, which can leave a voice sounding thin and unnatural. Sometimes, all you need is a simple high-pass filter to get rid of low-end mud and rumble. You can dive deeper into how to use an audio high-pass filter to clean things up.
Painting Away Noise with Spectral Repair
So, what about those random, one-off sounds? The dog that barks next door, a sudden cough, a chair squeak, or a phone notification—these can ruin an otherwise perfect take. They're too short for a noise gate to catch and too complex for a standard EQ to fix. This is the domain of spectral repair tools, found in incredible software like Adobe Audition or iZotope RX.
A spectral editor gives you a visual representation of your audio, but not as a simple waveform. It shows a spectrogram, which maps frequency over time, with louder sounds appearing as brighter colors. On this display, a sudden noise like a phone ping shows up as a distinct, bright blob.
With spectral repair, you can literally see the sound you want to remove. It’s like using the healing brush in Photoshop—you just select the visual artifact of the noise and erase it.
The software then intelligently analyzes the surrounding audio to patch the hole, making it sound as if the noise was never there to begin with. It’s the closest thing to magic in the world of traditional audio editing. The demand for these powerful solutions is exploding; the background noise reduction market is projected to leap from USD 2.31 billion in 2025 to USD 45.02 billion by 2034. This is driven in part by the 71% of consumer electronics manufacturers now building noise suppression into their devices. You can read more about these market trends in background noise reduction.
The New Wave of Audio Cleanup: Letting AI Do the Heavy Lifting
While the traditional tools of the trade—EQs, gates, and spectral editors—give you incredible control, they also demand a ton of time and a seasoned ear. This is where things are getting really interesting. AI-powered tools are completely changing the game, making high-level audio repair something anyone can do, no audio engineering degree required.
Forget spending hours hunting down rogue frequencies or painstakingly erasing individual sounds. The modern workflow is so much more intuitive. It’s less about surgical precision and more about simply telling the tool what you want to fix, then letting a smart algorithm handle the complicated bits. This isn't about replacing skill; it's about amplifying it, letting creators get professional-sounding results in a fraction of the time.
As you can see, a tool like Isolate Audio is built for speed. The focus is on a simple upload and a natural language prompt to get things started. This design choice completely sidesteps the technical hurdles you’d find in a traditional DAW, putting all the focus on the creative outcome instead of the complex process.
So, How Does AI Audio Separation Actually Work?
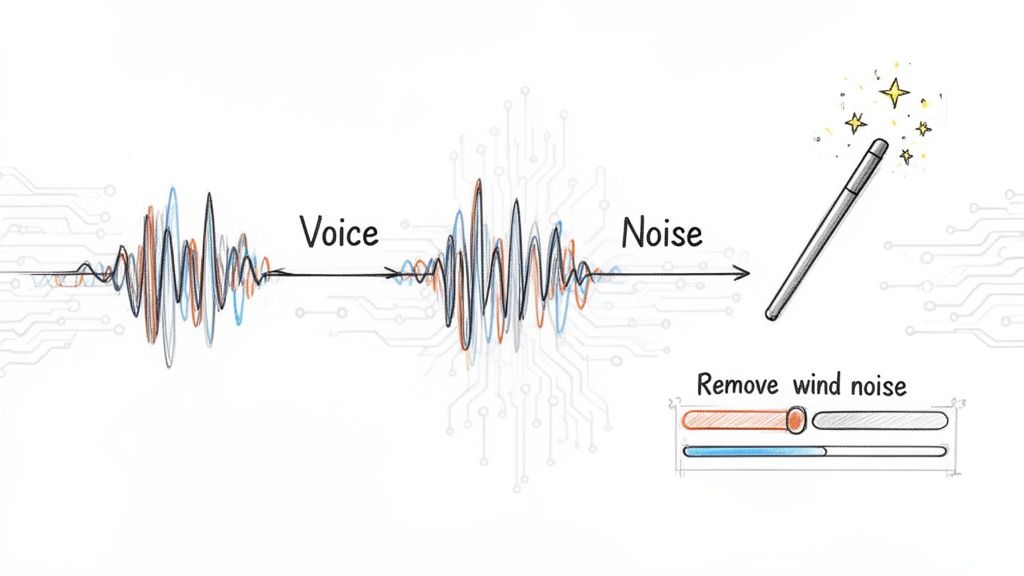
Traditional tools identify noise based on pretty simple rules, like volume (noise gates) or specific frequencies (EQ). AI is playing a totally different ballgame. It uses machine learning models that have been trained on massive libraries of sound. These models have learned to recognize the unique sonic "fingerprints" of different things—human speech, a specific guitar, the rumble of traffic, or the hiss of wind.
When you upload a file and type a prompt like "isolate the acoustic guitar," the AI isn't just looking for frequencies in a certain range. It analyzes the entire recording, identifies the complex harmonics and textures that make that guitar sound like that guitar, and then digitally lifts it out of the mix.
What you get back are two clean audio files:
- The Isolated Sound: The specific thing you asked for, like just the guitar part.
- The Remainder: Everything else from the original file—the vocals, drums, and any background noise.
This process is called source separation, and it's the magic behind why AI audio cleanup is so powerful. It gives you a level of flexibility that used to be impossible unless you were in a high-end studio with the original multitrack recordings.
Real-World Problems, Solved by AI
The real "aha!" moment comes when you see how this technology tackles common, frustrating audio issues. Let's move past the theory and look at how this works in the real world.
For a podcaster, imagine you just finished an interview, but your guest was in a big, echoey room. Trying to fix that reverb manually is a true nightmare. With an AI tool, you can just upload the file and tell it to "isolate my guest's voice." The AI separates their direct dialogue from the room's echo, giving you a clean track that sounds like it was recorded in a proper studio.
Or maybe you’re a musician with a fantastic live recording of a solo performance, but it's ruined by the audience cheering and talking over it. Instead of tossing the take, you could use a prompt like "remove crowd noise." The AI will identify and pull out the cheering, leaving you with just the pristine instrument performance.
Even video editors see huge benefits. Think about a documentary interview filmed outside where a gust of wind blasts the microphone. Old-school wind reduction filters often just muffle the voice along with the wind. An AI separator, on the other hand, can target and remove only the wind, preserving the clarity and natural tone of the speaker's voice.
This shift from manual editing to AI-driven separation is a huge leap. It turns a task that could take an audio engineer hours of meticulous work into a process that often takes just a few minutes.
This isn't just a niche tool; it's a technology that's driving serious market growth. AI is fundamentally changing audio cleanup, with some online systems hitting up to 95% accuracy in separating speech from background noise. This progress is a big reason the Online Audio Noise Reduction System market is projected to jump from USD 563 million in 2024 to USD 961 million by 2032.
The Simple AI Noise Removal Workflow
One of the best parts about using a tool like Isolate Audio is just how straightforward it is. You don't need to know what a frequency spectrum is or what "attack and release times" mean. The whole workflow is designed to be direct and get you to the finish line quickly.
- Upload Your File: First, just drag and drop your audio or video file. Most modern platforms handle a huge range of formats, from WAV and MP3 to video files like MP4.
- Describe the Sound: Here's where the magic happens. Instead of fiddling with knobs, you just type what you want to isolate or remove. Prompts can be simple like "vocals" or more specific, like "the humming sound from the air conditioner."
- Process and Download: The AI gets to work, separating the audio based on your instructions. You can then listen to the results and download the clean audio files you need.
For those extra-tricky recordings where sounds are really tangled together, many platforms offer a Precision Mode. This setting uses a bit more processing power to do a deeper analysis of the file, which can yield much better results on challenging audio. If you want to see how these tools stack up, check out our guide on the best audio repair software available today.
This simple process makes the ability to remove background noise accessible to everyone. It lets creators focus on their performance and their message, knowing that technical audio problems can be sorted out quickly and effectively later on.
Solving Tricky Audio Problems
Sometimes, after you’ve dealt with the obvious hum or hiss, a whole new set of subtle problems can pop up. This is the troubleshooting phase—the part where you really start to fine-tune your audio and fix the stubborn issues that initial processing can uncover or even cause. Don't get discouraged here; working through these tricky situations is what separates good audio from truly great audio.
One of the most common pitfalls of aggressive noise reduction is that dreaded "watery" or robotic artifact. It’s a tell-tale sign that the processing is working too hard, stripping away bits and pieces of the desired audio along with the noise. What you're left with is a hollow, unnatural sound that can be just as distracting as the original problem you tried to fix.
Fixing Over-Processed Audio
If your dialogue sounds like it’s coming from underwater, you’ve probably pushed your settings way too far. The fix is almost always to simply dial it back. Instead of aiming for 100% noise removal, shoot for 80%. Honestly, a tiny bit of the original room tone sounds far more natural than a heavily processed, artifact-riddled track.
Start by easing off the main noise reduction parameter—it’s usually labeled "Reduction" or "Sensitivity." Make small, incremental adjustments and listen carefully after each one. You're looking for that sweet spot where the noise is significantly lower, but the voice still has its natural character and warmth.
Key Takeaway: The goal isn't complete silence; it's clean, natural-sounding audio. It's always better to leave a little bit of clean room tone than to create distracting digital artifacts.
Handling Dynamic Background Noise
A constant fan hum is one thing, but what about noises that come and go? A police siren wailing in the distance, a door slamming shut, or intermittent construction sounds can be a real headache. A single, static noise reduction setting just won't cut it because the noise profile is constantly changing.
This is where AI-powered tools like Isolate Audio really shine. You can target these unpredictable sounds with surgical precision.
- For a siren: Try a prompt like "remove the siren wail." The AI is smart enough to identify that specific sound signature and lift it right out without messing with the dialogue.
- For a door slam: A prompt to "remove the loud bang" can surgically erase that one sound event.
This approach is far more effective than fumbling with volume automation or noise gates, which often fail to catch abrupt, complex sounds cleanly.
Rescuing Extremely Noisy Recordings
What do you do when the background noise is almost as loud as the voice you’re trying to save? This is a classic problem for recordings from crowded events, windy outdoor shoots, or interviews in a bustling cafe. In these extreme cases, traditional tools just give up; they can't tell the voice apart from the noise.
This is a job for a more powerful solution. AI tools often have a Precision Mode designed for this exact challenge. This setting triggers a much deeper, more detailed analysis of the audio, allowing it to untangle the complex, overlapping frequencies of the voice from the equally complex noise. It takes a bit longer to process, but the results can be astonishing—often saving recordings that would otherwise be completely unusable. You can see a similar process in action when you remove background music from audio.
Reducing Unwanted Echo and Reverb
Finally, let’s talk about that roomy, echoey sound. Recording in a space with bare walls and hard floors creates reverb, which can make your audio sound distant and unprofessional. While preventing it during recording is always best, you can definitely treat it in post-production.
There are specialized "de-reverb" plugins out there, but modern AI separators offer a much simpler route. Just upload your file and ask it to "isolate the speaker's voice." The algorithm can often distinguish between the direct sound of the voice and the reflected sound waves causing the echo. The result is a much tighter, more focused recording that sounds like it was captured in a properly treated studio.
Finalizing and Exporting Your Clean Audio
You’ve done the hard work of meticulously cleaning up your audio, but the job isn't quite finished. The final export is where it all comes together, and choosing the wrong settings can sabotage everything you've just accomplished by squashing the sound or delivering it at a wonky volume.
Let's walk through how to make sure your audio sounds just as good out in the world as it does in your editing software.
Choosing the Right Export Format
The first decision is your file format. This isn't about picking the "best" one, but the right one for where the audio is going next. Think of these formats as different kinds of containers, each with its own purpose. They basically fall into two camps: lossless and lossy.
Lossless (WAV, FLAC): This is your high-fidelity, archival-quality option. A WAV file is a pure, uncompressed replica of your project's audio. A FLAC file is its clever cousin, shrinking the file size without tossing out a single bit of audio data. You should always use a lossless format if you're archiving a project or sending the audio to someone else for more work, like a video editor.
Lossy (MP3, AAC): These formats are all about creating smaller, more manageable file sizes. They do this by intelligently removing audio information that most human ears won't miss. An MP3 is perfect for the final delivery—think uploading to a podcast host or emailing a quick preview. The golden rule here? Exporting to a lossy format should be the absolute last step. Never, ever edit or re-export an MP3.
So, if you just finished cleaning up a podcast interview, you’d export the final mix as a high-quality MP3 (say, 320 kbps) to upload to your host. But if you were sending that same dialogue track over to a video editor to sync with footage, you'd give them a WAV to ensure they have the most quality to work with.
Mastering for Loudness and LUFS
Ever wonder why you can jump between different songs or podcasts on Spotify and the volume stays pretty consistent? That's not an accident. It’s a process called loudness normalization, and the standard that governs it is LUFS (Loudness Units Full Scale).
Every major platform—Spotify, YouTube, Apple Podcasts—automatically adjusts your audio's volume to hit their specific LUFS target. If your track is too loud, they'll turn it down (which can crush its dynamics). If it's too quiet, they'll crank it up, which can also amplify any tiny bit of noise you might have missed.
To sidestep this, you need to master your audio to the correct LUFS target before you export. This puts you back in control, ensuring your audience hears your work exactly as you intended.
Here are the targets you need to know:
- Spotify: -14 LUFS
- YouTube: -14 LUFS
- Apple Podcasts: -16 LUFS
Nearly any modern audio editor or DAW has a LUFS meter built-in, and there are free online tools that do the job, too. Hitting these targets is what separates amateur audio from a polished, professional production. It’s a crucial final check after you've learned how to remove background noise effectively.
Ready to skip the tedious manual work and achieve pristine audio in minutes? Isolate Audio uses powerful AI to separate vocals, instruments, or noise from any recording with simple text prompts. Transform your workflow and try it for free at isolate.audio.