A Producer's Guide to Using a Compressor for Music
At its heart, an audio compressor is an automatic volume knob. Its job is to turn down the loudest parts of a sound so you can turn up the quieter parts, giving you a performance that feels more consistent, powerful, and glued together. This whole process is called dynamic range compression, and it’s one of the biggest secrets to getting a polished, professional sound.
Why Do We Need Audio Compression Anyway?
Have you ever noticed how a lead vocal can go from a gentle whisper to a full-on scream, yet it always sits perfectly in the mix? It never vanishes, and it never gets painfully loud. That’s the magic of compression.
Imagine you had a tiny, lightning-fast audio engineer whose only job was to ride the volume fader for a single track. The moment a snare drum hits too hard, they pull the fader down. When a bass note gets a little lost, they push it up. A compressor does that same job, but with superhuman speed and precision.
The core purpose here is to manage dynamic range—that’s just a fancy term for the difference between the quietest and loudest parts of a recording. A raw, uncompressed vocal or drum take will have big, spiky peaks that can feel jarring or even cause nasty digital distortion. A compressor gently tames those peaks, smoothing everything out.
Once you have that control, you unlock a few massive benefits for your music:
- Consistency is King: It evens out unpredictable jumps in volume, helping an instrument or vocal sit in one place instead of jumping all over your mix.
- More Punch, More Power: By clamping down on the peaks, you create headroom to turn up the overall level of the track. This is how you get drums and bass that really hit you in the chest.
- Clarity and Detail: Compression can bring out the good stuff that gets lost in the noise, like the breathy texture of a singer's voice or the subtle ring of a cymbal after it’s been hit.
A Quick Trip from the Radio Booth to Your DAW
This isn't some newfangled digital trick. The first audio compressors showed up back in the 1930s for a very practical reason: keeping radio broadcast signals from getting too loud or too quiet for listeners at home. By the mid-50s, legendary hardware units like the Fairchild 670 were already shaping the sound of classic records we still love today.
Now, that same power is an absolute staple in music production, available as both hardware and software in every studio. The sheer size of the global music production market shows just how essential these tools are. You can find some fascinating data on the industry's growth over on IBISWorld.com.
A compressor doesn't just make things louder. It reshapes the very character of a sound, adding punch, presence, and polish. It’s the glue that holds a modern mix together.
Ultimately, getting comfortable with a compressor for music is one of the most important steps you can take toward a professional sound. It’s the tool that lets you take control of your dynamics and make sure every part of your song is heard exactly the way you want it to be.
Getting a Handle on the 5 Core Compressor Controls
Every audio compressor, whether it's a piece of classic analog gear or a sleek plugin, operates on five key principles. Once you get your head around these, you'll be able to stop relying on presets and start shaping your audio with real purpose. Think of these controls as the five levers that give you total command over your sound's dynamics.
This is the fundamental job of a compressor: it takes the wild, loud moments in a performance and smooths them out, creating a more balanced and listenable track.
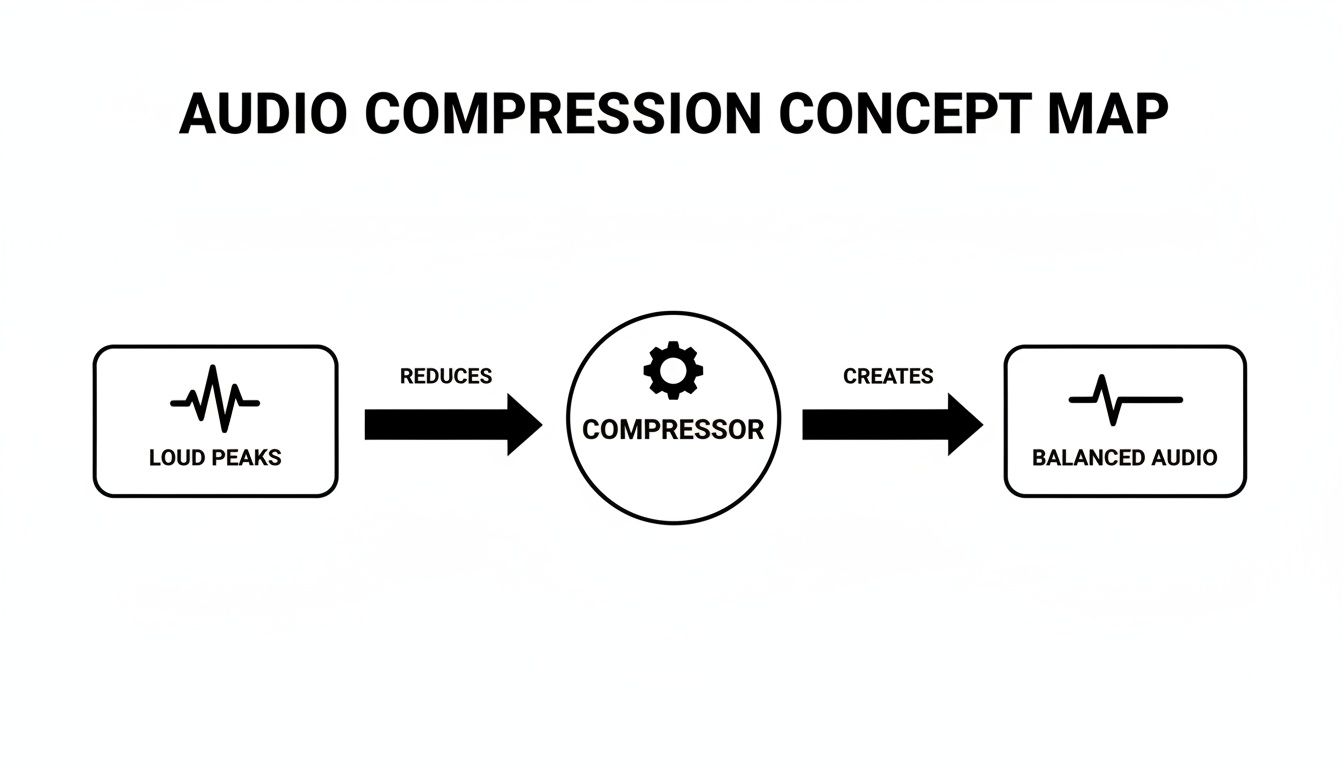
As you can see, the compressor acts like an automated volume fader, catching those unruly peaks before they hit the listener's ear. This simple action is the secret to a polished, professional sound.
H3: Threshold and Ratio: When and How Much?
The first two controls are a tag team. They decide when the compressor should kick in and how hard it should work once it does.
Threshold: This is your trigger point. Think of it like a volume ceiling. Any part of your audio signal that’s loud enough to push past this ceiling gets compressed. Anything quieter is left completely alone. Setting a lower threshold means more of your track will get processed.
Ratio: Once the audio crosses that threshold, the ratio determines the amount of volume reduction. A 4:1 ratio is a classic example. It means for every 4 decibels (dB) the signal tries to go above the threshold, the compressor only allows 1 dB to pass through. A gentle 2:1 ratio just lightly tames things, while a more aggressive 10:1 ratio really clamps down hard.
Your threshold tells the compressor what to pay attention to. Your ratio tells it how to react. This dynamic duo is the absolute foundation of compression.
H3: Attack and Release: It’s All in the Timing
Next up are Attack and Release. These two controls are all about timing and feel. Nailing them is the key to making your compression sound musical and transparent, rather than squashed and lifeless.
Attack: This knob sets how fast the compressor reacts after the signal breaches the threshold. A lightning-fast attack will grab a sound almost instantly, which is perfect for clipping the sharp transient of a snare drum. A slower attack, on the other hand, intentionally lets that initial "crack" or "pluck" of a sound through before the compression begins, which is a great way to add punch.
Release: This is the flip side. It tells the compressor how long to hold on before letting go of the signal. A quick release can add a sense of energy and excitement, but if it’s too fast, you might hear unnatural "pumping" artifacts. A slower release will give you a much smoother, more invisible result.
H3: Makeup Gain: Bringing It Back to Level
After all this squeezing and reducing, your track is naturally going to sound quieter than when you started. That's where the final control comes into play.
Makeup Gain is just a clean volume boost applied to the entire signal after compression. Your main goal here is to bring the overall level of the compressed track back up to match the perceived loudness of the original. This is crucial—it allows you to make an honest A/B comparison and hear the character of the compression (the added density and control) without just being fooled by a simple volume drop.
Many modern plugins you'll find in the best DAWs for beginners even have an "auto-gain" function to give you a decent starting point.
To help these concepts stick, here’s a quick-reference table with some simple analogies.
Understanding Compressor Controls with Analogies
| Control | What It Does | Simple Analogy |
|---|---|---|
| Threshold | Sets the volume level where compression begins. | A security guard at a door who only stops people who are taller than a certain height. |
| Ratio | Determines the amount of volume reduction. | For every four people who try to rush the door, the guard only lets one through. (4:1 Ratio) |
| Attack | How quickly the compressor starts working. | The guard's reaction time. Is he instantly on alert, or does he take a moment to react? |
| Release | How long the compressor stays active. | How long the guard keeps the door blocked before letting things return to normal. |
| Makeup Gain | Boosts the overall volume after compression. | Turning up the volume on the PA system so everyone in the room can hear at a comfortable level again. |
This table can be a handy mental shortcut as you start experimenting with your own tracks.
By learning to balance these five simple controls, you can add serious punch to your drums, create smooth and present vocals, or even glue an entire mix together with confidence. It’s no exaggeration to say the compressor is one of the most powerful tools in any audio engineer's toolkit.
Choosing the Right Compressor Type for Your Sound
Once you get a handle on the basic controls, you'll start to notice that not all compressors are created equal. Far from it. Each type has its own sonic signature, a unique personality shaped by its internal circuitry. Think of them as different flavors of dynamic control—some are transparent and surgical, while others are thick, colorful, and warm.
Picking the right compressor is like a painter choosing the right brush. A wide, coarse brush is great for broad strokes, but you’d never use it for fine details. In the same way, the character of the compressor is often just as important as the settings you dial in.
This variety is exactly why the audio plugin market is booming. Dynamic processors are essential tools, and the demand for them is a big driver in the music production software market, which is projected to grow by about USD 432.8 million between 2024 and 2029. This incredible growth is fueled by producers at all levels needing a diverse toolkit to make their music sound great everywhere, from pro studios to earbuds. You can dig deeper into these trends in this detailed market report from Technavio.
Let's break down the main "families" of compressors you'll run into.
VCA and FET Compressors: The Fast Responders
If you need speed, VCA and FET compressors are your first call. They're both known for their lightning-fast reaction times, but they leave very different sonic footprints.
VCA (Voltage Controlled Amplifier): Think of a VCA compressor as the clean, reliable workhorse. It’s incredibly fast and precise, clamping down on dynamics without adding much, if any, color or distortion. This makes it perfect for taming the sharp, pokey transients of drums or adding a tight punch to a bass guitar without messing with its core tone.
FET (Field Effect Transistor): FET compressors are the energetic rock stars of the compression world. Modeled after classics like the legendary UREI 1176, they are famously aggressive and bursting with character. When you push them hard, they add a beautiful, gritty saturation that can bring vocals, bass, or individual drum hits right to the front of the mix.
Optical and Vari-Mu Compressors: The Smooth Operators
Sometimes, you don't want speed. You want grace and musicality. That’s where Optical and Vari-Mu designs shine.
These compressors are less about surgical control and more about adding a gentle, cohesive "glue" to your tracks. Their slower, smoother reaction often sounds far more natural to our ears.
Optical compressors have a unique design that uses a light source and a light-dependent resistor to achieve gain reduction. This process is inherently smooth and gentle, resulting in a compression that’s almost effortless. It’s a go-to for vocals, acoustic instruments, or any source where you want to level things out without ever really hearing the compressor at work.
Vari-Mu compressors are the undisputed champions of mix buss glue. Built around vacuum tube technology, they don't have a fixed ratio. Instead, the compression becomes more intense as the signal gets louder, creating a rich, warm, and wonderfully cohesive sound. This is why you’ll often find them parked on a mix buss or instrument group, pulling everything together.
Digital and Multiband: The Modern Problem Solvers
Finally, we have the modern tools born in the digital age, designed for ultimate precision and flexibility.
A standard digital compressor is the epitome of transparency. It does one job—control dynamics—with clinical precision and zero added color, unless you tell it to. This makes it an amazing tool for any task where you need to manage levels without changing the fundamental character of the sound.
A multiband compressor is the specialist. It's like having several compressors in one, allowing you to treat different frequency ranges independently. Got a boomy low-end in an acoustic guitar but want to keep the high-end sparkle? A multiband compressor can clamp down only on the low frequencies, leaving the rest untouched. It's an incredibly powerful problem-solver for modern mixing.
Dialing It In: Practical Starting Points for Your Instruments
Knowing the theory is one thing, but actually hearing a compressor grab hold of a track and shape it is where the real learning begins. The settings I'm about to share aren't rigid rules etched in stone. Think of them as battle-tested starting points—a solid foundation you can tweak to fit the unique vibe of your song.
Every instrument has its own dynamic personality. A lead vocal needs to feel intimate and upfront, a kick drum needs to punch you in the chest, and a bass guitar has to be the unwavering anchor. Our compression strategy needs to honor that.

Crafting Vocals That Sit Perfectly in the Mix
For most pop, rock, or R&B tracks, the goal is to make the vocal consistently present without killing the performance. You need every word to be clear, from the softest breath to the loudest chorus, so the listener hangs on every line. A smooth optical compressor or a FET with some attitude usually gets the job done beautifully.
- Ratio: Start with a gentle touch. A 2:1 to 4:1 ratio is often perfect for evening things out without losing the emotion.
- Attack: A fairly fast attack time (around 1-5 ms) will help catch those sudden peaks and keep the vocal from jumping out of the mix. Just be careful—too fast, and you’ll squash the consonants, making the vocal sound muffled.
- Release: A medium release (try 40-60 ms) is a great starting place. Your goal is to get it breathing in time with the singer’s phrases. You don't want to hear it obviously "pumping" between words.
- Gain Reduction: On the loudest parts, aim for about 3-6 dB of gain reduction. This is usually enough to tame the dynamics while keeping the performance feeling alive.
Adding Punch and Weight to Drums
Drums are all about that initial impact—the transient. Your compressor settings can either make that punch hit harder or completely flatten it, so getting the attack and release right is everything. A snappy VCA or an aggressive FET compressor is a go-to for adding that smack.
For a kick drum, try a slower attack. This lets the initial "thwack" of the beater slice through the mix before the compressor clamps down on the boomier part of the sound. The result? A kick that feels punchier and more defined. For a snare, a faster attack can tame the sharp "crack," bringing up the body and sustain of the drum.
When you shape the envelope of your drums with a compressor, you're not just controlling volume. You're sculpting the groove and energy of the entire song.
Building a Rock-Solid Bass Foundation
A great bassline is the anchor for your whole mix. It needs to feel solid and consistent whether you’re listening on big studio monitors or tiny laptop speakers. Compression is your number one tool for getting that stability.
- Ratio: Don't be afraid to go a bit higher here. A ratio of 4:1 to 6:1 will help lock the bass right into place.
- Attack: A medium attack (10-20 ms) works well. It preserves the initial pluck or finger sound while controlling the long, sustaining part of the note.
- Release: This is crucial. Set the release so it grooves with the song’s tempo. You want the compressor to reset completely before the next bass note hits to avoid unwanted pumping.
- Gain Reduction: You can be a bit more generous here. Hitting 4-8 dB of gain reduction can deliver that thick, unwavering low-end that glues the kick and bass together.
Gluing the Entire Mix Together
Mix bus compression is the final, subtle step that can make a collection of individual tracks feel like a cohesive, finished song. We’re not looking for heavy-handed control; this is about adding that final bit of polish and "glue." A clean VCA or a vibey Vari-Mu compressor is ideal for this.
The key is to be incredibly gentle. Use a very low ratio like 1.5:1 or 2:1, a slow attack (around 30 ms), and a relatively fast release (maybe 100 ms). You should barely see the needle move—just 1-2 dB of gain reduction on the absolute loudest peaks. The effect should be felt more than heard. It’s a subtle tightening that makes the whole track feel more powerful and connected. This final polish is especially important when exporting your final tracks, a process where it helps to understand what are stems in music and how they function in modern production.
Advanced Compression Techniques for Modern Producers
Alright, once you've gotten the hang of the basic controls, it’s time to unlock what a compressor can really do. The advanced techniques are where the magic happens—they’re how pro mixes get that incredible punch, clarity, and energy. We're moving beyond just taming peaks and into the world of creative sound design.
Two of the most essential methods in any producer's toolkit are parallel and sidechain compression. They might sound intimidating, but the core ideas are surprisingly simple. Mastering these will let you fix common mix issues and inject some serious rhythmic life into your tracks.
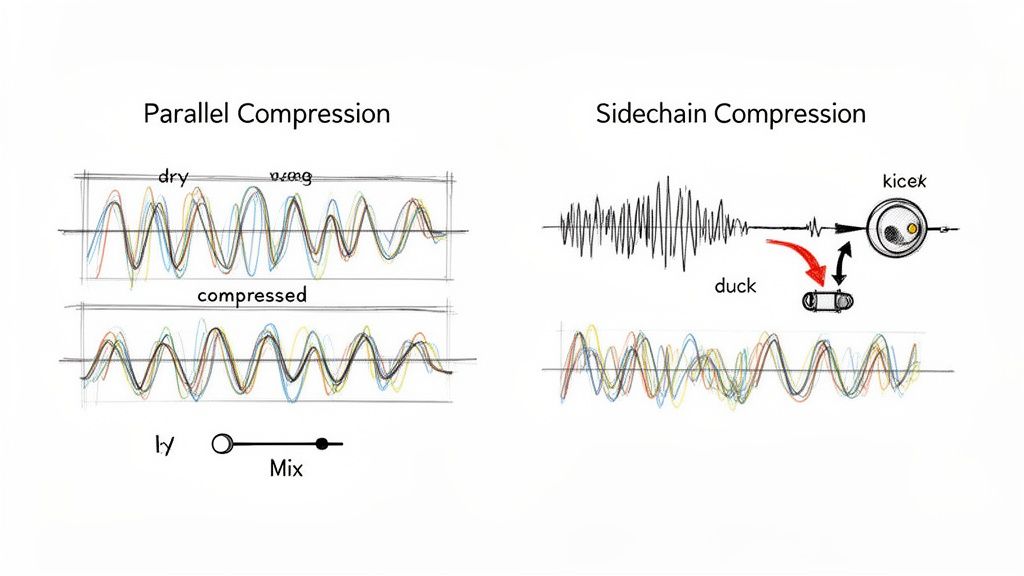
Parallel Compression: Getting That "Big" Sound
You'll often hear this called "New York compression," and it's a go-to trick for adding serious weight and density to a sound without killing its natural vibe. Instead of just squashing the original signal, you're blending in a heavily compressed version right alongside it.
Here’s the basic recipe:
- Create a Copy: Duplicate the track or bus you want to fatten up, like your main drum bus.
- Slam the Copy: On this new duplicate track, get aggressive with a compressor. We're talking high ratios (10:1 or even higher), a lightning-fast attack, and a quick release. The goal is to make this copy sound completely crushed and over-the-top.
- Blend It In: Pull the fader on the duplicated track all the way down. Now, slowly raise it, tucking it just underneath the original, uncompressed track. Listen as the sound gets thicker and more powerful, but without losing the snap of the original hits.
This works wonders on drums, vocals, and bass. It adds a layer of rich, sustained body that you just can't get with a single compressor.
Sidechain Compression: Making Space and Creating Groove
Sidechaining is all about creating space in your mix by letting one sound trigger the compressor on another. You've definitely heard it in dance music—that classic "pumping" effect where a synth pad ducks out of the way every time the kick drum hits.
But it’s not just a creative gimmick; it’s a fundamental mixing tool. By ducking one element to make room for another, you can carve out a clean, defined low end where everything has its place.
Think about the classic kick and bass problem. You can put a compressor on your bass track but set its "key" or sidechain input to listen to the kick drum instead. Now, every time the kick hits, the bass's volume will dip for a split second. This stops them from clashing and fighting for the same frequencies, resulting in a tight, punchy rhythm section where both the kick and bass can be heard clearly.
Surgical Compression with Today's Tools
Modern tech has blown the doors wide open for what's possible. Let's say you have a finished stereo drum loop, but the snare is just a little weak. In the past, you were stuck. But with AI-powered tools like Isolate Audio, you can actually pull just the snare out of the full loop.
From there, you can apply compression to just the isolated snare to give it the perfect crack and punch, then mix it back into the original loop. This kind of surgical precision was once unthinkable. It’s a powerful workflow that combines classic techniques with new possibilities, and you can see a similar approach in action when producers create instrumental music from popular songs, transforming existing audio in creative ways.
Common Compression Mistakes and How to Avoid Them
Compression is a double-edged sword. It can be the secret ingredient that makes a track feel powerful and polished, or it can be the very thing that sucks all the life out of it. Knowing what not to do is just as important as knowing what to do. Let's walk through some of the most common traps mixers fall into.
The biggest and most frequent mistake is, without a doubt, over-compression. This is what happens when you get a little too happy with the controls, setting a super low threshold and a high ratio. You end up squashing the performance flat, killing the natural ebb and flow that gives music its emotional impact. The result? A mix that sounds small, lifeless, and frankly, a bit amateur.
Your bypass button is your best friend. Seriously. Flip it on and off constantly. If the compressed signal doesn't sound clearly better—not just louder or different—then you need to rethink your settings. It's your most honest reality check.
Getting Your Attack and Release Wrong
Your timing controls are where the real magic happens, but they're also easy to mess up. Setting them incorrectly doesn't just fail to improve the sound; it can actively create new problems.
- Attack Too Fast: A super-quick attack time can chop the front end right off a sound. This is especially bad for drums and other percussive hits, as it shaves off the initial transient that gives them their punch. Instead of cutting through the mix, they get pushed back and sound dull.
- Release Too Fast: When the release is too quick, the compressor can start frantically turning the volume up and down in the quiet spaces between notes. This creates an unnatural and often distracting "pumping" or "breathing" sound, which is particularly noticeable on vocals and bass.
Another classic error is forgetting about makeup gain. Compression, by its nature, turns things down. If you don't compensate by turning the signal back up, you can't make a fair comparison. You'll always think the uncompressed version sounds better simply because it's louder. Always level-match your "before" and "after" to make sure you're actually improving the sound, not just changing its volume.
How Loudness Has Changed the Game
A lot of these bad habits were born during the "loudness wars," a period where the goal was to make tracks as loud as humanly possible, often by using extreme bus compression and brickwall limiting. But with the rise of streaming, that game has changed.
Most major platforms now normalize audio, bringing everything to a consistent playback level, typically around -14 LUFS. This means those hyper-compressed tracks that used to scream out of the speakers are simply turned down. There's much less incentive to squash a master to -8 or -9 LUFS anymore. With streaming making up 67.95% of music revenue in 2025, virtually all commercial music is shaped by these new standards. You can dive deeper into these music market industry trends here.
By sidestepping these common pitfalls, you can use compression as it was intended: to add punch, control, and character, creating mixes that feel both powerful and dynamic.
Sometimes, you need to compress just one element in an already-mixed track, but traditional EQs and compressors can't do that. With Isolate Audio, you can type in a simple prompt like "isolate vocals" to pull any sound out of a full mix. From there, you can apply targeted compression and then blend it back in, giving you a level of surgical control that was impossible before. Start isolating audio with AI for free today.