How to Create Karaoke Tracks Your Audience Will Love
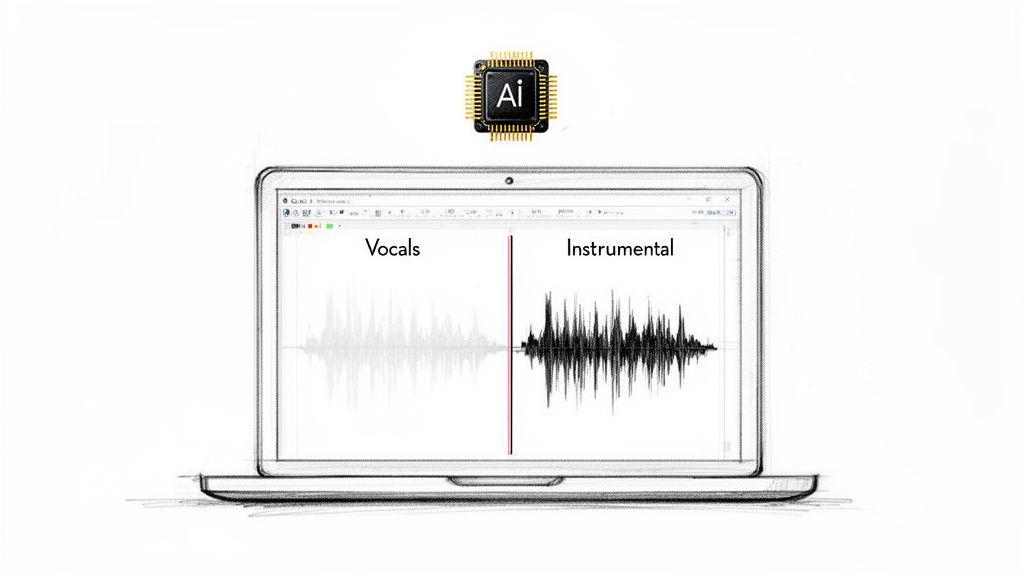
At its core, making a great karaoke track means stripping the lead vocal from a song, leaving a clean instrumental for someone to sing over. For years, this was a tedious, often frustrating job for audio engineers. But now, AI-powered audio separation has completely changed the game, turning a complex chore into a quick and simple task.
Let's walk through how this modern process works, from start to finish.
The Modern Way to Create Karaoke Tracks
Forget spending hours fiddling with EQs and phase inverters trying to coax a vocal out of a mix. Those old-school methods almost always left behind a muddy, artifact-riddled instrumental. Today, we can get a pristine karaoke track in minutes, all thanks to artificial intelligence.
This leap in technology couldn't have come at a better time. The karaoke market is absolutely massive—the app segment alone was valued at approximately $5.6 billion in 2023. Creators are scrambling to produce custom tracks to meet this demand. For context, an experienced engineer using a tool like Adobe Audition might spend 4-6 hours on a single track and still only achieve 70-80% vocal removal. AI tools slash that time to just a few minutes while hitting 95% isolation rates or better. You can get a better sense of this market growth from reports like the one on cognitivemarketresearch.com.
How AI Changed Everything
The evolution from traditional, manual vocal removal to modern AI-driven separation is a night-and-day difference for anyone creating karaoke tracks.
| Feature | Traditional Methods (e.g., Phase Inversion) | Modern AI Tools (e.g., Isolate Audio) |
|---|---|---|
| Time Required | 4-6 hours per track for a professional | Under 5 minutes per track |
| Accuracy | 70-80% at best, often with audible artifacts | 95%+ clean vocal and instrumental separation |
| Quality | Muddy instrumentals, "ghost" vocals, compromised audio | Crisp, clean instrumentals with no vocal bleed |
| Required Skill | High-level audio engineering expertise needed | Minimal technical skill required; intuitive interface |
| Process | Complex, manual EQ adjustments and phase cancellation | Automated, one-click separation process |
This table really highlights just how much more efficient and effective AI tools are, making high-quality karaoke production accessible to everyone, not just seasoned audio pros.
The old challenge was always the same: how do you cleanly remove a vocal that's been baked into a final mix? Techniques like phase inversion or aggressive EQ were blunt instruments, often causing collateral damage to the instrumental track. You'd kill the vocal, but you might take half the snare drum or the shimmer of the cymbals with it.
AI-powered platforms like Isolate Audio approach the problem from a completely different angle. Instead of using clumsy tricks, they rely on machine learning models trained on thousands of hours of music. These models have learned to recognize what a vocal sounds like, what a drum sounds like, and what a bass sounds like, allowing them to separate them with surgical precision.
This new approach brings some huge benefits:
- Blazing Speed: What used to be a half-day project is now done in the time it takes to grab a coffee.
- Pristine Quality: The final instrumental is clean and full, free of the weird artifacts that plagued older methods.
- User-Friendly: You don't need a degree in audio engineering. The interfaces are designed to be simple and intuitive for everyone.
The real breakthrough is the ability to deconstruct a finished song. Think of it like un-baking a cake—AI can now separate the flour, sugar, and eggs back into their original bowls. That’s the level of precision we’re now working with.
This guide is all about this modern, AI-first workflow. We’ll skip the outdated phase inversion tricks and show you how to get a stage-ready backing track in just a few clicks. We'll start with why high-quality source audio is so critical and then move through the simple steps that transform any song into a karaoke classic. To learn more about the tech itself, check out our guide to the best stem separation software.
Preparing Your Source Audio for the Best Results
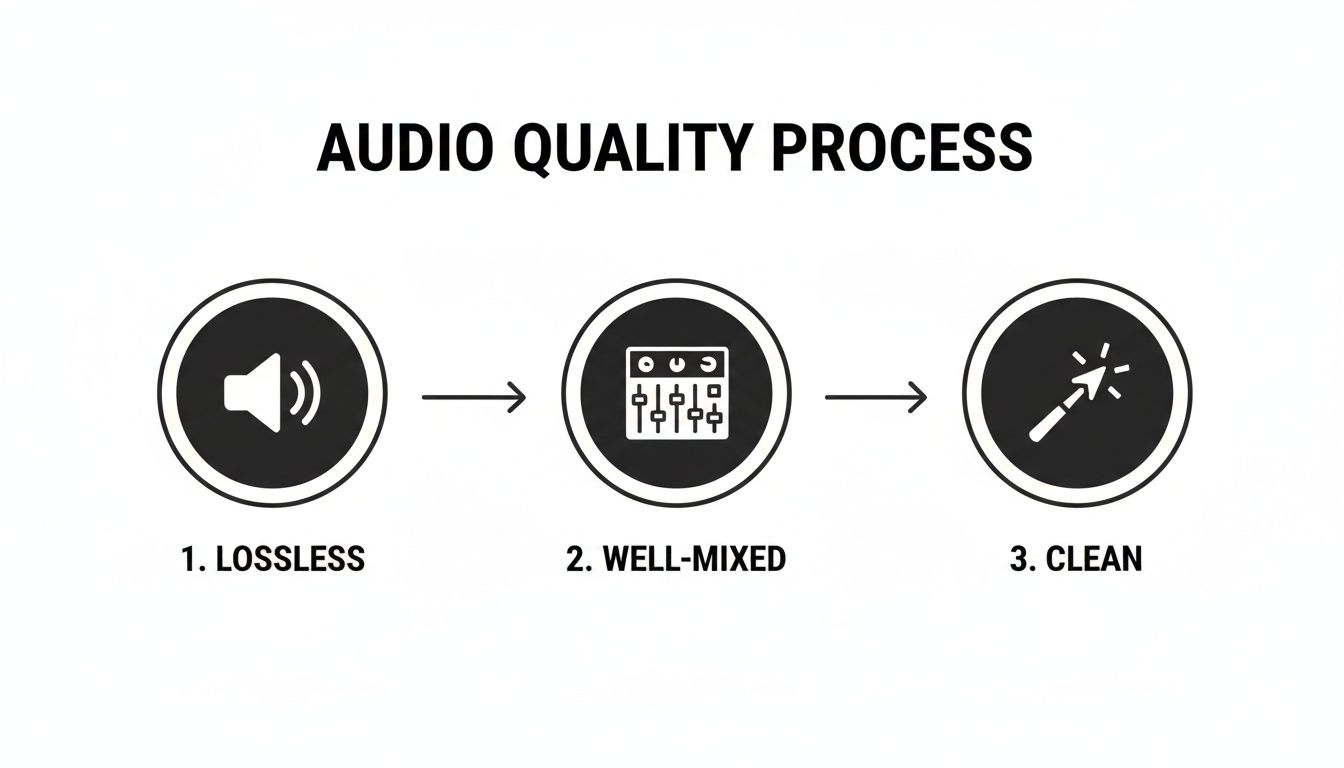
The final quality of your karaoke track is almost entirely decided before you even touch the vocal removal software. It all comes down to the quality of your source audio. I always tell people to think of it like cooking a great meal—you can’t expect a five-star result if you start with subpar ingredients. The exact same principle applies here.
Starting with a high-quality, uncompressed audio file is the single most important thing you can do. It’s so tempting to just grab a common MP3, but you're immediately shooting yourself in the foot. MP3s use lossy compression, which is a fancy way of saying they throw out audio data to shrink the file size. That process creates tiny artifacts and blurs the lines between instruments, making it much, much harder for the AI to figure out what's a voice and what's a guitar.
Choose Lossless Formats
For the cleanest possible instrumental, you really need to use a lossless audio format. These formats keep every single bit of the original recording, giving the AI the best possible data to work with.
- WAV (Waveform Audio File Format): This is the gold standard for professional audio. It's a perfect, bit-for-bit copy of the original master, offering the highest fidelity you can get.
- FLAC (Free Lossless Audio Codec): FLAC gives you the exact same quality as WAV but cleverly compresses it into a smaller file. It's my go-to for saving space without losing a single drop of quality.
- ALAC (Apple Lossless Audio Codec): Think of this as Apple's version of FLAC. It's another fantastic option, especially if you're already in the Apple ecosystem.
When you start with one of these, you're giving the AI a rich, detailed audio landscape to analyze. This dramatically boosts your chances of getting a crisp instrumental with virtually zero vocal bleed. If your audio is coming from a video, the same rule applies—start with the highest quality version you can find. For a deeper dive, check out our guide on how to extract audio from a video file.
Identifying a Good Mix for Separation
Beyond the file type, the song's original mix is a huge factor. Honestly, not all songs are created equal for this task. What you're looking for is a track with a clean, modern production style where the lead vocal sits right in the center of the stereo image, separate from everything else.
A well-mixed song with a distinct lead vocal is like giving the AI a clear roadmap. If the vocals are buried in effects or fighting with other instruments in the same frequency range, it's like asking the AI to navigate without a map—it might get there eventually, but the result will be a lot messier.
Try to steer clear of songs with certain characteristics that are known to make separation a headache.
Common Pitfalls to Avoid
Some tracks are just naturally tougher to work with. While a powerful AI can often muscle through them, you'll get far better results by avoiding these if you can.
| Challenging Trait | Why It's a Problem |
|---|---|
| Heavy Vocal Reverb/Delay | That long reverb "tail" smears itself all over the other instruments, making it incredibly difficult for the AI to cleanly remove it. |
| Live Recordings | Crowd noise, instrument bleed from other mics, and weird room acoustics can really confuse the AI. It struggles to tell the singer apart from the audience. |
| Dense Backing Vocals | If you have a wall of harmonies panned wide and mixed nearly as loud as the lead vocal, the AI can get confused about what to keep and what to remove. |
| Older or Poorly Mixed Tracks | A lot of songs from the 60s or 70s have vocals panned hard to one side or instruments "bleeding" into the vocal mic, which complicates clean isolation. |
If you absolutely have to work with a tricky track, advanced settings can certainly help. But nothing beats starting with a clean, well-mixed studio recording. That's the secret to getting a truly professional-sounding karaoke track every time.
Using AI to Remove Vocals
With your audio prepped and sounding great, it's time for the magic. This is where we hand the track over to an AI to do the heavy lifting of vocal removal. In the old days, this part of the process was a frustrating, technical nightmare. Now, it’s as simple as telling the software what you want in plain English.
Forget fumbling with confusing EQs, phase inverters, or complex plugins. The innovation here is moving away from all that technical jargon and just… talking to the tool. You don't need a degree in audio engineering anymore; you just need to know what you want to hear (and what you don't).
It All Starts With a Simple Prompt
Instead of a dashboard full of knobs and sliders, your main tool is a text box. This is where you give the AI its instructions. Getting a clean instrumental track really comes down to writing a clear, specific prompt.
Here are a few prompts I use all the time when making karaoke tracks:
remove lead vocals: This is my go-to for 90% of projects. It’s direct, effective, and tells the AI to pull out the main singer while leaving the backing vocals and instruments untouched. Perfect for most pop songs.isolate all singing and background vocals: I use this when I need a completely clean instrumental slate. It strips out every voice—lead, harmonies, ad-libs, you name it. This is great for tracks with complex vocal arrangements where you want absolutely no trace of a voice left.remove vocals but keep reverb: This one is a bit more nuanced. Sometimes, the vocal reverb is a huge part of the song's vibe and soundstage. This prompt tells the AI to take out the voice but leave that atmospheric reverb tail, which can prevent the instrumental from sounding too dry or empty.
The AI doesn't just guess; it's been trained on countless hours of music to recognize the unique sonic signatures of different elements. When you type "lead vocals," it knows what to listen for, making the process incredibly precise and minimizing the kind of "collateral damage" to the instruments that plagued older vocal removal methods.
Choosing the Right Isolate Audio Preset
Once you’ve written your prompt, you'll need to select a quality preset. This choice is really a balance between how fast you need the track and how good you want it to sound. Picking the right one for the job will save you a ton of time.
To help you decide, here’s a quick rundown of how to use each preset in Isolate Audio when you're making a karaoke track.
Isolate Audio Preset Guide for Karaoke Creation
This table breaks down which preset to use based on your needs, whether you're just messing around or creating a final, professional-level backing track.
| Preset | Best Use Case | Processing Speed | Output Quality |
|---|---|---|---|
| Fast | Quickly checking if a song will separate cleanly or for creating a rough practice track. | Very Fast (Under a minute) | Good, but may contain minor artifacts. |
| Balanced | The workhorse option for most projects. It provides excellent quality for high-grade demos. | Moderate (A few minutes) | High quality, clean separation. |
| Best | Essential for a final, professional-grade karaoke track for performance or distribution. | Slower (Can take several minutes) | Pristine, studio-grade separation. |
For any track you plan to use in a performance or share publicly, always, always choose the 'Best' preset. Seriously, don't skimp here. The extra few minutes it takes to process is a tiny price to pay for an instrumental that's free of distracting vocal bleed or weird artifacts. It’s like rendering a video in 4K instead of 720p—the difference in quality is what makes it professional.
The quality of your starting file is just as important. A great AI can't fix a terrible source file.
Starting with a lossless, well-mixed, and clean source file is the foundation for getting a fantastic result from the AI.
The Evolution of Karaoke Creation
Think about how far this technology has come. The karaoke industry, which hit $6.31 billion in 2023 according to a recent market report, started with clunky hardware in the 70s. For years, software like Audacity got us maybe 75% of the way there, but it could take 2-3 hours of tedious work for a single song.
Today, a tool like Isolate Audio can hit 98% fidelity in under 10 minutes on the 'Best' setting. It’s a completely different world.
The biggest shift isn't just the quality—it's the accessibility. Anyone can now create a professional-sounding instrumental without needing an audio engineering degree. You simply describe what you hear, and the AI does the heavy lifting.
Once the AI finishes processing, you just download your new instrumental. If you started with a good source file and used the right preset, it's often ready to go immediately. To see how this natural language approach stacks up against more traditional tools, check out our guide on the best vocal removal software.
Refining and Polishing Your Instrumental Track
After the AI has worked its magic, you'll have an instrumental track that’s likely 95% of the way there. This is where your human touch comes in, transforming a good track into a truly professional-sounding one. While modern AI is incredibly good, it's not always perfect.
Especially with songs that have complex mixes or vocals drenched in reverb and delay, you might hear some faint echoes or artifacts left behind. Think of this next phase as the final buff and shine, not a major repair job. With a few subtle tweaks in a Digital Audio Workstation (DAW), you can clean up these minor imperfections and really prep the track for a singer.
Hunting Down Vocal Remnants with EQ
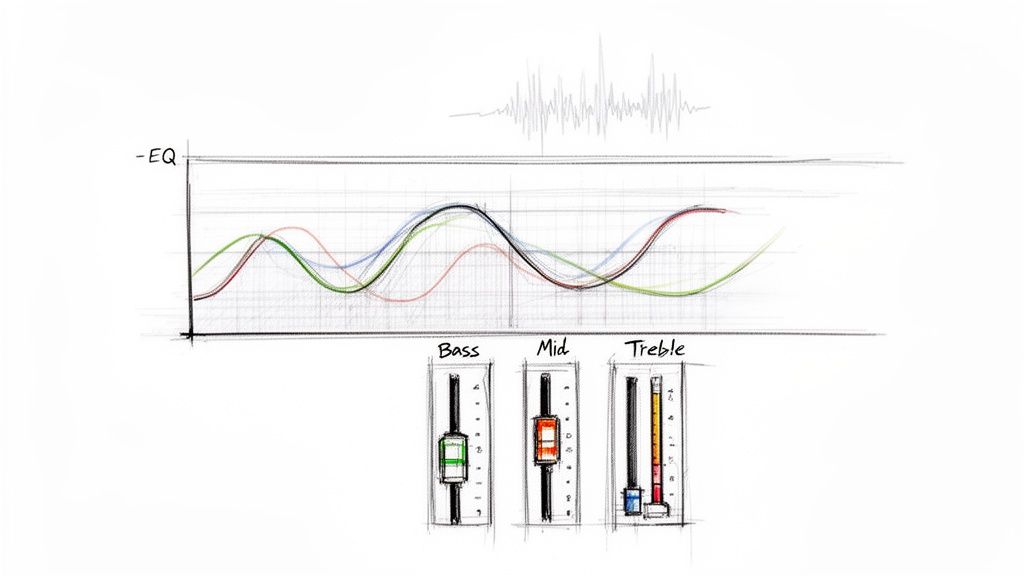
The most common thing you’ll run into is a faint "ghost" of the original vocal. This usually isn't the vocal itself, but its sonic footprint—the specific frequencies it used to dominate. Your best friend for this task is a good equalizer (EQ).
Every sound has its own space in the frequency spectrum. Lead vocals in most pop and rock music tend to hang out in the 1 kHz to 4 kHz range. Our ears are most sensitive to this range, which is why vocals are mixed to be so clear and present right there. When you pull the vocal out, this area can sometimes feel a bit hollow or, conversely, still hold onto some of that vocal energy.
To clean this up, we'll use a classic audio engineering trick called a subtractive EQ cut.
- First, pull your instrumental into a DAW like Audacity, GarageBand, or Logic Pro.
- Slap a parametric EQ plugin onto the track.
- Create a narrow EQ band and give it a big boost, maybe around +10 dB.
- Now, slowly "sweep" this boosted frequency across that 1 kHz to 4 kHz range. As you move it, listen closely for the spot where the vocal remnants suddenly jump out at you.
- Once you’ve found that pesky frequency, flip the boost into a gentle cut. You don't need much—just a 2-4 dB reduction should do the trick. The key is to keep the cut narrow so you don't thin out the other instruments.
This small adjustment is often all it takes to make those last traces of the vocal vanish, leaving the instrumental sounding clean and natural.
Rebalancing the Mix After Vocal Removal
Sometimes, yanking a powerful lead vocal out of a mix can throw the song's balance off a bit. The vocal might have been masking some of the snap from a snare drum or the crunch of a rhythm guitar. Without it, those elements can suddenly sound a little too loud or harsh.
This is an easy fix. You're not trying to remix the entire song from scratch, just make some small, targeted volume adjustments. You might find that pulling the snare down by just 1 dB or nudging a guitar fader back a hair is all you need to restore the track's original vibe. Trust your ears on this one—if something suddenly sounds out of place, a tiny fader move is probably the solution.
Don't overdo it with the rebalancing. The goal is simply to make sure no single instrument is hogging the spotlight now that the lead singer is gone. A few small tweaks are usually all that’s needed to bring back the song’s intended dynamics.
Adding Singer-Friendly Guides
A truly great karaoke track does more than just supply the music; it actively helps the singer nail their performance. Two simple additions can make a world of difference for the person at the mic: a click track and a guide melody.
- Click Track: This one is a no-brainer. Adding a simple click or a four-beat count-in at the top of the song gives the singer a clear tempo cue so they can jump in confidently on that first line.
- Guide Melody: For songs with tricky timing or long instrumental breaks, a quiet guide melody can be a lifesaver. You can record a simple piano or synth line that lightly follows the vocal melody. The trick is to mix it low—just loud enough for the singer to hear it for reference, but not so loud that it distracts from their own performance.
These little touches are the hallmarks of high-quality karaoke. They show a level of care that turns a simple instrumental into a polished performance tool. Once these final details are in place, your track is ready for export.
Finishing Touches: Exporting Your Track and Navigating Copyrights
You’ve done the hard work. Your instrumental is clean, polished, and just waiting for a singer to bring it to life. Now for the final hurdle: getting it out of your DAW and into the world. This isn't just about clicking "Export." You've got to think about the technical side—the file format—and the legal side that dictates where and how your karaoke track can be used.
The way you export your track really depends on its final destination. A file you're loading onto a live performance rig has totally different needs than one you’re uploading to a karaoke app or sharing with friends online. It's all about picking the right tool for the job.
Choosing the Best Export Format
Let’s be clear: not all audio formats are created equal. Your choice here has a real, audible impact on the final sound quality. It's like the difference between a high-resolution photo and a pixelated thumbnail.
For Live Performance & Pro Use (WAV): If your track is destined for a professional PA system at a bar, event, or live show, you absolutely need the best quality. Export as a WAV file. This is a lossless format, which means it keeps 100% of the original audio data. You get a full, rich sound with zero compression artifacts.
For Online Sharing & Karaoke Apps (High-Bitrate MP3): When you're sharing online, file size suddenly becomes a big deal. This is where a high-bitrate MP3 (320 kbps) is your best friend. It uses clever compression to shrink the file size dramatically while keeping the audio quality so good that most people would never notice the difference from a WAV.
A quick pro-tip: Always, always keep a master WAV file of your finished instrumental. You can create as many compressed MP3s as you want from a high-quality WAV, but you can never get back the quality lost in a compressed file. Think of it as your project's pristine, archival copy.
Understanding the Rules of the Road
Alright, now for the part that can trip people up: copyright.
Making a karaoke track of a copyrighted song for your own personal practice at home? You're generally in the clear. But the moment you decide to share it, distribute it, or use it in any kind of public setting, you've officially entered the world of music licensing.
This is a critical distinction. You can't just cook up an instrumental of the latest hit song and throw it on YouTube or use it at a paid gig. The original songwriters and publishers own the rights to that musical composition, and using it without permission is copyright infringement, plain and simple.
Public Performance and Mechanical Licenses
When you're working with a copyrighted song and plan to use it publicly, there are two main types of licenses you'll need to know about.
Mechanical License: This license gives you the right to actually reproduce and distribute a song. If you’re thinking about selling your karaoke tracks or even just giving them away on a large scale, you'll need a mechanical license from the publisher.
Public Performance License: This one is for when the song is performed in public. That could be at a karaoke night in a bar, a concert, or even as background music in a video you post online. Organizations like ASCAP, BMI, and SESAC are the ones who handle these licenses for songwriters.
Getting a handle on these legal requirements is non-negotiable if you want to keep your creative work on the right side of the law. It might seem like a headache, but it’s a fundamental part of being in the music industry. The whole scene is growing fast, with the global karaoke market forecasted to hit $7.68 billion by 2031. This boom is powered by accessible tools, with some regions seeing as many as 60% of pro tracks produced with help from AI.
Got Questions? Let's Troubleshoot Common Karaoke Track Issues
Even with the best tools, you're bound to run into a few tricky situations when you start making your own karaoke tracks. That’s perfectly normal. Moving from a fully mixed song to a clean instrumental often unearths some unique challenges.
This section is all about tackling those common hurdles. Think of it as your field guide for the "what if" moments—from chasing down stubborn vocal echoes to figuring out what to do with a song that just sounds… empty.
Can I Just Grab a Song from YouTube?
Yes, you absolutely can, and honestly, it’s how most people get started. But there's a catch: the quality of your final instrumental is only as good as the audio you feed the AI. YouTube is notorious for compressing audio to save on bandwidth, which can make a clean vocal separation a bit more difficult.
To give yourself the best shot at a great result, here are a few pro tips:
- Go to the Source: Always hunt down the official music video on the artist's or label's channel. These are almost always the highest quality versions available.
- Crank Up the Quality: Before you do anything else, make sure the video playback is set to the highest resolution possible, like 1080p or 4K. A higher video quality usually means a better audio bitrate.
- Do a Quick Headphone Check: Give the track a quick listen with good headphones. If it already sounds muddy, distorted, or tinny on YouTube, those problems will only get worse once the vocals are gone.
While you can get surprisingly good results from a high-quality YouTube rip, a lossless file like a WAV or FLAC will always give you a cleaner, more professional-sounding instrumental.
What if I Can Still Hear Faint "Ghost" Vocals?
This is hands-down the most common issue people face. You process the song, and it sounds amazing, but then you notice it—a faint, whispery echo of the singer lingering in the background. It’s not your imagination, and it usually happens for a couple of key reasons.
The number one culprit is heavy vocal effects, especially reverb and long delays. These effects essentially "smear" the vocal across the entire mix, baking it into the other instrument tracks. While a good AI can surgically remove the main vocal performance, those echoey reverb tails sometimes get left behind.
It’s like trying to remove a coffee stain from a piece of paper. You can lift the dark spot, but a faint brown shadow might remain. That shadow is the vocal reverb, and it takes a bit more finesse to clean up completely.
Another cause is a super dense mix where the vocals and instruments are all crammed into the same frequency range. In those cases, you might need to do a little audio "microsurgery" with a subtractive EQ in your DAW, just like we covered in the polishing section.
How Should I Handle Songs with Lots of Backing Vocals?
This is a great question because the "right" answer depends entirely on what you're using the track for. Some songs just aren't the same without their signature harmonies.
Here's how to approach it based on your goal:
- For a True Instrumental: If you need a completely blank canvas for a performer who will be singing every single part, you'll want to remove all the vocals. A prompt like
isolate all vocals including harmonies and ad-libstells the AI to identify and strip out every voice it finds. - For a Performance-Ready Track: Often, those backing vocals are a crucial part of the song's energy. If you want to keep them, just tell the AI to
remove lead vocal only. This targets just the main melody, leaving those rich harmonies intact for the singer to perform with.
It's this level of control that really sets modern tools apart. You get to decide precisely which vocal elements stay and which ones go.
My Instrumental Sounds a Little Empty. What Gives?
Ever remove the vocal and feel like the track lost its punch? It's not a glitch. A lead vocal, especially in pop or rock music, takes up a huge amount of sonic real estate right in the center of the mix. When you take it out, you can be left with a noticeable gap.
Fortunately, it's usually an easy fix. Here’s what you can do to bring the energy back:
- A Gentle Rebalance: Nudge the volume of the main melodic instruments—like a lead guitar, piano, or synth—up by just a decibel or two. This can help fill the space the vocal once occupied.
- Add a Touch of Reverb: Applying a subtle "master" reverb across the entire instrumental can help glue all the remaining parts together, making them sound more cohesive.
- Weave in a Guide Melody: As we discussed earlier, adding a quiet guide melody with a soft instrument like a piano or synth not only helps the singer stay on key but also fills in some of that empty melodic space.
The idea isn't to re-mix the song from scratch, but to make small, subtle adjustments to compensate for the missing vocal. This ensures your final instrumental sounds full, balanced, and ready for the spotlight.
Ready to stop wrestling with complicated software and start creating flawless karaoke tracks in minutes? Isolate Audio lets you remove vocals with simple text prompts, giving you studio-quality instrumentals without the hassle. Try it for free and hear the difference for yourself.