How to Synchronize Audio with Video Flawlessly
At its core, synchronizing audio and video is all about lining up separately recorded sound and picture tracks in your editing timeline. You're usually looking for a sharp, clear reference point—like the classic clap of a slate—that you can easily match up in post-production. It’s a skill that seems simple on the surface, but mastering it is what separates amateur work from polished, professional content.
Why Perfect Audio and Video Sync Is So Important

Ever watched a video where someone’s lips are moving, but the words you hear are just slightly off? It’s jarring. That "lip flap," as it’s often called, is the most obvious sign of bad sync, but the problem goes deeper. Even a tiny delay of a few milliseconds, almost imperceptible, can create a subconscious feeling that something is off, signaling a lack of quality to your audience.
This slight disconnect introduces a subtle friction to the viewing experience. It makes the brain work just a little harder to connect what it's seeing with what it's hearing, which can break immersion, chip away at viewer trust, and kill attention spans. When your audio and video are perfectly locked, the content just flows. It feels seamless and professional, letting your message hit home without any distractions.
The Evolution of Synchronization
The struggle to marry sound and picture is as old as "talkies" themselves. It's been a central challenge in filmmaking from the very beginning, though the tools have changed dramatically. A major breakthrough came in 1941 with the Magnetophon, a German-engineered magnetic tape recorder. For the first time, sound could be captured with incredible clarity and manipulated separately from the film, which completely changed the game for post-production. If you're curious, you can find more on the history of video editing over at vodpod.com.
Key Takeaway: Perfect sync isn't just a technical box to check. It’s a critical part of effective communication that builds credibility, keeps viewers engaged, and makes your work look and feel professional.
What You Will Learn in This Guide
This guide is your complete roadmap to mastering audio and video sync, from the fundamentals to advanced, real-world techniques. We’ll cover everything you need to know to tackle any sync scenario you might encounter.
You'll discover how to:
- Prepare for Success: We'll start on set. Learn simple best practices like using a slate (or just a hand clap!) and matching frame rates to save yourself a massive headache later.
- Master Your Editor: Get practical, step-by-step workflows for manual waveform alignment and the powerful auto-sync features inside Premiere Pro, Final Cut Pro, and DaVinci Resolve.
- Use AI to Your Advantage: See how modern AI tools can isolate dialogue or clean up messy audio, making it possible to sync tracks that would have been a nightmare to deal with just a few years ago.
By the time you're done, you'll know exactly how to synchronize audio with video, turning what was once a common post-production frustration into a smooth and efficient part of your creative process.
Setting Up Your Shoot for Flawless Sync
Let’s be honest: the best way to fix a sync problem is to make sure it never happens in the first place. A few extra minutes of careful setup on set can literally save you hours of soul-crushing work in post. Getting this right from the very beginning is the secret to a smooth edit and a professional final cut.
Think of it as laying a solid foundation. If your audio and video files are already on the same page from the moment you hit record, the whole process of syncing them up later becomes almost trivial.
Match Your Rates to Avoid Drift
One of the sneakiest and most common sync issues I see is a mismatch in recording settings between the camera and the external audio recorder. This is especially killer on long takes—like interviews or event coverage—where a tiny discrepancy slowly pulls your audio and video apart. We call this sync drift, and it's a nightmare.
To sidestep this completely, you have to align two critical settings on all your devices before you even think about rolling:
- Frame Rate (Video): Make sure every single camera is set to the exact same frame rate. Whether you're shooting at 24 fps, 29.97 fps, or 60 fps, consistency is king. Mixing frame rates is a guaranteed recipe for a headache.
- Sample Rate (Audio): For any kind of video work, the industry standard for audio is 48 kHz. You might see 44.1 kHz used for music (it's the standard for CDs), but using it for video can introduce tiny timing errors that compound over time. Stick to 48 kHz.
Locking these settings in across the board is non-negotiable. It ensures one second of video is exactly the same length as one second of audio, stopping that frustrating drift before it can start.
Create a Clear Sync Point
Automated syncing tools are fantastic, but they aren't magic. They need a clear, sharp reference point to do their job. This is where a classic piece of film gear comes into play: the clapperboard, or slate. That iconic "clap" creates a massive, unmistakable spike in the audio waveform and a precise visual cue of the sticks coming together.
Don't have a professional slate? Don't sweat it. A single, loud hand clap in front of the camera works just as well. The whole point is to create one, sharp, instantaneous event that both the camera's built-in mic and your external recorder can capture at the same time.
Pro Tip: Slate at the beginning of every single take. I know it feels repetitive, but when you’re staring at a timeline with dozens of clips, you'll thank yourself. That reliable sync point on every clip makes the entire process practically effortless.
Always, Always Record Scratch Audio
This is a big one. Even if you're capturing beautiful audio on a high-end external recorder, always record audio directly into your camera, too. We call this "scratch audio." The quality will probably be terrible, and that's completely fine. Its job isn't to sound good; its job is to be a guide.
This scratch track is the reference your editing software needs. The powerful, automated sync features in tools like Premiere Pro, Final Cut Pro, and DaVinci Resolve work by analyzing the waveform of your good audio and lining it up perfectly with the scratch audio from the camera. Without that reference track, the software is flying blind, and you're stuck syncing every single clip by hand.
Think of it as a blueprint. The scratch audio shows your editing software exactly where the high-quality audio needs to go, enabling you to sync clips with just a click or two. It's a tiny step that unlocks the fastest post-production workflows.
Bringing Audio and Video Together in Post
Once your footage is safely on your drives, the real work begins. This is where you'll marry your pristine external audio with your video clips. Thankfully, modern editing software gives us some incredibly powerful and efficient ways to do this. Whether you're a hands-on editor or you'd rather let automation do the heavy lifting, getting perfect sync is more accessible than ever.
The entire process really just boils down to giving your Non-Linear Editor (NLE) a clear point of reference. You can either show it exactly where to line things up yourself or let its algorithms analyze the audio and find the match for you. Both methods work great, but knowing which one to use—and when—is what separates a smooth edit from a frustrating one.
The Art of Manual Waveform Syncing
Sometimes, the old ways really are the best. This is especially true when you need absolute, frame-perfect precision or when the automated tools just can't figure it out. Manual waveform syncing is a foundational skill every editor should have in their back pocket. It's direct, it's reliable, and it puts you in complete control.
The idea couldn't be simpler: you visually line up the audio waveforms from your camera's scratch track and your dedicated audio recorder. That sharp, loud spike from your clapperboard or a good, solid hand clap becomes your anchor.
Here’s how it usually goes down:
- Drop your video clip (with its built-in scratch audio) onto the timeline.
- Place your high-quality external audio clip on a separate track right underneath it.
- Zoom way in on the timeline—so far in that you can see the individual peaks and valleys of the audio waveforms.
- Find that distinct spike from the slate clap on both audio tracks. It should be impossible to miss.
- Nudge the external audio clip left or right until its peak aligns perfectly with the peak on the camera's scratch audio.
Once they're locked in, you can just mute or delete the scratch audio track. What you're left with is beautiful, clean sound perfectly synced to your picture.
Letting Your Software Do the Heavy Lifting
While manual syncing is a crucial skill, automated tools are your best friend when you're up against a deadline or dealing with a multi-camera shoot. Modern NLEs like Adobe Premiere Pro, Final Cut Pro, and DaVinci Resolve have built-in features that can analyze and synchronize a mountain of clips in seconds.
These tools generally use one of two methods to get the job done:
- Timecode: If you were working with professional gear that records identical timecode to both the video and audio files, the software can match them up instantly. This is the gold standard for big, complex productions.
- Audio Waveform Analysis: Far more common for most of us, the software intelligently "listens" to the camera's scratch audio and the external audio, finds the matching patterns, and aligns them all on its own.
This automated process isn't new; it's built on principles proven since the 1971 CMX 600, where editors first aligned clips using audio waveforms. Today, this remains the core of an estimated 85% of professional workflows. Premiere’s ‘Synchronize Clips’ feature, for instance, can analyze up to 10 tracks at once, slashing sync time from hours to seconds with an impressive 92% accuracy on clips with a clean slate sound.
The simple on-set workflow below—matching rates, slating, and recording scratch audio—is what makes all this post-production magic possible.
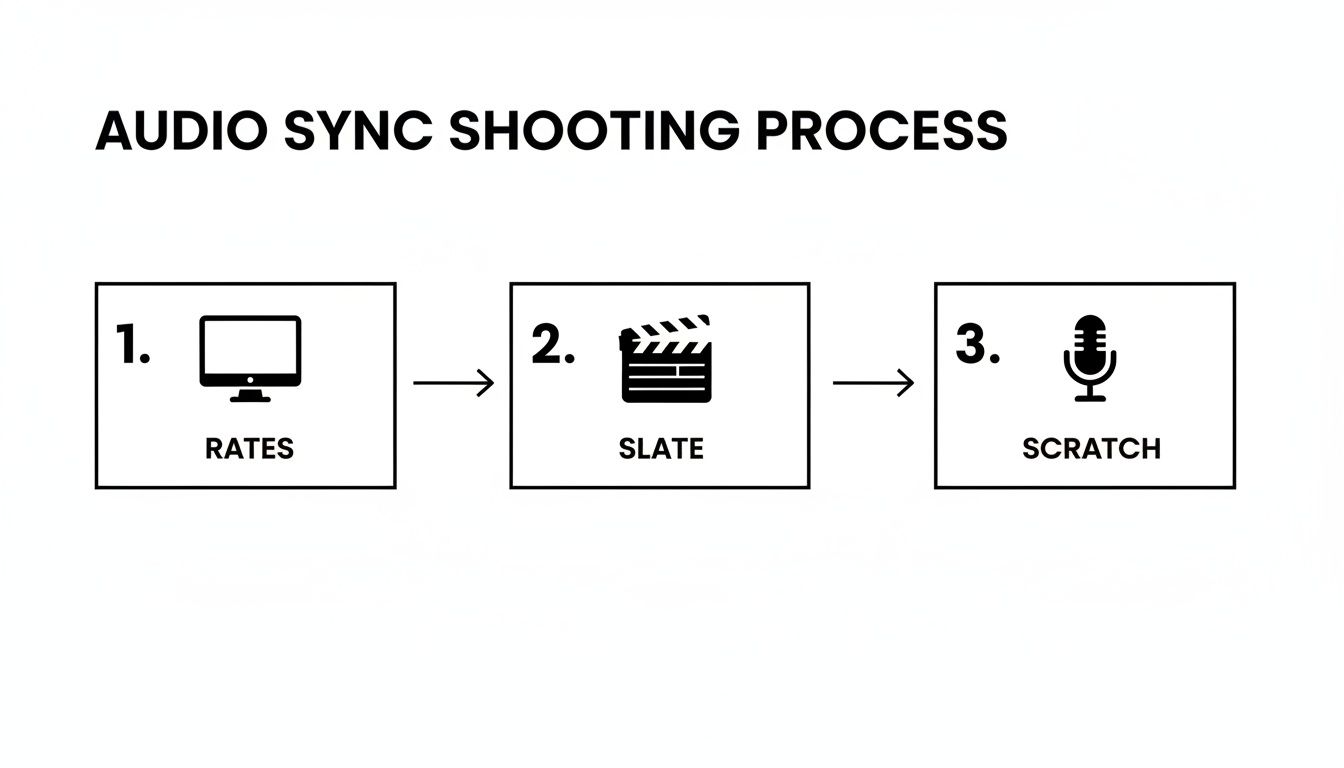
This just goes to show how a few extra seconds of prep during the shoot can save you hours of headaches in the edit bay.
To help you decide which approach is best for your project, here’s a quick breakdown of the different methods.
Choosing the Right Sync Method
| Sync Method | Precision Level | Speed | Required Setup | Best For |
|---|---|---|---|---|
| Manual Waveform Sync | Very High | Slow | Visible sync point (slate, hand clap) | Tricky clips, single-camera interviews, or when automated tools fail. |
| Automatic Waveform Sync | High | Very Fast | Clean scratch audio on camera, clean external audio | Most projects: vlogs, narrative shorts, documentaries, multi-cam shoots. |
| Timecode Sync | Highest | Instantaneous | Professional gear with timecode input/output (jam sync) | Large-scale productions, feature films, broadcast television. |
| AI-Assisted Sync | High | Fast | AI software or plugins | Complex syncs, repairing audio drift, or projects with no slate. |
Ultimately, the best method is the one that fits your footage and your timeline. Most editors find themselves using a mix of manual and automatic syncing depending on the situation.
Platform-Specific Syncing Workflows
Every major NLE handles syncing a little differently, but the core idea is always the same. Here’s a quick guide to getting it done on the most popular platforms.
Adobe Premiere Pro
In Premiere, just select both the video clip and its matching audio clip in your Project panel. Right-click, and hit ‘Synchronize.’ A little box will pop up, letting you choose to sync by Clip Start, Timecode, or (the one you'll use most often) Audio. Premiere takes it from there.
If you have audio that's noisy or needs cleanup before you sync, it can be helpful to first extract the audio from the video to work on it separately. This gives the sync algorithm a cleaner reference to analyze.
Final Cut Pro
Final Cut Pro makes this incredibly simple. Select your video and audio clips in the browser, right-click, and choose ‘Synchronize Clips.’ FCP will think for a moment and then create a brand new, perfectly synced clip for you, neatly packaging your video with the high-quality external audio.
When Automated Sync Fails...
If your software throws an error and can't sync a clip, it's almost always because the reference audio is too messy. Loud background noise, a muffled slate, or a camera that was too far away to pick up a clear sound can all confuse the algorithm. When this happens, just roll up your sleeves and go back to the manual waveform method. It's the bulletproof backup plan.
DaVinci Resolve
Resolve is a powerhouse, offering sync options in both the Media and Fairlight pages. In the Media Pool, you can select your clips, right-click, and find ‘Auto-sync Audio.’ You get options to sync based on timecode or by waveform. This feature is a lifesaver for batch-processing dozens of clips at once.
No matter which software you call home, combining a smart on-set workflow with these powerful built-in tools makes achieving perfect audio sync a routine part of the process, not a chore.
Troubleshooting Common Sync Problems
Even when you do everything right, you'll eventually hit a clip where the audio and video just won't play nice. It’s a rite of passage in editing, but learning how to diagnose and fix these headaches is what keeps a project moving forward. Whether it's audio that slowly drifts away or a clip with no clear reference point, almost every sync problem has a solution.
The trick is figuring out why it's happening. Is it a technical mismatch from the recording itself, or is your editing software just not getting enough information to work with? Once you pinpoint the root cause, you can apply the right fix and get back to the creative part of your edit.
The Dreaded Sync Drift
This one is maddening. Your audio and video start off perfectly aligned, but over the course of a long take, they slowly and stubbornly fall out of sync. What looked perfect at the one-minute mark is painfully off by minute ten.
Nine times out of ten, this comes down to a conflict in recording settings. The two usual suspects are:
- Mismatched Audio Sample Rates: If your camera was recording audio at 48 kHz but your external recorder was set to 44.1 kHz, you've baked a timing problem right into your files. Your NLE tries to reconcile the two different timebases, causing one to inevitably drift away from the other.
- Variable Frame Rate (VFR): This is a huge one, especially with footage from smartphones, screen recordings, or some drones. To save file space, these devices let the frame rate fluctuate instead of locking it to a constant rate (like 29.97 fps). Editing software is built for constant frame rates, and trying to sync clean audio to a video with a wobbly timeline is a recipe for disaster.
The only real fix for VFR footage is to convert it to a constant frame rate before you even drop it into your timeline. You can use a free tool like HandBrake or the Media Encoder that comes with Premiere Pro to transcode the video. This creates a stable foundation for a solid sync.
When Automated Sync Fails
You’ve lined up your clips, hit the "Synchronize" button, and… nothing. Your software throws up its hands and gives you an error. It’s a common situation, and it usually means the audio it's trying to analyze is just too messy for the algorithm.
Loud, persistent background noise is often the main culprit. If a truck rumbles by at the exact moment of your slate clap, the software can't distinguish that sharp, transient sound from all the other noise. In the same way, if the scratch audio recorded by your camera is super thin, muffled, or quiet, the waveform might not have enough definition to create a reliable match.
A Note on Precision: When we talk about sync, even the tiniest errors can be distracting. Professional standards are incredibly tight. For instance, the European Broadcasting Union has guidelines stating that audio shouldn't lead the video by more than 40 milliseconds or lag by more than 60 milliseconds. You can dive deeper into the technical side of this on Wikipedia's page for audio-to-video synchronization.
Rescuing Audio with No Sync Point
So what do you do when a clip has no slate, no hand clap, and the on-camera scratch audio is unusable? Maybe the camera was too far away to pick up a decent reference, or the audio track is just plain corrupted. This is where you have to roll up your sleeves and get creative with visual cues.
Your best bet is to hunt for plosives—those hard consonant sounds like 'P,' 'B,' and 'T' that create a very distinct mouth shape. Zoom way in on your timeline and scrub through the video frame-by-frame. Pinpoint the exact frame where the speaker's lips press together to form a 'P,' then look for the corresponding spike in your external audio waveform. It’s a meticulous process, but it can absolutely save a shot that would otherwise be lost.
If the background noise in your external audio is so bad that you can't even spot those plosive peaks, you'll need to clean it up first. Our guide on how to reduce background noise in your recordings walks through several techniques that can help you pull the dialogue out of the mud. By cleaning the track before you sync, you give yourself a much clearer waveform to work with, turning a nearly impossible task into a manageable one. It's a lifesaver for rescuing critical dialogue recorded in less-than-ideal conditions.
Using AI to Rescue and Sync Difficult Audio
Let's be honest, sometimes you run into audio that’s just a complete mess. You might be working with footage where the background noise is so loud that the dialogue waveform is completely buried, making it impossible to sync by eye or even with your NLE’s automated tools.
In other situations, you might not just want to clean the audio—you need to completely pull one sound out of the mix to tell the story right. This is where AI stops being a buzzword and becomes an incredibly practical editing tool. Modern AI-powered audio platforms can analyze and deconstruct complex soundscapes in a way that feels like magic.
What AI Makes Possible for Audio Sync
Think about a documentary interview shot on a busy city street. The rumble of traffic and chatter from people walking by completely drown out your subject's voice. Your scratch track is a muddy, unusable disaster. Traditional noise reduction might take the edge off, but it often leaves behind weird artifacts and can't truly separate the dialogue from the chaos.
This is where AI tools change the game. They’ve been trained to understand the difference between a human voice, a bus engine, and a gust of wind. This lets them perform a kind of digital surgery on your audio, meticulously removing what you don't want while keeping the dialogue crystal clear.
This opens up entirely new workflows for syncing audio:
- Rescuing Unusable Audio: You can clean up and isolate dialogue from incredibly noisy environments, creating a sharp, clean waveform that’s easy to sync.
- Creative Sound Design: Need to feature just the lead guitar from a live band performance? AI can pull that single instrument out of the mix.
- Post-Production Dialogue Replacement: Extract a clean version of an actor's lines from a noisy on-set recording to use as a perfect guide track for ADR (Automated Dialogue Replacement).
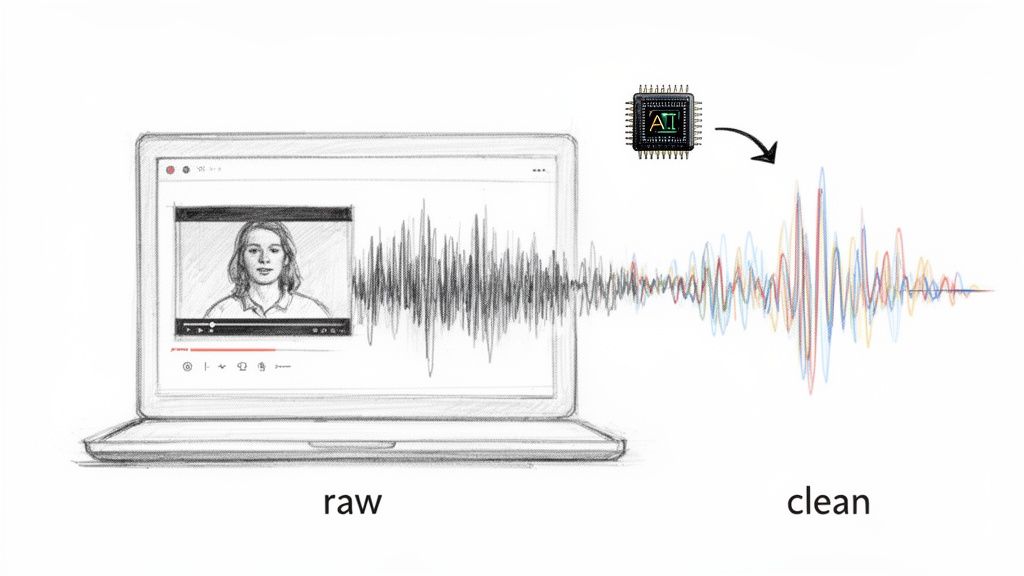
By generating a clean audio stem, AI gives you a perfect new reference track. The resulting waveform is defined and clear, making both manual and automated syncing in Premiere or Final Cut a breeze.
A Practical AI Workflow for Audio Isolation
The best part is that this process is surprisingly simple, taking complex audio engineering and boiling it down to a user-friendly interface. Let's walk through a common scenario using a tool like Isolate Audio.
Imagine you have a video of a speaker at an outdoor conference, and the wind is so bad you can barely make out what they're saying. The camera's scratch audio is just a wall of wind noise and muffled words.
First, you'd upload the video file directly to the platform. No need to detach the audio or convert files; the tool does it for you.
Next, instead of messing with EQs and compressors, you just type a simple command. You could write something like: “isolate the main speaker’s voice and remove wind noise.”
The AI gets to work, analyzing the entire audio track. It identifies the unique sonic signature of the human voice and separates it from the low-frequency rumble and hiss of the wind. A few moments later, you get a new, clean audio file with just the speaker’s dialogue.
By transforming a noisy, composite track into a clean, isolated stem, AI doesn't just make audio sound better—it makes it usable. This clean stem can then be dropped into your editing timeline, where its clear waveform makes syncing with the original video a simple drag-and-drop operation.
From Rescue to Creative Control
This process is a game-changer for syncing audio, especially when you’re dealing with challenging source material. It turns what could be a frustrating, hours-long technical problem into a quick fix: upload, describe, download. For any editor on a tight deadline, that’s huge.
But the applications go way beyond just repair. You could isolate the sound of footsteps for a dramatic scene, pull a specific bird call out of forest ambience, or separate a lead vocal from its backing track for a music video. This level of control gives you a new layer of precision in your sound design.
If you're looking to explore this further, there is excellent audio repair software available that can handle a wide range of these complex tasks. It's a modern approach that truly closes the gap between audio rescue and creative enhancement.
Common Questions About Keeping Audio in Sync
Even with the best prep work, sync issues can still sneak into a project. Let's tackle some of the most common questions editors run into, so you can solve problems fast and get back to the creative work.
How Do I Fix Audio Sync on My Phone?
This one depends on whether you're watching or editing. If you're just watching a video and the sound is off, it’s almost always a streaming issue. A spotty connection can cause the video to stutter while the audio plays on, creating that annoying lag. The fix is usually as simple as jumping on a stronger Wi-Fi network or dropping the streaming quality a notch.
But if you're editing video you recorded on your phone, you’ve likely run into the infamous variable frame rate (VFR). Phones use VFR to save space, but it's a nightmare for editing software. You need to convert the footage to a constant frame rate (CFR) first. Tools like HandBrake or Adobe Media Encoder are perfect for this job.
Can I Sync Audio and Video Online?
Absolutely. There are some surprisingly capable cloud-based editors out there that let you sync audio and video right in your browser. They often mimic the timeline interface of desktop software, making the process feel familiar.
The workflow is straightforward:
- Upload your video and audio files.
- Drag them both onto the timeline.
- Zoom in and slide the audio track until the waveforms from your slate or clap line up.
- Mute the camera's scratch audio.
- Export the new, perfectly synced video.
This is a lifesaver for making quick fixes on the go or when you're working on a machine that doesn't have your full editing suite installed.
Why Do My Files Go Out of Sync During Streaming?
When you're streaming live, sync drift is almost always a network bottleneck. Your internet connection just can't keep up with the demand of sending high-quality video and audio streams out at the same time.
Your streaming software has to make a tough choice. It might drop video frames to keep the broadcast alive, but the audio just keeps on trucking in real-time. That growing gap is what causes the audio and video to drift further and further apart.
Plugging directly into your router with an ethernet cable is the single best thing you can do for stability. If that's not an option, lowering your stream's bitrate or resolution can also take a huge load off your connection and help keep everything locked together.
How Should I Handle Multi-Camera Syncing?
Syncing a multi-camera shoot can feel like a huge job, but it all comes down to a single, shared reference point. Before you even roll, make sure every single camera and audio recorder is set to the same frame rate and audio sample rate. This is non-negotiable.
On set, a loud slate clap that all devices can see and hear is your golden ticket. Back in the edit suite, modern NLEs like Premiere Pro or DaVinci Resolve have incredible multi-cam features. You just select all your video clips and your master audio, and the software will analyze the waveforms to build a synced multi-camera sequence for you automatically.
What Is the Best Codec for Maintaining Sync?
Your choice of codec makes a bigger difference than you might think. For editing, you want to stick with professional, intra-frame codecs like Apple ProRes or Avid DNxHD. These formats treat every single frame as a complete picture, which makes it much easier for your computer to zip through the timeline without the lag that can throw off your perception of sync.
The compressed codecs you deliver with, like H.264, are fantastic for final exports but are a real pain to edit. A standard pro workflow is to transcode all your original footage into a high-quality intermediate codec before you even start editing. It adds a step up front but saves you from a world of headaches later.
If you're struggling with audio that's too noisy to sync properly, or you need to pull a single voice out of a chaotic recording, Isolate Audio can be a game-changer. Our AI tool lets you upload your video, type a prompt like "isolate the speaker's voice," and get back a clean audio track that's ready to be dropped right into your timeline. See how it works at https://isolate.audio.