Music Production Tips for Beginners: Quick Start Guide to Pro Sound
Stepping into the world of music production can feel like learning a new language. With endless software options, complex terminology, and a mountain of techniques to master, it's easy to feel overwhelmed before you even press record. What if you could bypass years of frustrating trial and error and start with a clear, direct path forward? This guide is designed to provide exactly that, offering a curated collection of foundational music production tips for beginners that cut straight to the point.
This listicle isn't about abstract theory or gear you don't need. Instead, we deliver actionable advice you can implement immediately. You will learn how to build a functional home studio, master the essential functions of your Digital Audio Workstation (DAW), and understand the core principles of recording, arrangement, and mixing. We'll cover everything from fundamental audio concepts like EQ and compression to practical workflow strategies that keep your projects organized and moving forward. We will also explore how modern tools, such as AI stem separators for deconstructing professional tracks, can dramatically accelerate your learning curve. Our goal is simple: to provide a practical roadmap that helps you transform your creative ideas into polished, professional-sounding music.
1. Start with Quality Source Material and Proper Recording Setup
One of the most essential music production tips for beginners is to prioritize high-quality source recordings. You simply cannot fix a fundamentally bad recording with mixing tricks. Think of it as building a house: a weak foundation will compromise the entire structure, no matter how well you decorate it. Quality source material is the bedrock of your production, making every subsequent step, from arrangement to mastering, easier and more effective.
This principle means capturing the cleanest, most detailed audio possible from the very start. Even if you have advanced tools, trying to salvage a noisy or distorted take is often a losing battle that wastes time and creative energy.
How to Get Quality Recordings
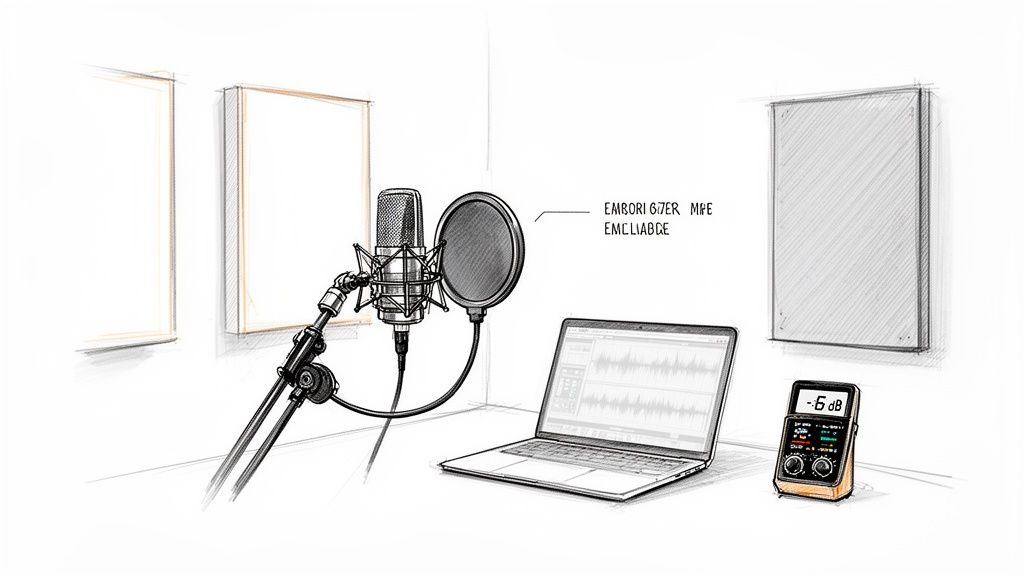
A "proper recording setup" doesn't necessarily mean an expensive professional studio. With a few key considerations, you can achieve excellent results in a home environment. The goal is to minimize unwanted room reflections and background noise while capturing a strong, clear signal.
- Acoustic Treatment: You can drastically improve your sound by recording in a closet filled with clothes or by hanging heavy blankets on the walls around your microphone. This makeshift treatment absorbs sound reflections, preventing the boxy, hollow sound common in untreated rooms.
- Gain Staging: Set your audio interface's gain so the loudest parts of your performance peak between -6dB and -3dB. This level is strong enough to avoid hiss but provides plenty of headroom to prevent digital clipping, which is irreversible and sounds terrible.
- Microphone Placement: Position your microphone away from noise sources like computer fans, air vents, or windows facing a busy street. For vocals, always use a pop filter to prevent harsh "p" and "b" sounds (plosives) from overloading the mic. Even with a good setup, you may still need to learn how to remove background noise from audio for the cleanest possible result.
2. Invest in Essential Equipment: DAW, Headphones, and Monitors
Your creative ideas need the right tools to become a finished song. For a beginner, the core of any production setup consists of a Digital Audio Workstation (DAW), studio headphones, and studio monitors. These three components work together to provide everything you need to record, arrange, mix, and listen back to your music accurately. Think of the DAW as your digital canvas, your headphones as a magnifying glass for detail, and your monitors as the true-to-life reference for how your track will sound in the real world.

Starting with the right gear establishes a professional workflow from day one, which is one of the most critical music production tips for beginners. This foundation ensures you are making creative decisions based on accurate audio information rather than fighting with consumer-grade equipment that colors the sound.
How to Choose Your Core Equipment
You don’t need the most expensive gear, but investing wisely in these three areas will pay dividends. The goal is to build a setup that offers reliability and sonic transparency, allowing you to trust what you hear.
- Choose a DAW: This is your primary music software. Popular choices include Ableton Live (favored by electronic producers like Skrillex), FL Studio (a go-to for hip-hop producers like Metro Boomin), and Logic Pro. For those on a budget, start with a free or affordable option like GarageBand or Reaper. Dive deep into one program; a solid understanding of the best DAWs for beginners is more valuable than dabbling in several.
- Prioritize Headphones: Quality studio headphones are essential for detailed listening, finding clicks or pops, and working late at night without disturbing others. They provide an isolated listening environment that helps you focus on specific elements in your mix.
- Add Studio Monitors: While headphones are great for detail, studio monitors (speakers) give you an accurate sense of stereo imaging, bass response, and how the mix translates in a room. Start with a smaller pair (like 5-inch speakers) if you're in a typical bedroom-sized space.
3. Learn Audio Fundamentals: Frequency, Dynamics, and EQ
Before you touch a single plugin, understanding the core concepts of audio is one of the most crucial music production tips for beginners. These fundamentals are the language of sound, and mastering them allows you to make informed, intentional decisions instead of just guessing. Think of them as the primary colors of mixing; all complex techniques are built from them.
The three pillars are frequency (the pitch of a sound), dynamics (the difference between the quietest and loudest parts), and EQ (the tool used to shape frequencies). Grasping these concepts prevents common mistakes like muddy mixes, harsh high-end, and inconsistent volume levels, empowering you to translate the sound you hear in your head into reality.
How to Apply Audio Fundamentals
Applying these principles involves using tools like equalizers (EQs) and compressors to sculpt your sound and make different elements fit together cohesively. The goal is to give every instrument its own space in the mix so the listener can hear everything clearly.
- Frequency Management: Use an EQ to carve out space for each instrument. For example, if a bass guitar and kick drum are competing around 80-100Hz, you can slightly cut that frequency in one to make the other more prominent. Likewise, gently cutting the 3-5kHz range on a vocal can reduce harshness.
- Dynamic Control: A compressor reduces the dynamic range of a performance. For a singer who moves between soft verses and loud choruses, a compressor can even out the volume, ensuring every word is heard without sudden, jarring jumps in level.
- Visualize Your Audio: Modern DAWs include frequency analyzers that show you a visual representation of the audio spectrum. Use these tools to see where frequencies are building up or where there might be clashes that your ears haven't identified yet.
4. Use Reference Tracks and Critical Listening Practice
One of the most powerful music production tips for beginners is to constantly compare your work against professional, commercial releases. This practice, known as referencing, removes the guesswork from mixing and mastering. By A/B testing your track against a well-mixed song in the same genre, you create a clear target for balance, dynamics, and overall loudness, helping you make objective decisions rather than relying on feel alone.
This process trains your ears to recognize what a "finished" track sounds like on your specific monitoring system. Over time, it builds your critical listening skills, allowing you to identify subtle issues in your own mix, such as a muddy low-end or overly harsh high frequencies, and correct them with confidence.
How to Use Reference Tracks Effectively
Effective referencing goes beyond just listening. It involves a systematic and analytical approach to comparison. The goal is to understand the sonic decisions made in the professional track and see how your own mix measures up, element by element.
- Loudness Matching: Before comparing, match the perceived loudness of your track and the reference. Most commercial tracks are loud, so turn them down to match your mix's level. Using a LUFS meter to match both tracks (e.g., to -14 LUFS integrated) ensures you're comparing tonal balance, not just volume.
- Focus on One Element at a Time: Don't try to compare everything at once. Isolate your focus. First, listen only to the kick and bass relationship in your mix, then switch to the reference track. Next, compare vocal presence, then snare drum impact, and so on.
- Analyze the Frequency Spectrum: Use a spectrum analyzer plugin to visualize the frequency balance of your reference track. Notice the shape of its curve. Does the bass roll off at a certain point? Is there a boost in the high-mid frequencies for clarity? Use this visual data as a guide for your own EQ decisions.
5. Master the Fundamentals of Mixing: Balance, Pan, and Automation
Mixing is the art of blending individual tracks into a single, cohesive stereo file. Many beginners mistakenly believe that mixing is all about adding flashy effects like reverb and delay. In reality, the most crucial music production tips for beginners in this area involve three fundamental skills: balancing levels with faders, positioning sounds with panning, and creating movement with automation. Mastering these basics is the key to creating a clear, professional-sounding mix.
Neglecting these core elements and jumping straight to effects often results in a muddy, unbalanced, and confusing track. By building a strong foundation with faders, pan knobs, and automation, every subsequent decision, from equalization to compression, becomes far more effective.
How to Build a Solid Mix Foundation
Getting started is simple. Before you touch a single plugin, focus on creating a static mix that already sounds good. The goal is to establish clarity, width, and dynamic interest using only the most basic tools available in your Digital Audio Workstation (DAW).
- Balance with Faders: Start by setting all your faders down. Bring up the most important element, usually the lead vocal or kick drum, and build the rest of the mix around it. Adjust the volume of each track so that every instrument has its own space and nothing is fighting for attention.
- Create Width with Panning: Panning places instruments in the stereo field (from left to right). A common technique is to pan backup vocals slightly left and right to create a wider vocal presence. This prevents them from clashing with the lead vocal in the center and makes the entire mix feel bigger.
- Add Life with Automation: Automation allows you to change a parameter, like volume or panning, over time. A classic example is "fader riding," where you slightly increase the volume of a vocal phrase to ensure it cuts through a dense chorus and then lower it during a quieter verse. This dynamic adjustment helps maintain listener engagement from start to finish.
6. Develop Ear Training and Listening Skills Over Time
Technical knowledge and expensive gear are only half the battle in music production; your ears are your most critical tool. Developing them is a long-term process of active, focused listening that transforms how you perceive sound. This skill, known as ear training, allows you to identify subtle frequency imbalances, recognize the effects of compression, and make more intentional mixing decisions, which is a cornerstone of professional music production.
This practice isn't about simply hearing music, but about critically analyzing it. Over time, you build the neural pathways needed to instantly spot a muddy kick drum or harsh vocal sibilance, moving from guessing to knowing what your mix needs. Every professional producer has invested thousands of hours into this skill.
How to Train Your Ears
Ear training should be a consistent, deliberate part of your daily routine. Like exercising a muscle, short and frequent sessions are more effective than occasional marathon efforts. The goal is to make critical listening an intuitive, second-nature process.
- Frequency Identification: Use an online tone generator or an EQ plugin to practice identifying specific frequencies. Play a frequency, listen, and try to recognize it. Start by learning to distinguish between 100Hz, 1kHz, and 10kHz.
- Reference Tracks: Actively listen to your favorite professionally mixed songs. Try to identify the characteristics of the reverb used, listen for how compression affects the drums, and notice where each instrument sits in the stereo field.
- A/B Testing: When applying an effect like EQ or compression, constantly switch it on and off (A/B testing) to hear exactly what it's doing. Make a small EQ boost, then ask yourself: "What did that change? Did it add clarity or harshness?"
- Mix at Low Volumes: Mixing at a consistent, moderate volume (around 85dB SPL is a common standard) prevents ear fatigue and gives you a more accurate perception of your mix's balance.
7. Understand and Use Effects Appropriately: Reverb, Delay, and Compression
Audio effects are powerful tools for shaping your sound, but they are often overused by beginners. Instead of trying to master dozens of processors, focus on the three pillars of mixing: reverb, delay, and compression. Understanding these tools is a fundamental music production tip for beginners because they solve the majority of common mixing problems, from adding depth to controlling dynamics.
Effects like reverb create the illusion of space, delay produces echoes for rhythmic interest, and compression manages volume levels for a polished, consistent sound. The key is moderation. Excessive effects can quickly make a mix sound muddy, artificial, and unprofessional. The goal is to enhance the existing recording, not to mask it.
How to Apply Effects Effectively
Learning to apply effects subtly is a hallmark of a skilled producer. Instead of placing effects directly on every track, a more efficient and cohesive method is to use send/return channels. This allows multiple tracks to share the same effect, creating a sense of unity in the mix.
- Use Send Channels: Create a dedicated "send" or "aux" track for your reverb and delay. This lets you blend the "wet" (processed) signal with the "dry" (unprocessed) signal of multiple instruments, making them sound like they exist in the same acoustic space.
- Start with Compression: Apply light compression to individual tracks first to even out their dynamics. This creates a stable foundation before you add spatial effects. For a more in-depth guide, you can learn more about how to use a compressor in music production.
- The 50% Rule: A great starting point is the "50% rule." Adjust an effect until you can clearly hear it, then reduce its level by about half. This often places the effect perfectly in the mix where it's felt more than heard.
- Glue Your Drums: Send all your drum tracks to a single bus and apply a compressor. A gentle setting (e.g., 4:1 ratio, medium attack) will "glue" the individual drum pieces together, making the kit sound like a single, cohesive instrument.
8. Organize Your Project: Structure, Naming Conventions, and Workflow
A disorganized project can quickly spiral into chaos, killing creativity and wasting hours of your time. One of the most impactful music production tips for beginners is to establish an organizational system from the very start. Thinking like a professional means keeping your digital workspace as tidy as a physical one, ensuring every element is easy to find, edit, and understand.
This practice is not just about neatness; it's about building a scalable workflow. A structured project allows you to navigate complex arrangements effortlessly, collaborate with other artists seamlessly, and revisit old ideas without confusion. Getting into this habit early prevents major headaches down the road.
How to Organize Your Sessions
A clean project is a creative project. By removing the mental friction of searching for files or guessing what a track is, you can stay focused on the music. These simple habits will transform your production process and set you up for success.
- Consistent Naming Conventions: Give every track a descriptive name. Instead of the default "Audio 1," use specific labels like "Vocal_Lead_Dry" or "Bass_Sub_Synth." Using numerical prefixes (e.g., "01_Kick," "02_Snare") helps maintain a logical track order.
- Color-Coding: Assign colors to instrument groups for quick visual identification. For example, use red for drums, blue for bass, green for synths, and yellow for vocals. This makes navigating your session timeline significantly faster.
- Create Project Templates: Once you find a setup you like, save it as a template. Include pre-configured tracks, buses for effects like reverb and delay, and standard routing. Starting a new song from a well-organized template saves setup time on every single project.
- Regular Backups: After each session, save your project and back it up to an external drive or a cloud service like Dropbox or Google Drive. Archive older versions with date tags (e.g., "MySong_v2_2024-10-26") to protect your work from data loss or corruption.
9. Learn Arrangement and Song Structure: Building Compelling Compositions
Many beginners get lost in sound design and mixing, but a compelling arrangement is what truly keeps a listener engaged. Arrangement is the art of organizing your song's sections over time, creating a journey with tension and release. A great song structure can make simple sounds feel powerful, while a poor one can make even the best sounds feel boring and repetitive.
This principle involves moving beyond a simple four or eight-bar loop and thinking about the bigger picture. How do you introduce new elements? When do you pull them back? This dynamic movement is what transforms a loop into a fully-realized song.
How to Build a Strong Arrangement
Learning to arrange is about understanding energy flow. A typical pop or EDM track doesn't start with every instrument playing at once; it builds intensity, drops to create contrast, and then builds again for a powerful climax. This is a crucial music production tip for beginners who find their tracks lack professional polish.
- Analyze Your Favorite Tracks: Pick a few songs in your genre and map out their structure. Note when the drums come in, when the bass changes, and how many bars each section (verse, chorus, bridge) lasts. You'll quickly see common patterns, like an 8-bar intro leading into a 16-bar verse.
- Create a Roadmap: Before getting lost in details, create empty clips in your DAW's timeline and label them: "Intro," "Verse 1," "Chorus," etc. This visual guide keeps you focused on the song's overall flow rather than just one small section.
- Build and Release Tension: A classic technique is to slowly introduce elements in the intro and build-up, then remove most of them for a breakdown. This creates anticipation and makes the final chorus or drop feel much more impactful when all the elements return.
- Vary Your Sections: To avoid repetition, make small changes between similar sections. For example, add a new hi-hat pattern or a subtle synth pad in the second verse to keep the listener's ear interested.
10. Practice Remixing and Use Stem Separation Tools to Deconstruct Professional Tracks
One of the fastest ways to learn arrangement and mixing is to deconstruct the work of professionals. Remixing lets you bypass the songwriting stage and focus purely on production, allowing you to experiment with structure, sound design, and effects using high-quality source material. It’s an invaluable exercise for any beginner looking to understand what makes a great track tick.
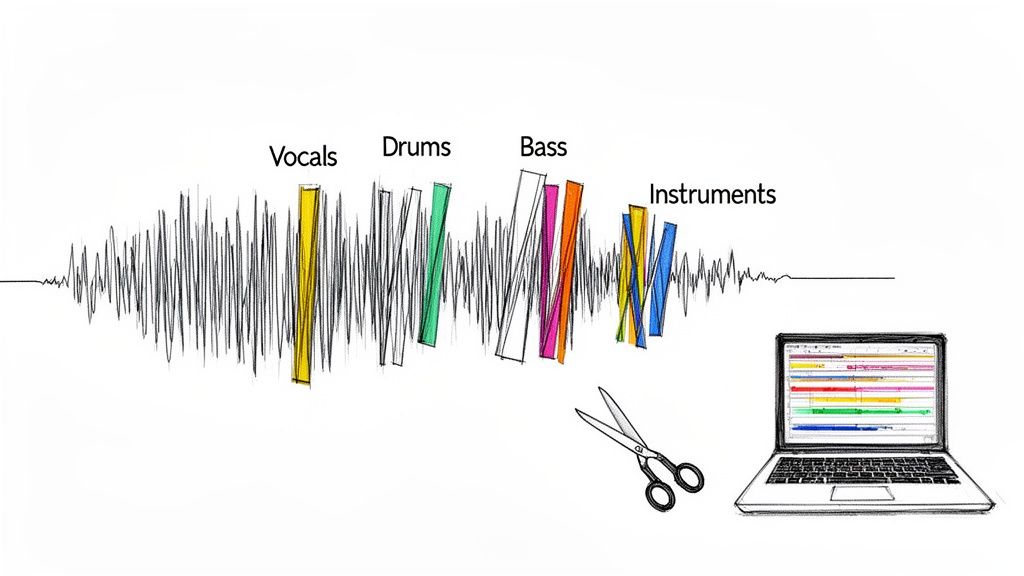
This process used to be limited to official remix contests, but modern stem separation tools have made it accessible to everyone. By isolating individual elements like vocals, drums, or bass from any commercially released song, you can dive deep into its architecture and build your own interpretation from the ground up.
How to Use Remixing for Practice
The goal is to actively study professional tracks, not just to listen. By separating a song into its core components, you can analyze how each part contributes to the whole. This is one of the most effective music production tips for beginners because it provides a direct look into professional techniques.
- Isolate and Analyze: Use a tool like Isolate Audio to extract the vocals from a hit pop song. Listen to the raw performance to hear the artist's delivery, then analyze the effects used, like reverb and delay.
- Rebuild from a Stem: Take the isolated drum loop from a classic funk track and build an entirely new electronic song around it. This forces you to think about how rhythm and groove drive a production.
- Create Your Own Version: Remove the vocals from a ballad to create an instrumental version. This helps you study the melodic and harmonic arrangement that supports the lead vocal.
- Focus on the Low End: Extract the bass line from a track and analyze its frequency content and role in the mix. See how it interacts with the kick drum to create a powerful foundation.
10 Beginner Music Production Tips Compared
| Item | Implementation Complexity 🔄 | Resource Requirements ⚡ | Expected Outcomes 📊 | Ideal Use Cases 💡 | Key Advantages ⭐ |
|---|---|---|---|---|---|
| Start with Quality Source Material and Proper Recording Setup | Moderate–High — technical setup & acoustics | High — mics, interface, treatment, learn time | Cleaner recordings; less corrective work downstream | Recording vocals/instruments; capturing stems for remixing | Produces high-quality raw audio that improves all processing |
| Invest in Essential Equipment: DAW, Headphones, and Monitors | Moderate — setup & DAW learning curve | High — DAW, monitors, headphones, interface, MIDI | Accurate monitoring; efficient editing and mixing | Tracking, detailed editing, monitoring and mastering prep | Reliable monitoring and versatile production tools |
| Learn Audio Fundamentals: Frequency, Dynamics, and EQ | Moderate — conceptual learning + practice | Low — tutorials, analyzers, time investment | Better mixing decisions; fewer frequency clashes | EQing, compression choices, corrective mixing | Foundational knowledge that improves long-term mixes |
| Use Reference Tracks and Critical Listening Practice | Low — systematic listening and comparison | Low — reference tracks, metering tools, monitors | Clearer sonic targets; improved balance and loudness | Genre benchmarking, mixing targets, mastering prep | Accelerates learning and sets realistic mix goals |
| Master the Fundamentals of Mixing: Balance, Pan, and Automation | Moderate — hands-on adjustments in DAW | Low–Moderate — DAW, good monitoring, time | Clearer, more defined mixes; solves many issues | Mixing sessions, dynamic arrangement, live automation | Achieves professional clarity with minimal processing |
| Develop Ear Training and Listening Skills Over Time | High — long-term, disciplined practice | Low — ear training tools, quality monitors, time | Acute critical listening; faster problem detection | Advanced mixing, mastering, nuanced sound design | Sustained, transferable improvement across projects |
| Understand and Use Effects Appropriately: Reverb, Delay, and Compression | Moderate — parameter knowledge & restraint | Low–Moderate — plugins, CPU, send/aux setup | Depth, cohesion, and controlled dynamics when used well | Adding space, rhythmic interest, and glue in mixes | Large perceptual impact when applied judiciously |
| Organize Your Project: Structure, Naming Conventions, and Workflow | Low — initial setup and consistent discipline | Low — templates, naming rules, backup solutions | Faster workflow; easier collaboration and recall | Complex projects, team collaboration, archival work | Saves time, prevents errors, and scales with project size |
| Learn Arrangement and Song Structure: Building Compelling Compositions | Moderate — study patterns and creative planning | Low — DAW timeline, reference songs, time | More engaging songs; improved listener retention | Composing full tracks, transitions, and dynamic builds | Turns simple elements into compelling musical journeys |
| Practice Remixing and Use Stem Separation Tools to Deconstruct Professional Tracks | Low–Moderate — tool use plus creative workflow | Low — Isolate Audio or similar, DAW, stems | Rapid practical learning; remix-ready stems | Remix practice, deconstruction, studying pro mixes | Direct access to isolated stems speeds skill acquisition |
Your Next Steps in Music Production
Embarking on the path of music production can feel like learning a new language, one where creativity and technical skill must harmonize. The ten tips we've explored provide a comprehensive roadmap, guiding you from setting up your first home studio to applying the final touches on a mix. Remember, this journey is not about mastering every concept overnight; it's about incremental progress and consistent application.
The most critical takeaway is to move from theory to practice. You now have the fundamental music production tips for beginners needed to start creating with confidence. Focus on getting clean, high-quality recordings from the start, as this will save you countless hours of corrective work later. Embrace the power of reference tracks to calibrate your ears and guide your mixing decisions, ensuring your music translates well across different listening systems.
From Knowledge to Actionable Habits
To truly internalize these concepts, transform them into habits. Make project organization a non-negotiable part of your workflow. Develop a system for naming tracks, color-coding regions, and structuring your sessions from day one. This discipline will not only accelerate your process but also liberate your creative mind to focus on what truly matters: the music.
Similarly, treat critical listening as a daily exercise. When you listen to your favorite songs, don't just hear them; deconstruct them. Ask yourself:
- How is the bass balanced against the kick drum?
- Where are the vocals panned and what effects are applied?
- How does the arrangement build tension and create an emotional release?
This analytical approach is the cornerstone of developing a professional ear. It bridges the gap between being a passive listener and an active, intentional producer.
Embrace the Journey of Completion
Perhaps the most valuable piece of advice is to finish your tracks. It's easy to get trapped in an endless cycle of tweaking a single loop, but real growth happens when you navigate the entire production process from initial idea to a final, exported song. Each completed project, regardless of its perceived quality, is a powerful learning experience.
Don't let the pursuit of perfection become a barrier to completion. Your first, tenth, and even hundredth track won't be flawless, and that's okay. The goal is to consistently apply the fundamentals: solid arrangement, thoughtful sound selection, balanced mixing, and appropriate use of effects. With each finished piece, you are building a library of experience that will inform your next creation, making your skills stronger and your workflow more intuitive. Your journey is a marathon, not a sprint, and every completed song is a milestone.
Ready to deconstruct your favorite tracks and hear exactly how they were built? Start practicing your critical listening and remixing skills with Isolate Audio. Our powerful stem separation tool allows you to isolate vocals, drums, bass, and instruments from any audio file, providing the ultimate learning resource for aspiring producers. Explore Isolate Audio today and accelerate your production journey.